The Navy Department Library
Elementary Map and Aerial Photograph Reading
FM 21-25
WAR DEPARTMENT FIELD MANUAL
ELEMENTARY MAP AND
AERIAL PHOTOGRAPH
READING
WAR DEPARTMENT – 15 AUGUST 1944
*****
WAR DEPARTMENT FIELD MANUAL
FM21-25
This manual supersedes FM 21-25, 12 April 1941, including C 1, 17 January
1942, C 2, 20 April 1942, and C 3, 19 June 1942.
ELEMENTARY MAP AND
AERIAL PHOTOGRAPH
READING
WAR DEPARTMENT × 15 AUGUST 1944
For sale by the Superintendent of Documents, Washington 25, D.C.
*****
WAR DEPARTMENT,
WASHINGTON 25, D. C., 15 August 1944.
FM21-25, Elementary Map and Aerial Photograph Reading, is published for the information and guidance of all concerned.
[A. G. 300.7 (1 Jul 44).]
BY ORDER OF THE SECRETARY OF WAR:
G. C. MARSHALL,
Chief of Staff.
OFFICIAL:
J. A. ULIO,
Major General,
The Adjutant General.
DISTRIBUTION:
As prescribed in paragraph 9a, FM 21-6 except Ch of Engr
(500), Engr Board (50), Engr Sch (2000), Sv C (100), Depts
(100), Armies (100), Corps (50), D(50); B(50); R(25); Bn
(20); C(20); T of Opns (100); Island Comds (100); Base
Comds (100); Def Comds (100); Sectors (50); Sub Sectors (25);
Tng Centers and Schs having no co orgn, ea off and en! pers (1);
additional copies may be requisitioned per WD Cir 264, dated
28 June 1944; on basis of (1) per individual.
(For explanation of symbols, see FM 21-6.)
*****
CONTENTS
This manual supersedes FM 21-25, 12 April 1941, including C 1, 17 January 1942, C 2, 20 April 1942, and C 3, 19 June 1942.
WHY LEARN TO READ A MAP?
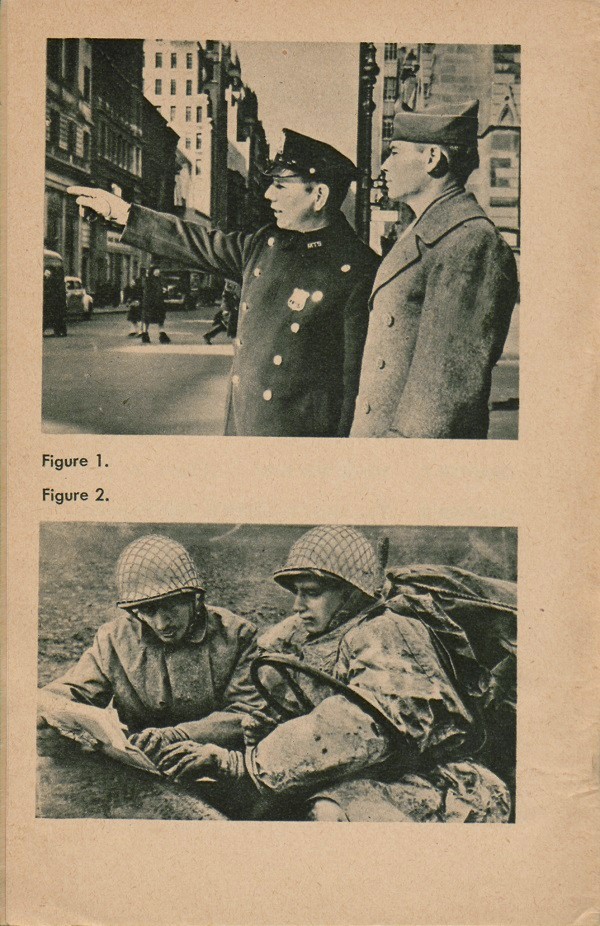
In civilian life it is possible for a stranger to find his way around a large city or town by merely asking directions. Any policeman or friendly native of the town can supply enough information so that the stranger can locate the street or building he wants. He may have to overcome a few wrong directions thrown in with the right ones, but he is sure of finding his way.
In war an army often finds itself in strange country, but often it does not find friendly people everywhere, ready and able to help it find its way. As a soldier in the army, you will have to ask directions like any other stranger, but you will ask your map. Your map has all the answers if you are able to read it, and if you can read it, it is one of your best friends.
There are lots of times in the army when you will need this friend. The two soldiers in figure 2 are using it to find their way to headquarters. They are messengers and they carry important news, but without knowing how to read and use a map they would never get there.
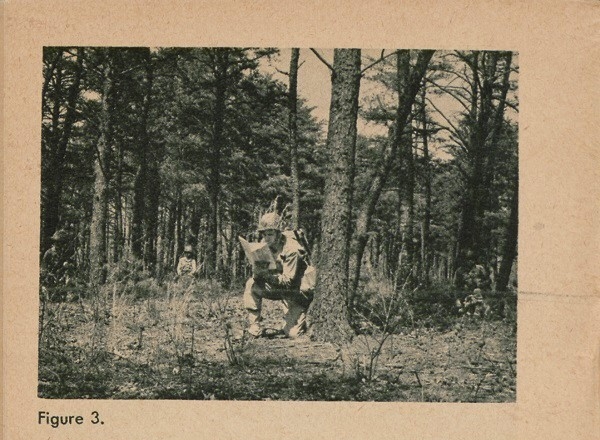
When you are on a patrol you and your detail are on your own. At times you may be entirely alone and a map will be your most trusted friend and guide. Reports from men in combat show that every man must know how to read and use a map if he wants to stay alive and keep his outfit safe.
1
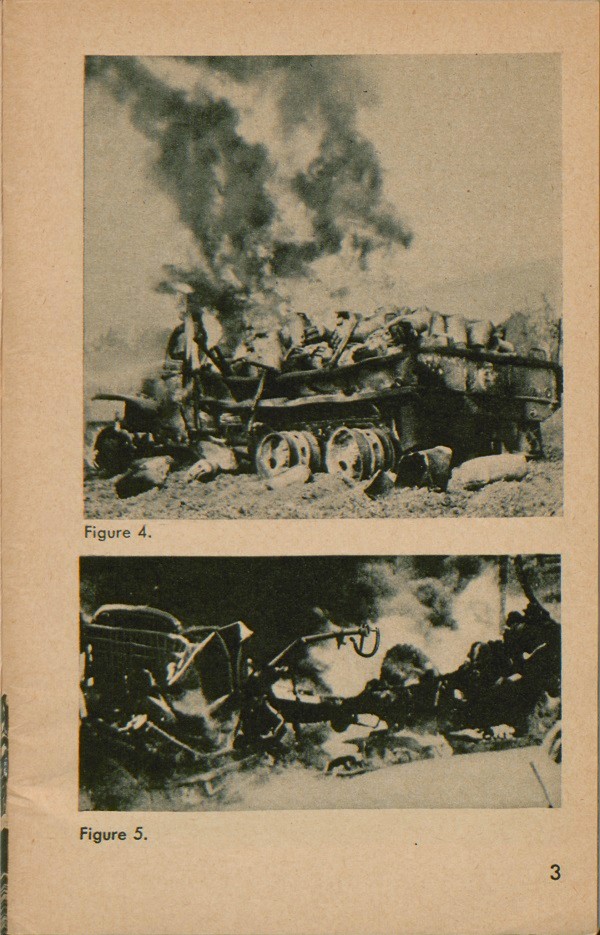
If a vehicle takes a wrong turn the result isn't always pretty. Look at the pictures in figures 4 and 5. That happened because someone did not know how to read a map and use his compass. The drivers had both a map and a compass, but that was not enough. They did not know how to use them.
A native of a place can tell us lots of things to help us, but we have to be able to speak his language. In that way, a map is no different from a native. We must learn to read and understand the language of a map. It is a simple and clear language. You will use it very often in the army, many times when you are in a tight spot. If you learn to use it correctly, it won't let you down.
2
WHAT IS A MAP?
A map is a picture. It isn't a puzzle and it isn't hard to read. It is a picture of the land and the things people have built on the land.
There are really only two things about a map which make it a little strange to read. In the first place, a map is flat and when we look at a map we are looking at a picture of the ground from a spot high in the air. That view is different from the one we have looked at all our lives, from one point on the ground to another point on the ground. So the first thing we must do is to understand where we sit when we look at this picture.
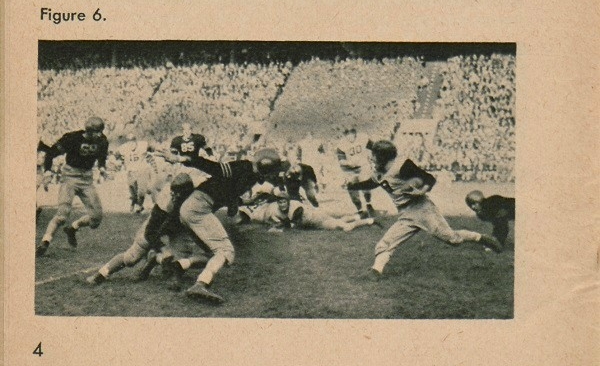
To give us an idea of what happens when we look at something from above, let's watch a football game and see what happens when we look at it from different seats. If we are on the player's bench, we see a picture like the one in figure 6.
4
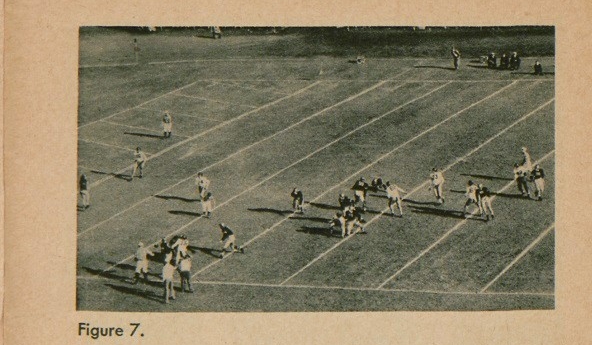
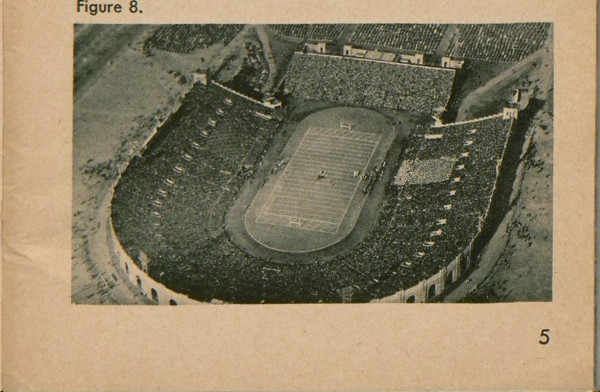
From the grandstand, we see things a little differently. The game looks something like the one in figure 7. If we climb into a blimp and rise up above the edge of the stadium, we see the game as in figure 8.
Now if our blimp takes us directly over the playing
5
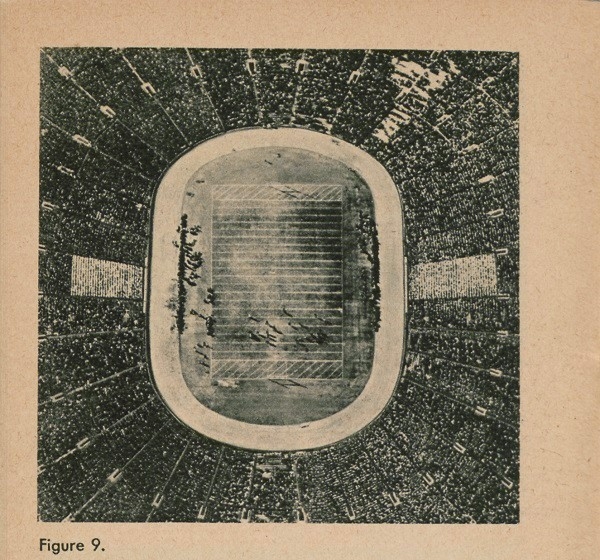
field, our football game looks as it does in figure 9. It is quite a different scene from what we saw from the sidelines. Even though it is a strange way to look at a football game, our overhead view is not too confusing, because we are close enough to the ground to understand what we are looking at. But in map reading we are looking at something with many more details than a football game, and at an area much larger and not so near to us; the land itself really looks strange from the air.
6
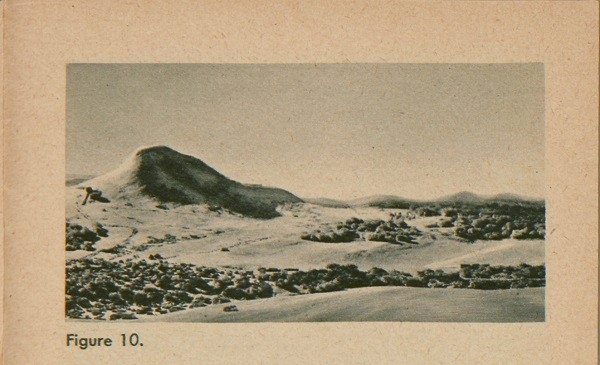
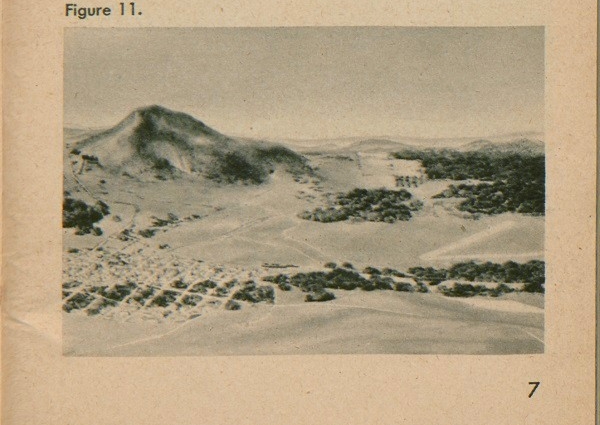
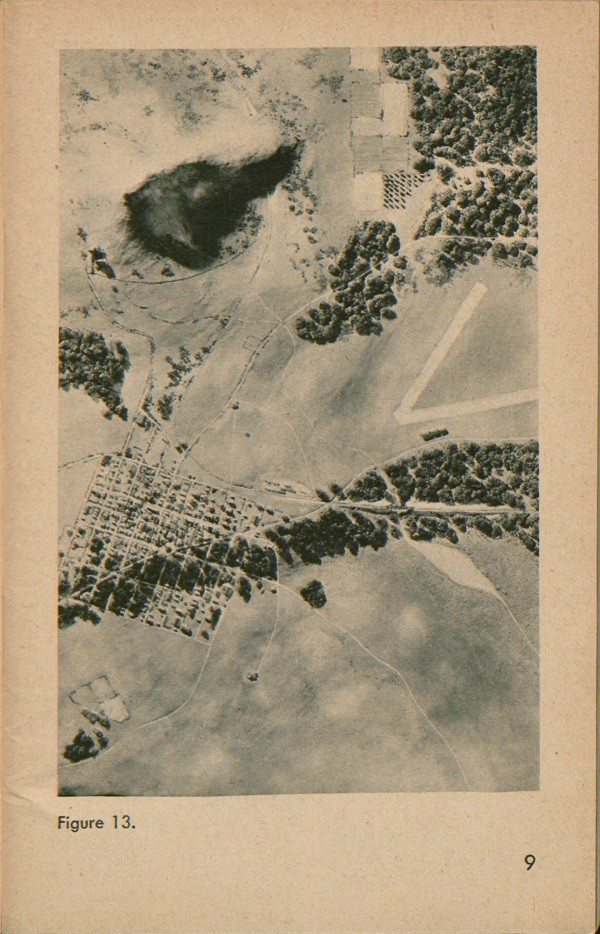
For example, from the ground we see the land as in figure 10. In figure 11 we see the land as we rise a little into the air. In figure 12 we have risen higher into the
7
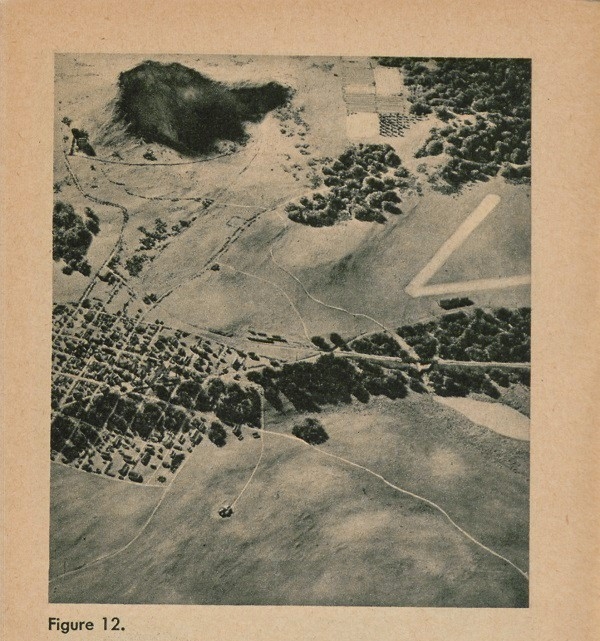
air, and, finally, figure 13 shows us what the land looks like from directly above it. That, then, is the first thing to remember about maps. Maps are views of things from directly above.
8
9
WHAT'S ON A MAP?
A map is a picture, but it is not a photograph. It is a drawing in ink on paper, and a big difference between a map and a photograph is that the map has signs and symbols instead of photographs of objects. We do the same thing with a football-game. For example, below is a diagram, or map, of a football play. - It may look like a puzzle, but it really isn't, and it is very simple. The "X's" stand for the players on one team, the "O's" stand for the players on the team having the ball, and the lines are the paths the players take in the play. A little study of the diagram, and it is easy to figure out that it illustrates an off-tackle play and shows each man's job.
A map is not much different. On a map there are sign, like the "X\" and "O's," which stand for things
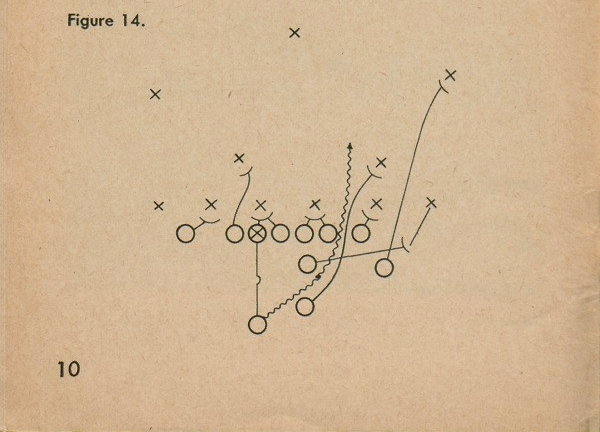
10
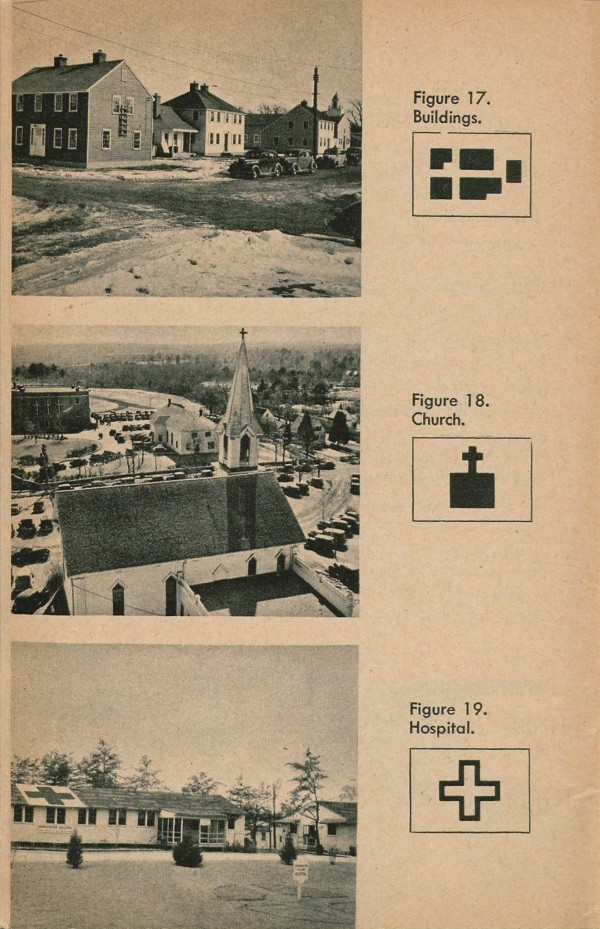
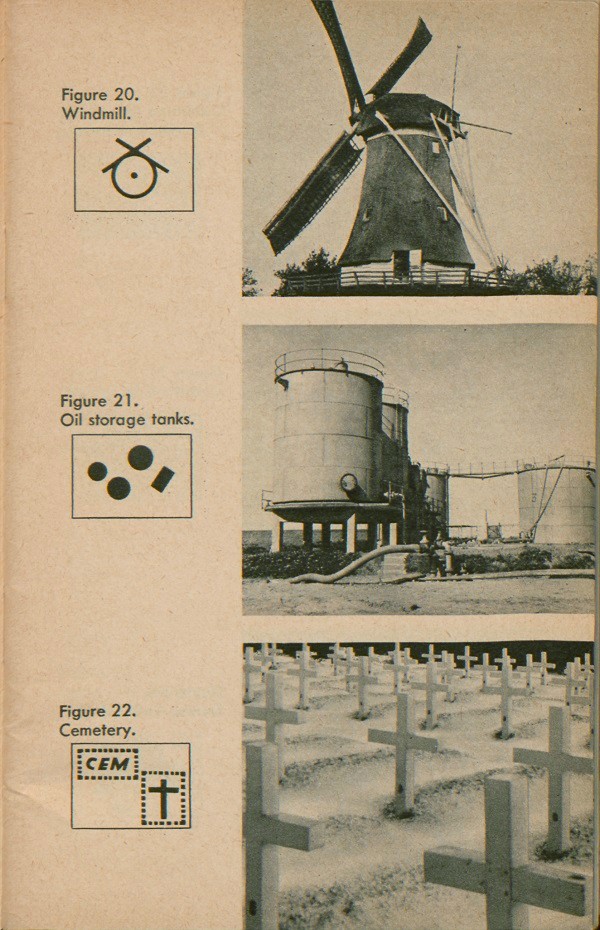
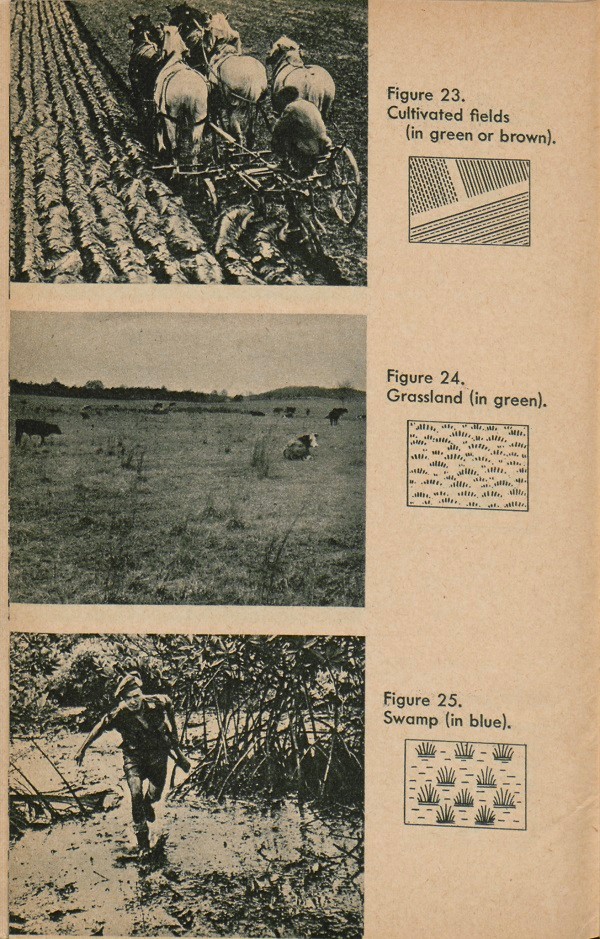
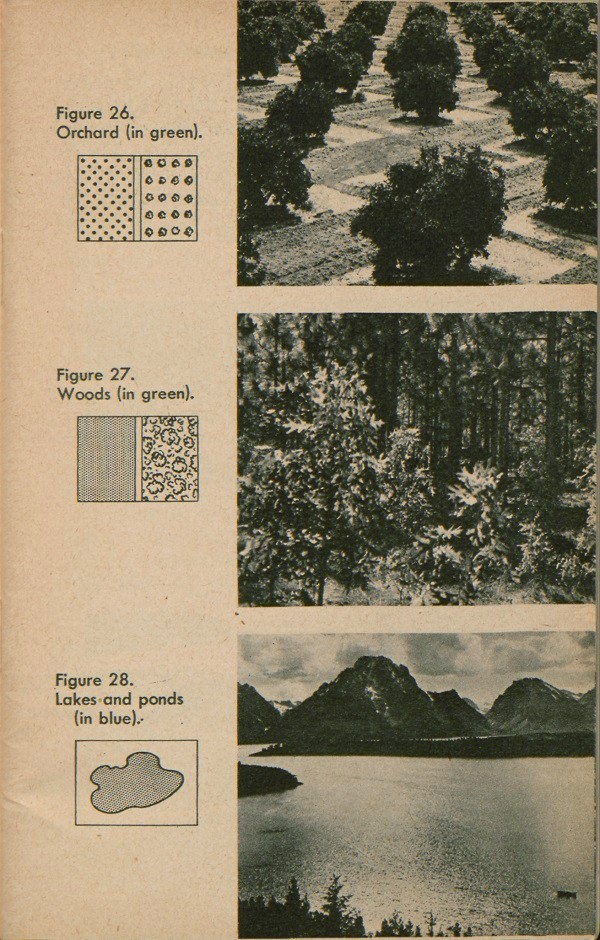
on the ground, just as the football symbols stand for the players on the ground. To read a map, then, we have to learn what these various signs mean. Map signs all look something like the actual thing they stand for. All the signs are simple to draw and are easily recognized. The following few pages show you some of the more common signs which are found on maps. There is reason for their shape, and the pictures with the signs show what they stand for.
Objects on the Land
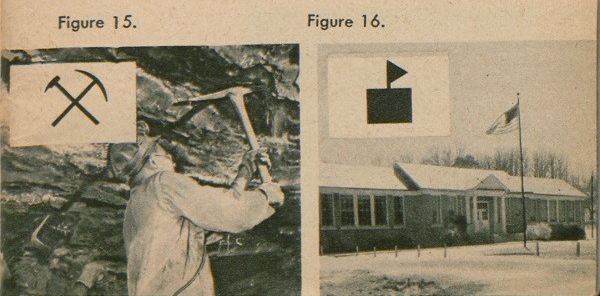
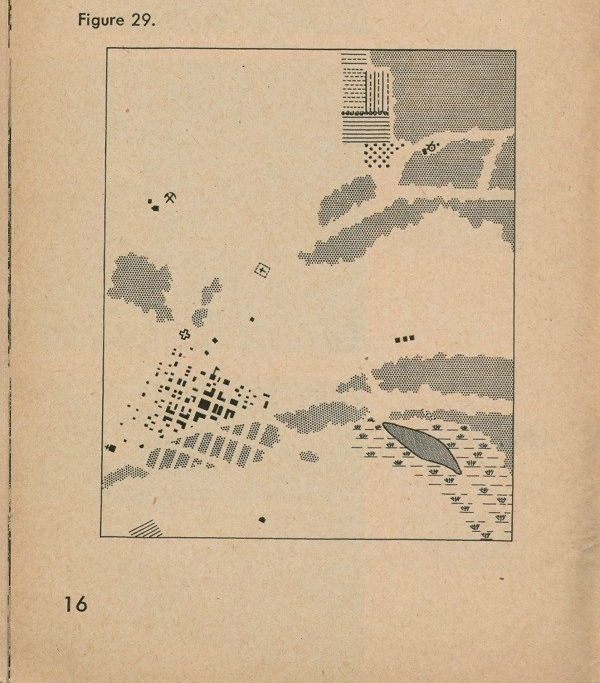
For example, figure 15 shows a pick crossed with a sledge-hammer, the sign for a mine, such as a coal mine. These two tools are used in mining. Figure 16 shows the sign for a schoolhouse, a black block with a flag flying from it. Most schools have a flag on a flagpole, and the sign gives you the idea of a school. Let us put these signs on a map and see what they look like. Figure 29 shows you the mapping signs for the things you saw in the photograph of the land in figure 13. Identify the signs shown. The map, however, is still incomplete. So far, we just have our objects on a flat, blank piece of land, but our land is not like that. It has much more on it than these signs alone can show us.
[11]
[12]
[13]
[14]
[15]
The Playing Field-Or the Land Itself
On the gridiron or playing field, we see the players not on a blank area, but against a background marked off with lines. These lines mean something to us, and we can tell where the players are by watching how far they are from these lines, the goal lines, the yard lines, and the sidelines. The lines form a pattern which connects the different objects on the field. Now on the land
16
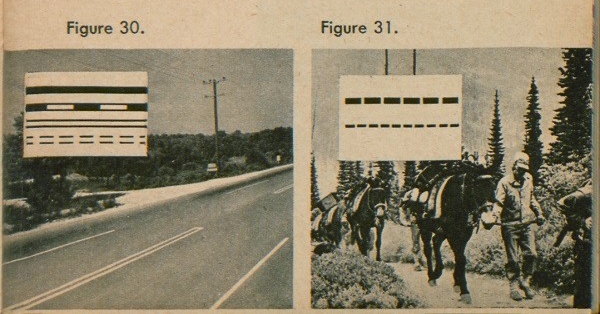
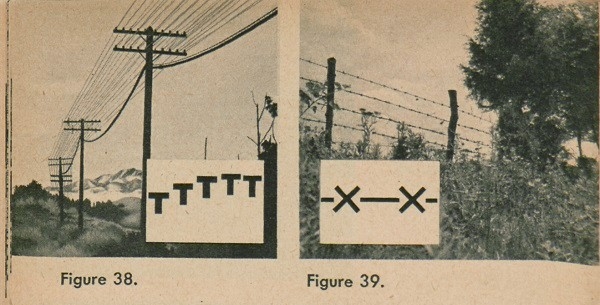
on which our signs are placed, there are already certain main lines which make a general pattern. These main lines are also shown by signs, and they stand for such important land marks as streams, roads, railroads, and fences. We try to make these lines look different from one another, so that we don't get them confused. At the same time we try to make them look something like what they are. Following are examples of these main lines and the signs used to show them on a map. The heavy line in figure 30 is a primary or first-class highway; the second line is a secondary highway; these are sometimes red on your map. The two parallel lines mean other surfaced roads, while the dotted lines mean a dirt road. The heavy single dotted line in figure 31 means a trail, while the light dotted line means a footpath or poor pack trail. Telegraph or Telephone wires are often on tall T-shaped poles across the country. The sign is also T-shaped.
(See fig. 38.)
In figure 39, the sign is given for a barbed-wire strand fence, not the kind that is a military entanglement. The sign for a smooth-wire fence has "O's" in place of the
"X's" like -0-0-0-0-.
[17]
[18]
[19]
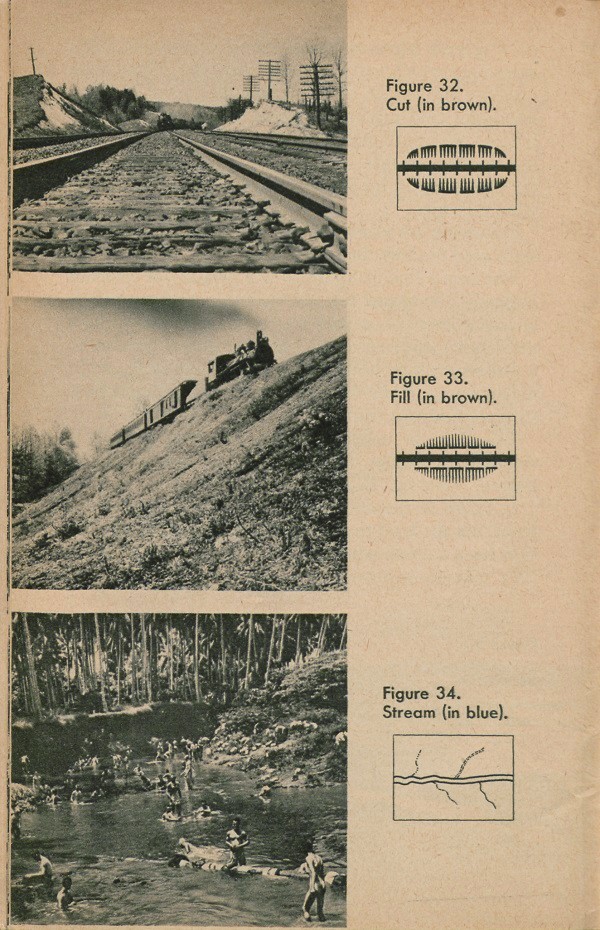
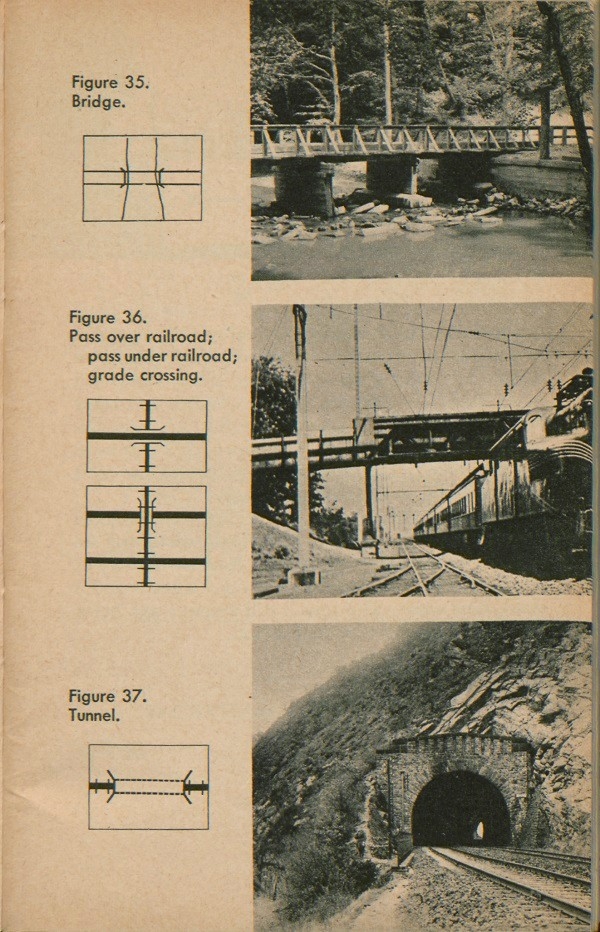
This covers the signs that are most used in mapping. It is important to remember the colors used with these signs. All water, such as swamps, rivers, lakes, and other bodies of water are in blue. Woods and other heavy vegetation are in green. Cuts, fills, and some cultivated fields are in brown. Some good roads may be in red. Other roads, railroads, buildings, bridges, and most man-made things are printed in black. If we put all these signs on a map and give them some names, we find ourselves with the land picture you see in figure 40. This is more like it! Now we have a pattern of ground against which our other signs begin to make some sense. This map is still a simple one, but it can tell us a good deal about the land.
20
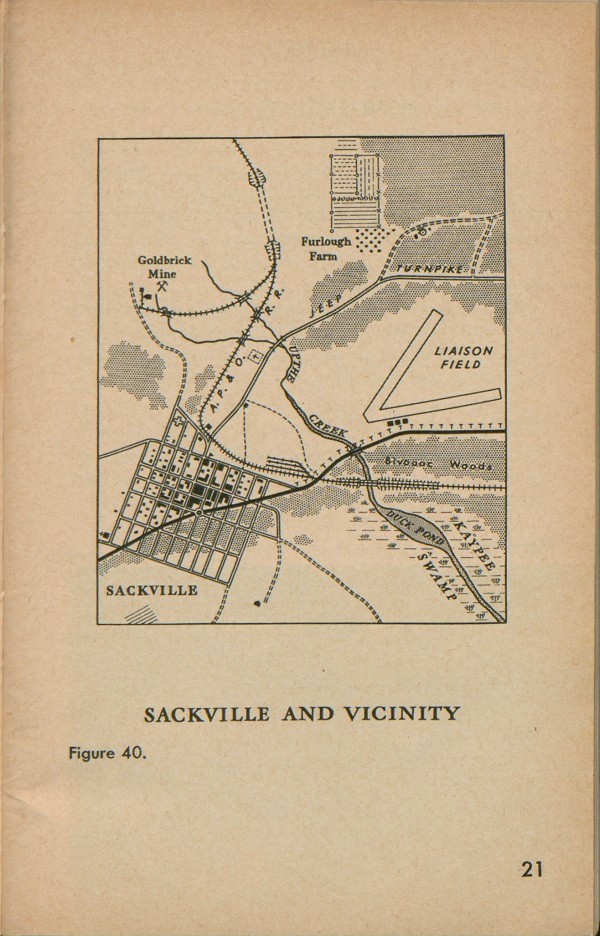
Sackville and Vicinity
[21]
HOW HIGH IS IT?
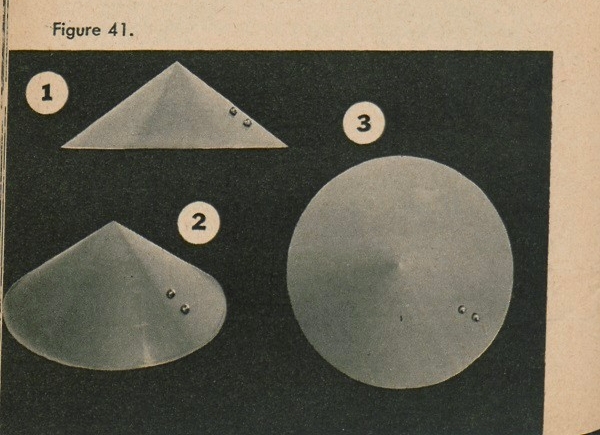
So far, everything on our map is flat. We must now find a way to learn something about the different ground levels. It means something to us to know that a hill is in a certain place, but we would further like to know how high it is. A picture of a hill taken from above will not show us this, but there is a way for our map to give this information. Since a hill is broader at its base than it is at its top, let us take an object which is like a hill, a cone, for example, and see what we can do to a picture of it from above to let us know how high it is.
Height
First, suppose there are two boulders on the side of the cone, as in figure 41(1). When we look at this
[22]
from above (fig. 41(3)), we can still tell that there are two boulders there, but if we had not already seen the cone from the side, we would not know which boulder was higher and we would not know how high up the cone either boulder is.
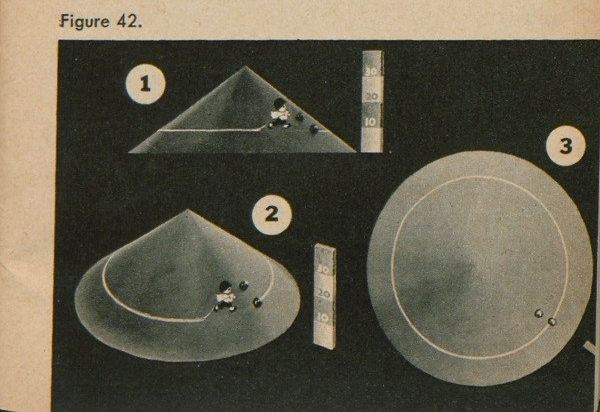
Next, let us suppose that we walk up this cone until we are 10 feet higher than the base (fig. 42). Now let us walk around the cone, staying 10 feet high all the way around. Finally, we will come back to the place we started from. If we had a leaky bag of flour with us as we walked, we would have left a mark on the hill which would look like figure 42(1). From above, this line would look like it does in figure 42(3).
Now what do we know about this mark as we look at it from above? We know that anything on it is 10 feet higher than the base of the cone. Notice that one of the boulders is right on this line; therefore its elevation, or height, is 10 feet. We know that anything outside it is lower than 10 feet. Let's move up the cone until we are 10 feet higher
[23]
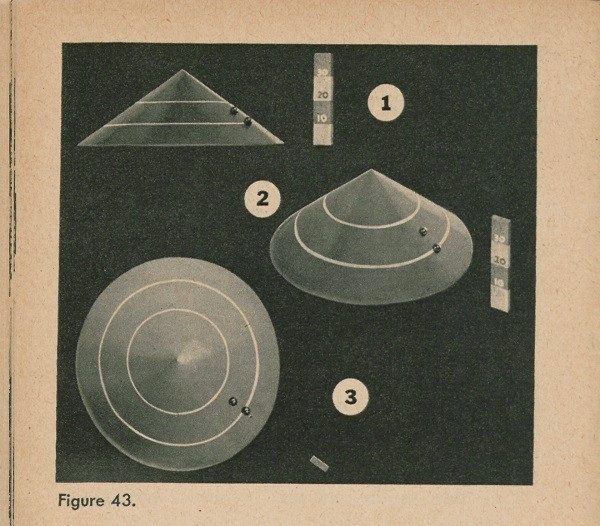
and do the same thing, as in figure 43. The result is another flour line. What do we know about this line in figure 43(3)? We know that everything on it is 20 feet high, and everything between it and the first line is somewhere between 10 and 20 feet high. Now the second boulder is about halfway between the two lines, so we can judge that the second boulder is about 15 feet high.
In this way we can tell the height of objects.
Shape
These lines tell us still more. They tell us that the
[24]
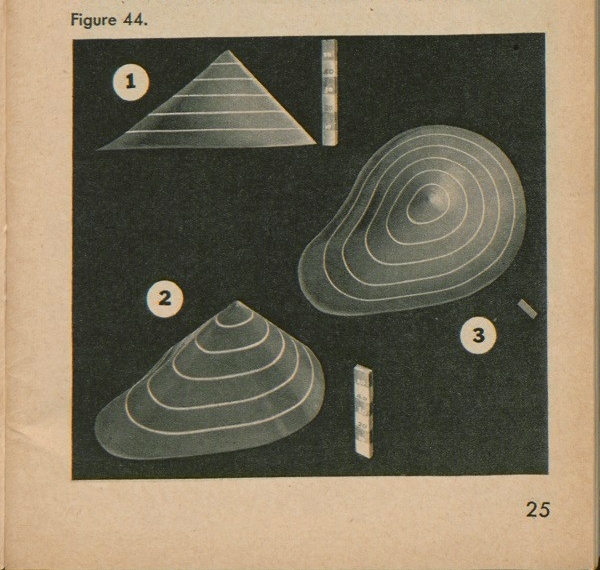
cone is round, for example. If the object were not round, an object other than a cone, these lines can tell us that, also. For example, suppose we stretch one side of the cone so that it looks like figure 44(1). If we do our-flour-bag stunt again, from above, the lines look like figure 44(3). We can tell which side it bulges on.
We find, then, that these lines can tell us two things: height and shape. Maps have many such lines: and if you understand what they mean, they are easy to read and very helpful. On maps these lines are called contours or contour lines.
Let us see what happens when we place contour lines on our map of Sackville. Figure 45(1) outlines the hill
[25]
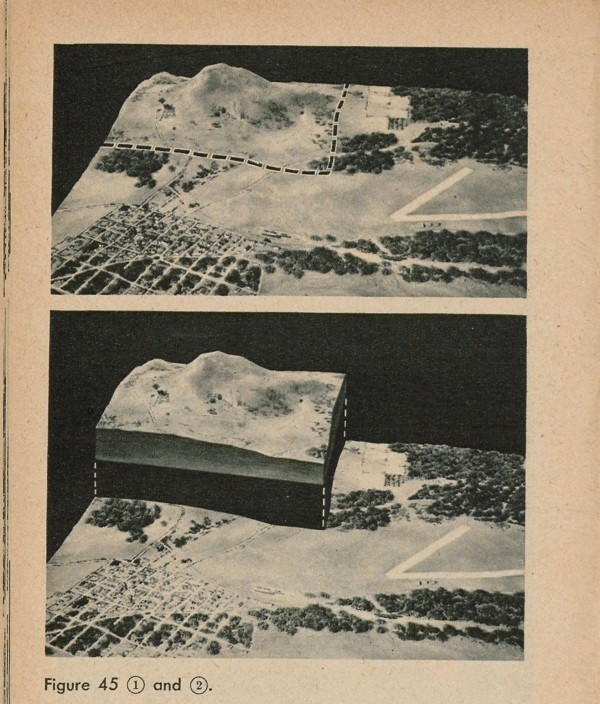
which overlooks the town. In the picture in figure 45 (2) we have lifted the hill right out of the ground so we can talk about it and examine it more closely.
First, let us make our flour marks on the hill, just the way we did on the cone. From the side, it looks like figure
26
46 (1). As we rise into the air we can see more of these lines, as in figures 46 (2) and (3).
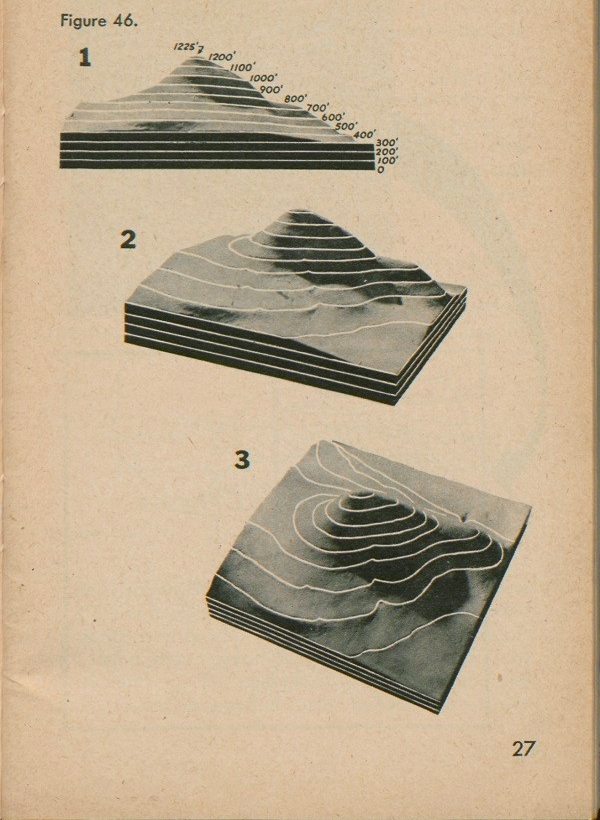
27
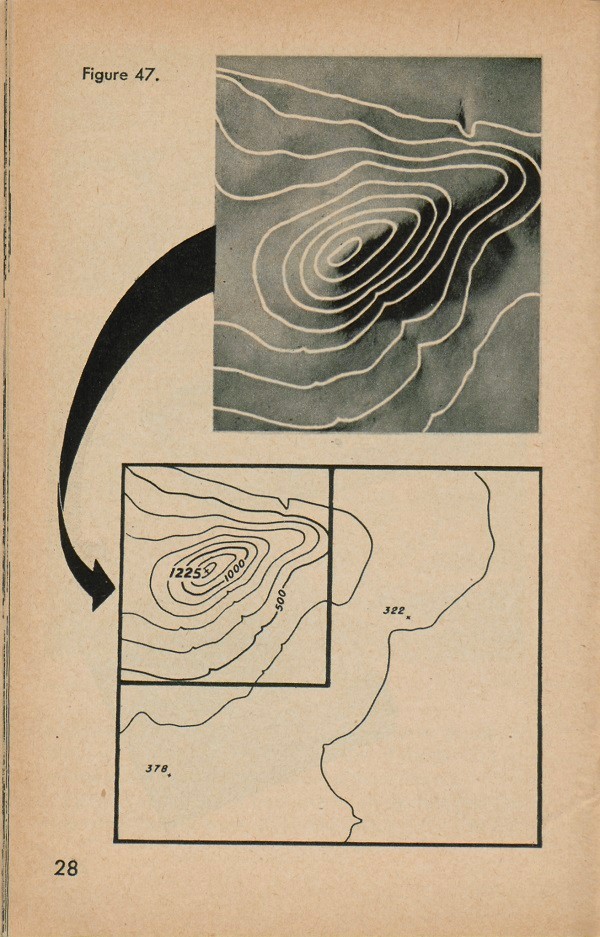
28
Finally, we have a view from directly above, and we can see that the shape of the hill is shown (fig. 47) just as the shape of the cone was shown in figure 44. If we take these lines out of the photograph and put them on a map, as in figure 47, we can tell which parts of the map are high and which are low.
It would clutter up the map too much to have the number showing the height of each contour line, so only a few of them are numbered. To make it easy to count these lines, every fifth line is made heavier than the others. The distance between contour lines on each map is shown by means of a note at the bottom of the map. This note may read, for example: Contour Interval: 10 feet
This means the distance between any two neighboring contour lines on that map is 10 feet in an up-and-down (vertical) direction. Figure 48 shows how the contour interval is noted on a map of Sackville: on this map the contour lines are 100 feet apart.

Since the highest point on the hill in figure 47 does not fall exactly on a contour line, this point is labeled with the exact height. On maps, such height numbers are found often. Some things take their names from these numbers. For example, if there are a number of road junctions on a part of a map, and we wish to name

one of them in particular, we may call it RJ J24 (that is, the road junction at a height of 124 feet).
Height Above What?
It may be noticed that the height of the base of the hill in figure 46 is 300 feet rather than 0 feet. The reason for this is height on all maps is figured from sea level. In other words, we compare the height of all land anywhere to the average level of the sea.
For example, in figure 49, although the hill is far from the sea, yet the base of the hill on the land is 300 feet above sea level. Sea level is the zero for our height measurements.
Ground Forms
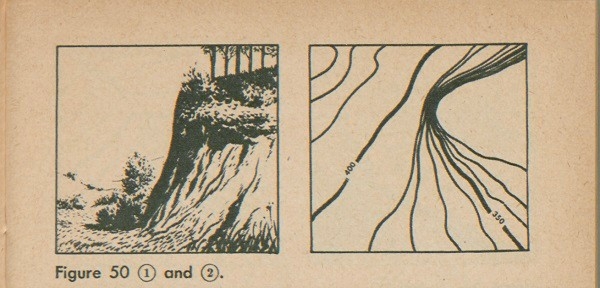
It is clear that these contour lines are very helpful things to have, and they can help us in other ways. For example, suppose we have a high spot of ground that breaks off suddenly and becomes a cliff. From the ground, as in figure 50(1), it is easy to tell this, it is also easy to tell this by examining the contour lines on the map. When a hill or cliff is steep, the contour lines appear close together, as in figure 50(2). This arrangement of contour lines on a map, always shows a sharp rise in the ground.
If, however, the lines are spaced gradually and fairly far apart, it means that the hill rises gradually and evenly.
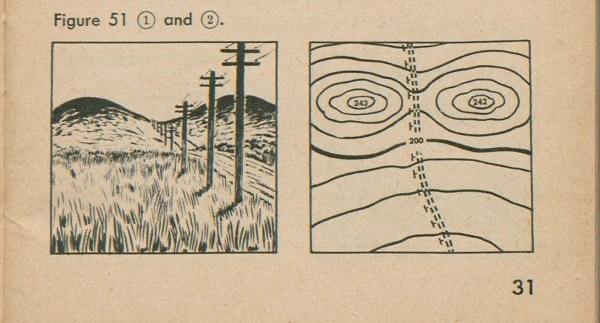
If there are two hills with a saddle between them, as in figure 51(1), the contour lines, as in figure 51(2), tell us exactly what these hills and valley look like.
A special kind of valley is formed by a stream, and contour lines in the area are usually regularly spaced (see fig. 52(2)). They form "V's" where they cross the stream. It is important to remember that these "V's" all point uphill, or upstream.
Contours, then, can tell us several things about streams. They can tell us the location of a stream or valley; they can tell us which way the stream is flowing, which shows the slope of the ground; and by the spaces
31
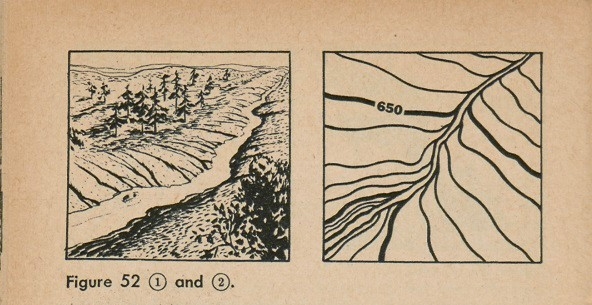
between the contour lines they can tell us how steep the valley is.
Remember, then, that V-shaped contours show valleys or streams.
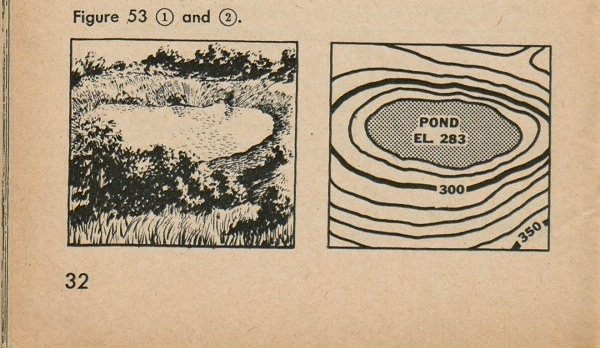
If we had a lake surrounded by mountains, as in figure 53(1), a first glance at the contours (fig. 53(2)) would make it appear to be a hill; however, by a closer look at the height numbers on the contour lines, we would see that as they get nearer the center they get smaller. We would know, therefore, that the, land is going downhill and forms a kind of basin.
32
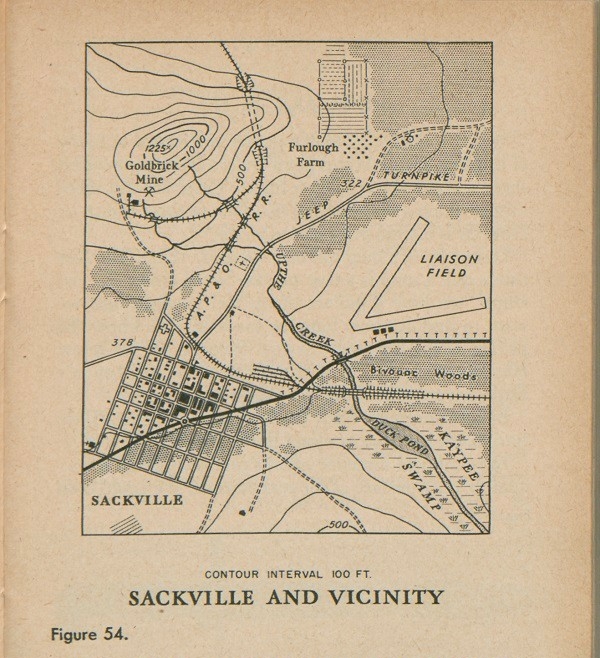
Figure 54 shows our familiar map of Sackville and vicinity with contour lines on it. Our map is becoming more complete. The contour lines show the shape of the ground. We can tell now that the land has a hill, with the ground sloping very gently from its base toward the town and toward the airfield.
33
HOW FAR IS IT?
We have now put a map together and looked at many of its parts, so that at this point we can learn a good deal about a region by reading a map. There are still more things which a map can tell us. One of these things is: How far is it from one place to another?
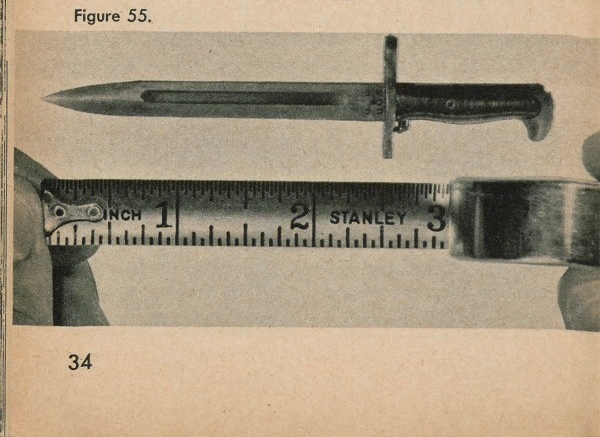
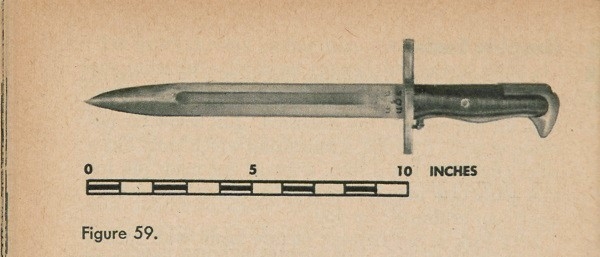
Distances on a map can be measured. The reason for this is that a map is a true picture of the land. For example, we have a picture of the Ml bayonet, and we want to find out how long the blade is. We know the picture is smaller than the real bayonet. If we knew how much smaller the picture is than the real bayonet blade, we could find out how large the blade is.
By measuring the blade on the picture in figure 55, we find that it is 2 1/2-inches long in the picture.
Now suppose someone tells us that the picture is one quarter (1/4) the size of the real bayonet. We could then
34
figure out how long the blade is. If the picture is one quarter the size of the real bayonet, the real bayonet is 4 times as large as the picture.
Let us put these figures to work. The picture of the blade is 2 1/2-inches long. The real blade is 4 times as long (as someone has told us); so the real blade is 4 times 2 1/2 inches, or 10 inches long.
4 X 2 1/2" = 10"
In the same manner as this, a map always tells you how much smaller it is than the real land. A map can tell you this in two ways.
One way is the same as we have just used on the picture of the bayonet.
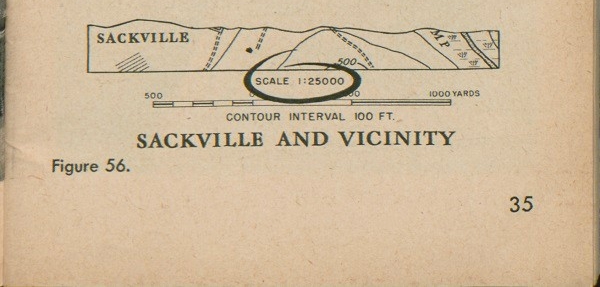
A distance is measured on the map, and then the map tells you how much smaller this distance is than the actual ground, by means of a number found in the bottom margin of the map, about in the center (figure 56). This number is called the SCALE.
The scale number may be shown in two ways, both meaning the same thing. It may be written as a fraction: 1/25,000; or it may look like this 1:25,000. In either case, it is the same as saying that 1-inch on the map is equal to 25,000 inches on the read ground, just as in our picture of a bayonet, 1 inch on the picture was equal to 4 inches on the real blade. -The scale of that picture of the bayonet would have been called 1/4 or 1:4.
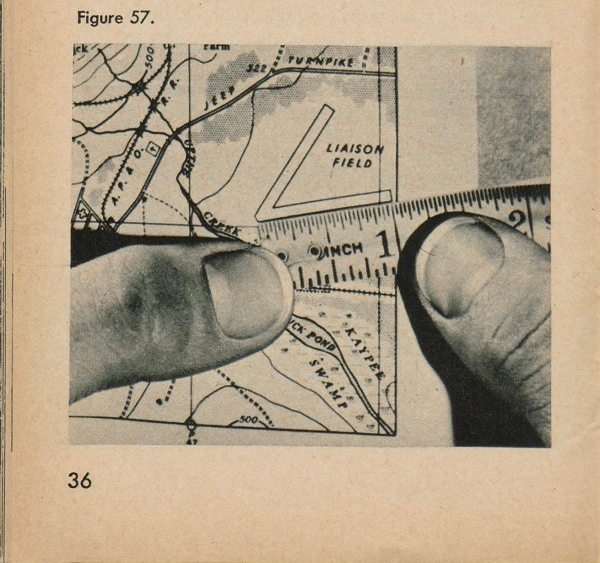
Let us try this out on our map. We want to find out how long the right-hand runway of Liaison Field is. First, place an ordinary ruler along the runway, as in figure 57.
It reads 1 inch. Now our scale reference says 1/25,000, or 1 inch on the map equals 25,000 inches on the field. So for each inch we have measured on the runway, we must substitute 25,000 inches. That means 1 times 25,000 inches, or 25,000 inches. But such long distances are usually stated in yards or feet. Let us divide by 36 and by 12 and find out the number of yards or feet in the runway:
25,000 divided by 36 equals about 700 yards.
25,000 divided by 12 equals about 2100 feet.
35
36
Graphic Scale
Another method for finding distances is by the use of the Graphic scale. This method is even easier to use than the one we have just discussed. Just below the notation of scale, 1/25,000 is something which looks like a ruler (fig. 58). It is a ruler, a special one made just for that particular map. It is a ruler which has already done your arithmetic for you.
Let's look at our bayonet picture again with such a ruler and see how it works. The ruler or graphic scale is a special one made just for this particular picture. All we have to do is place this ruler on the picture of the bayonet with the zero at the tip of the blade, as in figure 59. We can see at a glance that the real bayonet blade is 10 inches long. The special ruler has shown the real distance of the bayonet.
This special ruler is called a graphic scale. But it does not matter what you call it as long as you know what it

looks like on a map and how it is used. It is used with a map in the following manner:
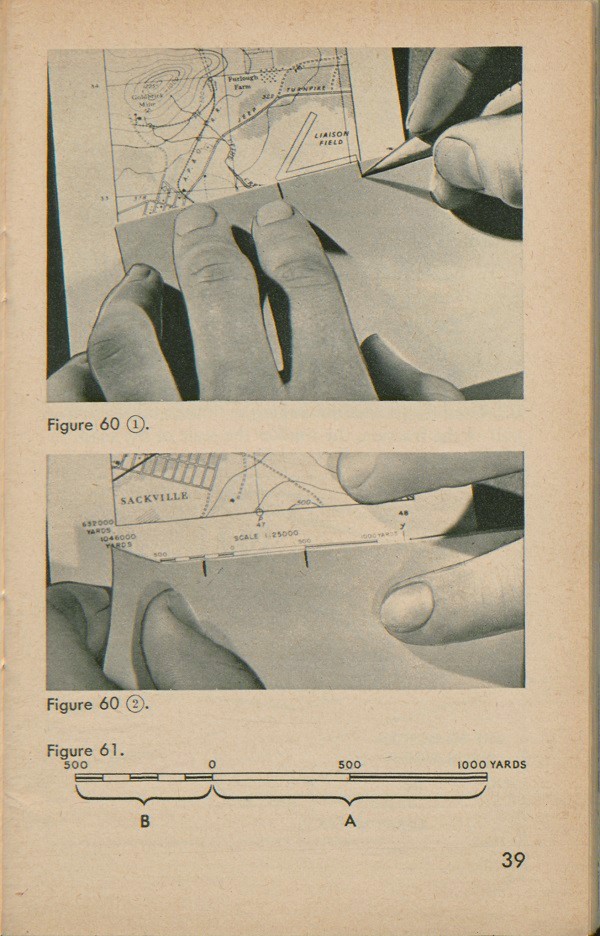
First, a straight strip of paper is placed on our map alongside the airfield (fig. 60(1)). We then place marks on the paper at both ends of the field. The paper is then placed alongside our graphic scale on the map which shows the field really is (fig. 60(2)). There is another thing to notice about this scale.
Figure 58.
It has two parts (fig. 61). From the zero mark to the right it reads in large numbers, 500 yards apart (The A
37
part of fig. 61). From the zero mark to the left it breaks down this large distance into smaller distances (the B part of fig. 61), 100 yards apart, so that we can measure more accurately.
For example, in figure 60(2) the marks on our strip of paper are farther apart than the distance between the zero and the 500-yard marks on the graphic scale. If we place the right-hand mark at the 500-yard point on the graphic scale, the left-hand mark overlaps into the "B" part of the graphic scale. We see that it is about at the second mark to the left of the zero, or at the 200- yard mark. By adding 200 yards to the first 500 yards we' can judge that the runway is about 700-yards long.
For purposes of allowing different units of measure to be used on a map, there are sometimes found more than one graphic scale on the same map. For example, one of the scales may be measured in miles, another in yards, or another in kilometers. In any case, there is a note on the scale which tells you what the unit of measure is, and you can use any of the scales shown on that map.
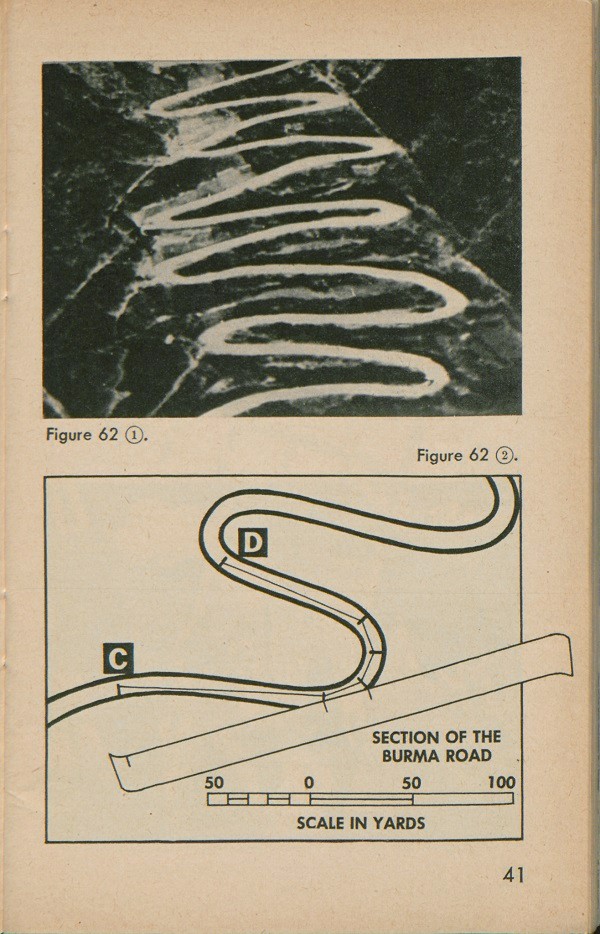
In order to measure a curved or irregular line, for example, a section of the Burma Road (fig. 62(1)), we divide the curved line of the road section, between C and
38
39
D, into small straight sections (fig. 62(2)). Then we lay the edge of a strip of paper on the tick marks, one after the other, 'adding each section to what we already have marked. We finish with a straight piece of paper with the total length of the curved road on it. We can measure this with the graphic scale, in the same way as we measured the runway.
Scale of Maps
It is important to be sure which is the larger scale, a 1/25,000 map or a 1/50,000 map. The answer is: the 1/25,000 map, because the number is a fraction and 1/25,000 of something is bigger than 1/50,000, just as 1/2 is large than ¼. That is clear enough to us, but these numbers are a little tricky, and it is easy to make mistakes and forget that the larger the number in the lower part of the fraction, the smaller the scale of the map.
40
41
WHERE IS IT?
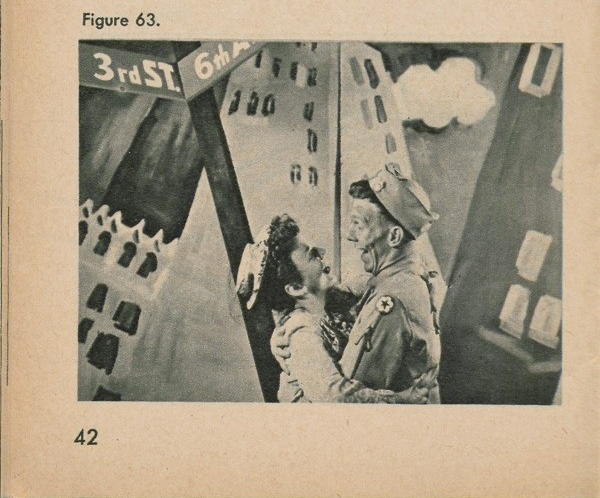
In a town or city, it is easy for us to tell someone that the church is at the corner of 1st Avenue and 1st Street. Or if you make a date with someone at the circle at the corner of 6th Avenue and 3rd Street, you could be pretty sure that both you and your date would be able to find the place. For example, if you were a stranger in town and did not know that the highway near the church went straight to the corner of 6th Avenue and 3rd Street, you would walk to the right, watching the numbers on the streets, until you reached 6th Avenue; from there you would walk up the avenue until you arrived at 3rd Street (fig. 64).
42
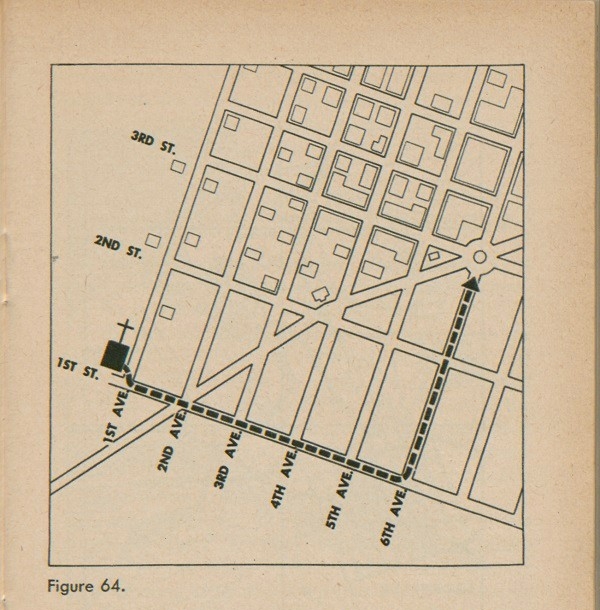
In the army, however, we are faced with a different problem. We must be able to give to someone else the location of a lone tree in the middle of a large field, or a machine gun or sniper in a woods, or a guard along a stream. There are no streets in those places, but our maps have a system of letting us tell someone else where these points are.
Grids
This is done by placing on the face of the map a series
43
44
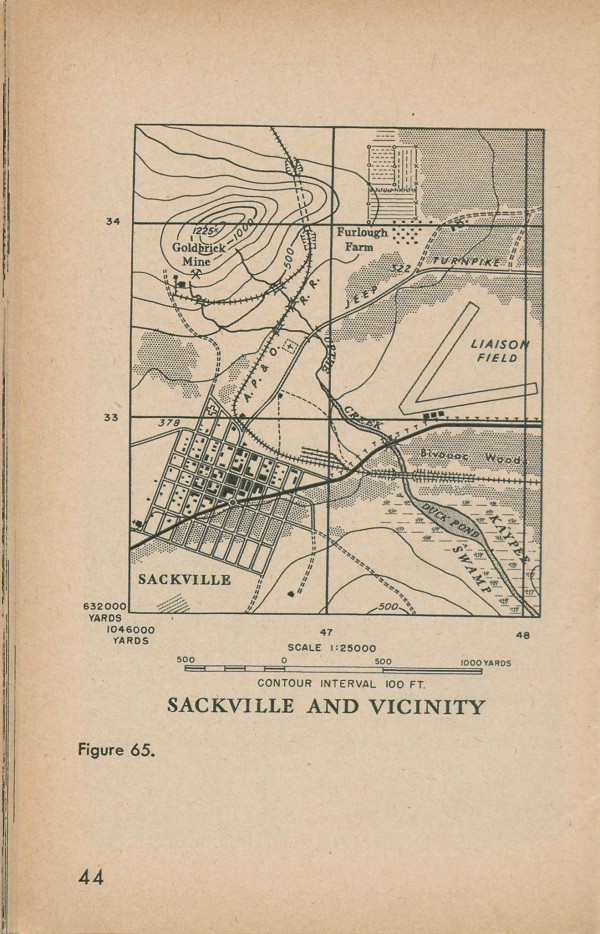
of lines in the form of squares. These squares are used somewhat like the street system in a city, and every point on the map is near some "street." All we have to do is tell someone to go to one of these corners, just as we do in town with real streets.
This is called a grid system, and the pattern is called a grid. Figure 65 shows our map with an army grid on it.
The streets in a grid all have very simple names. They are all numbers. Before we can use these numbers, however, we must learn a few rules about them.
In the first place, each square gets its name from the numbered lines which meet at its lower left-hand corner.
This name is made up of two numbers separated by a dash. The first number is the one you read to the right, which marks the line running from the bottom of your map to the top, and the second number is the one you read up, which marks the line running from side to side.
For example, if we told you that an enemy patrol was observed in square (47-33), you would know the square meant is the one whose lower-left-hand corner is made by the crossing of up-and-down line 47 and side-to-side line 33. Notice that we use only the two most important numbers of the grid line. The whole numbers for the corner squares, 1046000 and 638000 are given once, in the lower left hand corner of the map, but these large numbers are too clumsy to use. For example, here we omit the three zeros at the end of the number and the 10 and 6 at the beginning. The two remaining numbers are enough to tell someone which grid line we mean.
There is a rule in army map reading which helps to
45
remember which number is given first. The rule is "READ RIGHT UP." For example, if your platoon leader tells you to meet a patrol on the path at (47-33) on our map (fig. 65), first you read right along the numbers at the bottom until you come to 47. Then you read up this line until you come to the line marked 33. Read right up.
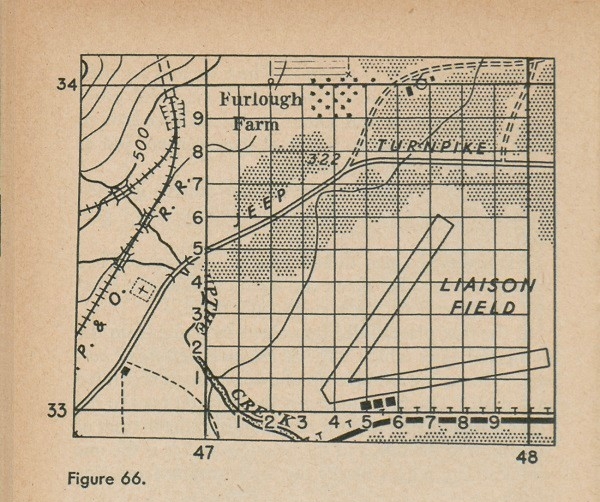
If the object we are trying to give the address of is not right at the place where a line crosses another line, we may imagine the sides of the grid square divided into 10 equal parts, so that 100 imaginary smaller squares are formed, as in figure 66. The lines on this grid are numbered to the right from 1 to 9, and up from 1 to 9. You read the numbers of the small squares just as you do the
46
large ones. For example; to find the number for road junction 322 in figure 66, you count right from the lower left corner of the square to the line 4 which forms a corner of the correct small square, and you count up to the correct line, 7. The number you get is (4-7).
This number, however, is not yet complete. It is necessary to show which large square the smaller squares were in. So we use a combination of both numbers, those of the large square and those of the small one. We write the numbers so that the numbers reading to right are together, separated by a period or decimal point, and the numbers reading up are together, separated by a period. For example, to give the location of RJ322 in figure 66, the first number would be 47.4 and the second 33.7. The whole address would then be (47.4--33.7).
There are only two more main things we must know about this army street system. The first is that these numbers are called coordinates. That is a fancy name for a simple idea, but once you understand how to use coordinates, the word itself should not trouble you. The second point is that on many army maps these lines are 1,000 yards apart, but this may not always be the case; other kinds of grids may be used. If they are, the unit of measure and the distance between lines of the grid are indicated in the margin. Look for these numbers before you use the grid.
For example, figure 65 has the 1,000-yard grid on it. We can tell from the map that the circle in the town is about 1,000 yards from the edge of the airfield, because it is about the same distance between two grid lines. This is another way to tell distances on a map, and you can use it instead of the graphic scale.
47
Thrust Lines
There is one trouble with grid coordinates. If the enemy gets hold of one of our messages with these numbers on it, he can read exactly what we have written and find the place on a map. So the army uses other kinds of addresses, too-ones with secret keys to them. One of these methods is called the thrust line method, and it works as follows:
In Treasure Island, the famous story of the hunt for buried treasure, the treasure-hunters have a map which says the gold is 10 feet from a certain tree. The only difficulty is that for a long time they don't know where the tree is. It does them no good to know the distance between the tree and the gold unless they know what tree the map is talking about.
A thrust line works on this same idea. Instead of a secret tree, we use a secret line, which is not known to the enemy. This line is a base line, set up by the commander. The line is designated by means of two points, lettered T and L, standing for "Thrust Line": T means the first point (or base point), and L means the second point (or thrust point). From this line we measure forward or backward and at right angles to the right or to the left.
The order which gives the location of the thrust line also gives the unit of measure to use with it, miles, yards, or feet. When the measurement is in miles, we always measure in tenths of this unit, but we leave out the decimal point. For example, if the number we are working with is 136, that means the distance is 13.6 miles, or if the number is 08, that means the distance is 0.8 miles. When yards or feet are used, the unit of measure is designated by the commander; no decimal point is involved
48
in this case. For example if the commander designates the unit of measure as "tens of yards," and we measure the distance as 64 yards, we write it 6; or if the distance is 178 yards, we write it 18.
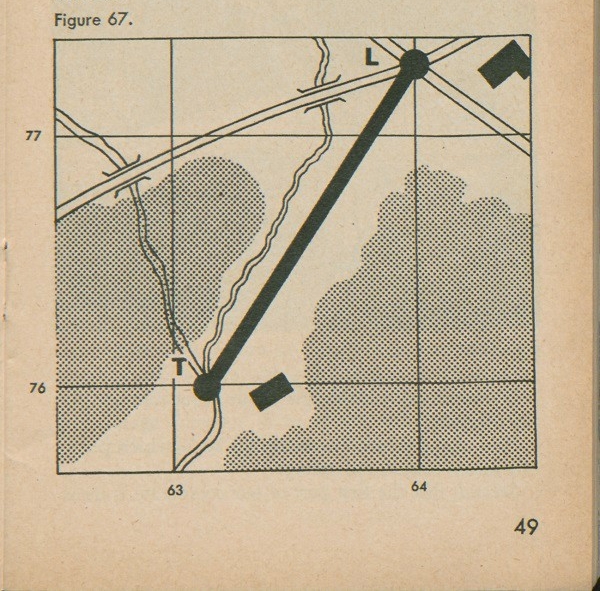
The order telling you the base line will give you the grid coordinates of the points T and L; for example, an order may set up a thrust line from a base point at the juncture of two streams at (63.2-76.0) to forward point CR 13 at (64.0-77.3), measurements in hundreds of yards (fig. 67).
The first thing you do is draw this line on your map lightly, so you can erase it later. Figure 67 shows you the line.
49

Before we can use this line as our secret base line, we must know:
First, that forward means from T to L, which generally means toward the enemy.
Second, that the first part of our coordinate is measured
50
along the thrust line.
Third, that we measure the second part of our coordinate to the right or left as we face forward along the line.
Fourth, that we use four simple abbreviations:
F, standing for forward from the base point T along the thrust line toward L
B, standing for backward from the base point T along the thrust line.
R, standing for right of the thrust line, at right angles, or 90°.
L, standing for left of the thrust line, at right angles, or 90°.
Now we are ready to use our thrust line. Suppose your platoon leader tells you that you are to destroy a bridge at B18R6. Where is the bridge?
B means backward from the base point. Therefore, first you extend the line straight back so you can work from it (fig. 68). The number 18 means 1800 yards, because you were told that the unit of measure is in hundreds of yards. With your graphic scale, you measure 1800 yards back from the base point. The next item in the address of the bridge is R6, which means 600 yards to the right of the thrust line as you look forward toward L. You measure this at right angles from the spot 1800 yards back of the base point, and get your location.
Now suppose that the enemy intercepted that message.
It would do him no good because he wouldn't know where our starting point or base point is or in what direction our thrust line runs! Our commander will change this point often, so that the enemy cannot find the location of the thrust line.
51
WHICH WAY IS IT?
Let's leave our map for a moment and talk about the direction of things. We shall come back to our map in chapter 8.
On the ground and on the map, the army has an easy way to point out the direction of things. It is easy because the same idea is used wherever we are. The idea is simply this: We suppose that wherever we happen to be at any given moment, we are in the center of a circle which has "avenues" running off in all directions, as in figure 69. This circle is marked off into 360 avenues (fig. 70). Each of the 360 spaces is called a degree and each avenue has a name called an azimuth. This azimuth is just a name for direction line; each of these direction lines has a number, depending upon which of the 360 avenues it is.
We can march off on one of these avenues, or azimuths, starting at the center of the circle. The avenues
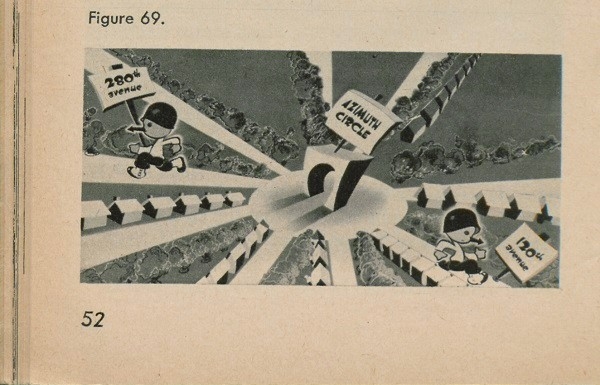

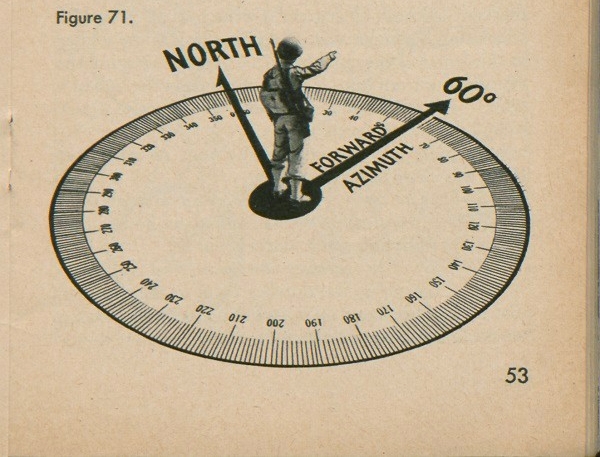
all start where you are, whether you are in a jungle, on a hill, or on a highway, just as with the soldier in figure 71. This soldier has been told to go along the avenue
53
marked "azimuth 60 degrees" (written as 60°), and he is pointing his finger at it. You can think of the soldier in the center of the circle with 360 avenues or azimuths running out from him like the spokes from the hub of a whee1. Every 10th avenue is numbered to make it easy to find those in-between.
Now there are two important things to remember about this circle of avenues.
FIRST: The zero-0-avenue must always point NORTH. In a moment we will talk about how to find north, but right now don't worry about it.
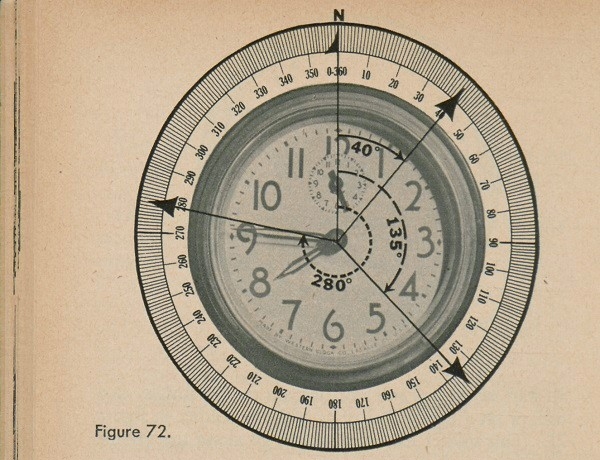
SECOND: The avenues are numbered CLOCKWISE. That means we number them in the direction that we number hours on a clock. Figure 72 shows what we mean by clockwise direction.
54
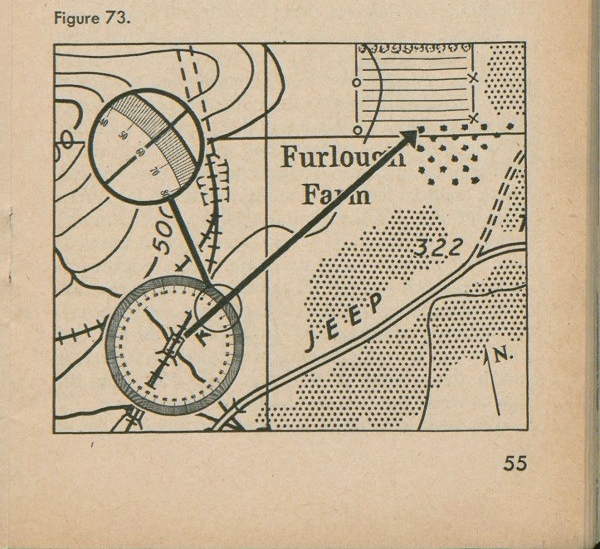
With this knowledge, let's put this circle to work for us. You are told that there is a sniper in a tree in the orchard at Furlough Farm, and also told you that if you crawl along Up the Creek to where the railroad crosses it at the foot of the hill, you can see the sniper's tree on an azimuth of exactly 60 degrees (60°). Figure 73 shows the situation.
You find where the railroad crosses the creek and go there. You remember that the center of the circle of azimuths is right where you are. The first thing to do is to point the zero mark on the circle at north. (You will learn how to do this with your compass later in this manual). Now it is easy to see which tree is on the avenue or azimuth- marked 60° on the circle. That is
55
the address of that tree, using the azimuth system.
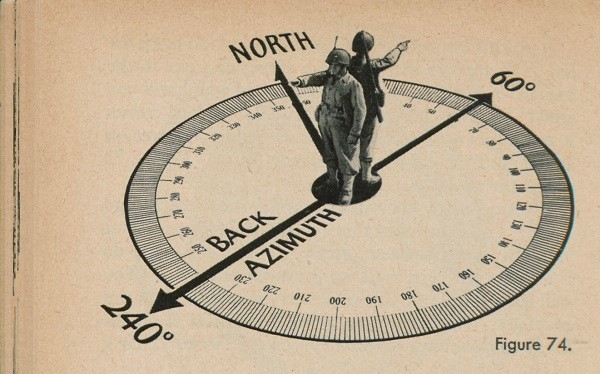
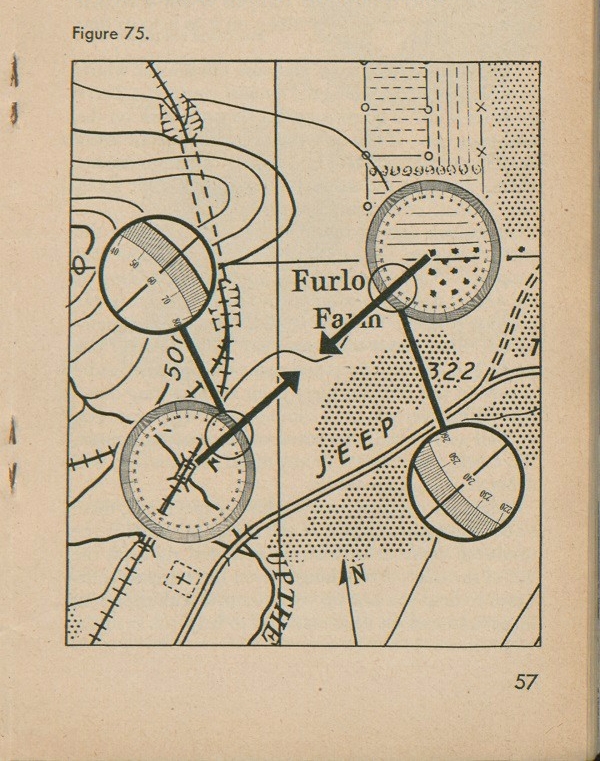
You take a bead on the sniper and knock him from the tree with your first shot. You move cautiously up to the tree, examine the fellow carefully, and find he is dead. You walk back to the railroad where it crosses the creek. Now what azimuth did you walk back on? Was it 60°? No, it wasn't. Look at figure 74. It shows you that if you face in one direction you have one azimuth (called a forward azimuth) and if you face in the opposite direction, the azimuth (called a back azimuth) has a different name. The back azimuth is on a straight line back through the center of the circle from the forward azimuth. Figure 75 shows you that at the railroad, with the zero of the circle pointing north, the azimuth on the circle reads 60° from there to the tree, and that at the tree, with the zero of the circle still pointing north, the azimuth on the circle reads 240° from the tree to where the railroad crosses the creek.
The back azimuth is an important thing to know
56
about, because if you know how to use it, it will take you back to your starting point. If you are sent on a mission to a point in strange country and at night, for example, your back azimuth will show you the direction in which you return. The following section, on compasses, show you how to find back azimuth.
57
The Compass
We come now to the compass, that useful item which finds north for us and finds our azimuth for us. The compass has on it the circle of numbered avenues or azimuths which we have been talking about in the last few pages. In other words, the compass is our direction finding tool, and it has everything on it to help us find our way.
There are several types of compass, but the one which we shall use here is called the lensatic compass. There are other kinds of compasses, but they all work on the same principle. If you understand how to use the army lensatic compass, you will find it easy to learn to use the others. Later in the manual we shall talk a bit about some of these other army compasses.
Let us look now at figure 76 for a good look at the lensatic compass. The most important thing about that compass is that no matter how you turn it, as long as you hold it level, the white arrow always points in the direction of north. It won't let you down if you remember one thing: never use it near any metal object if you can help it. Metal objects will make the compass needle (arrow on this compass dial) point in the wrong direction. Whenever you use a compass then, make sure you are well away from such metal objects as your helmet, rifle, truck, a wire fence, or any metal object which will bother your compass needle.
Besides the compass needle which points north, there is another important part of the compass. That is the numbered circle of avenues or azimuths right on the face of the dial. Everything else on the compass is designed to help you line up your compass with things on the ground and on your map and to help you read the
58
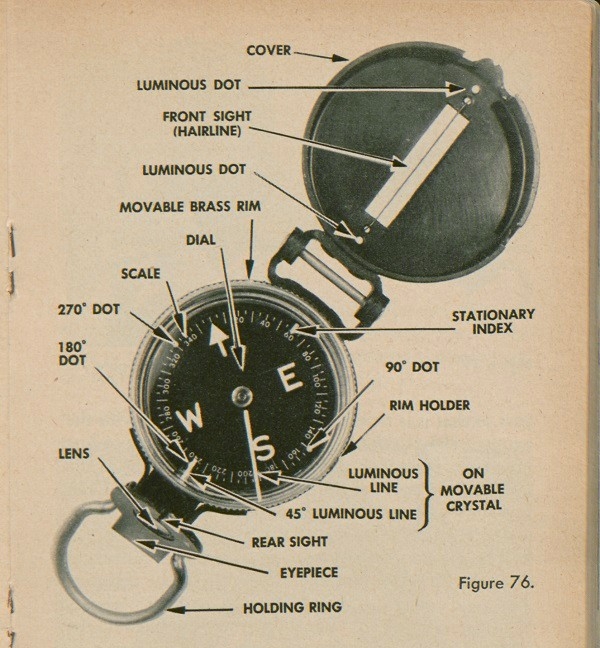
avenue or azimuth numbers.
Compass reading is easy, if it is done correctly. For example, it is important to hold the compass correctly. Remember to point the compass in the general direction you want to go before you try to use it, and hold it level. Figure 77 shows the compass ready to be used in daytime sighting. Figure 78 shows how to hold the compass-
59
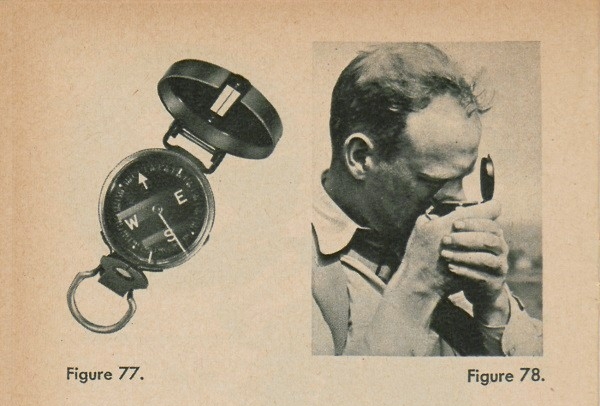
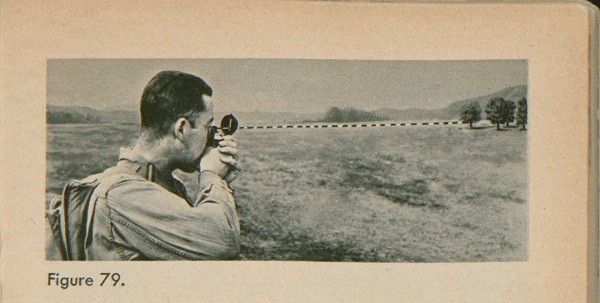
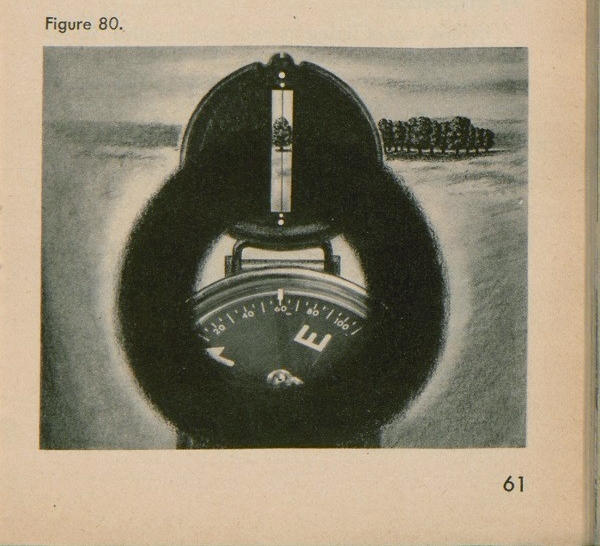
pass so that it is steady. Notice that it is held with the eyepiece close to the eye. Figure 79 shows how to line up a tree. You look at the tree through the slit in the eyepiece and through the slit in the cover with the hair line in it. The glass eyepiece is used only to read the azimuth numbers on the dial. It is there only so you will be able to glance down and read these numbers at the same time you line up an object with the compass. The view you get when you use the compass correctly is shown in figure 80. The soldier here has lined up the tree in his compass sights and found that the tree is on an azimuth of 60°.
With a compass, you can see how easy it is to find a back azimuth. You can do it in two ways. The first way is to read your back azimuth right off the dial, by taking the number opposite the forward azimuth on a straight line through the center of the dial. The second way is to sight from the point you have reached, back to
60
point you started from. The main difference between these two methods is that in the first way, you do not have to be able to see your starting point in order to get the back azimuth.
61
TWO WAYS TO LINE UP YOUR MAP WITH THE-GROUND
Before the compass and the map are ready to work together, the map must be placed in a position so that the directions on the map are lined up with the directions on the ground. There are two ways to do this, one of them without the aid of a compass and the other with the help of a compass or of some other way of finding north. This act of lining up your map with the ground is called orienting the map.
By Inspection
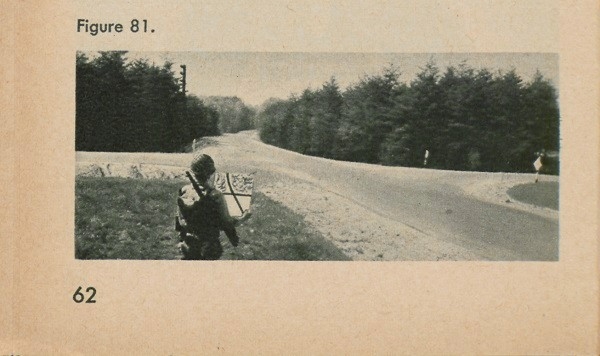
The first way of lining up your map is called "by inspection," which simply means "by looking at the ground with the map in front of you." This can be done when you have found objects on the ground which you recognize on your map and which you can see. For example, in figure 81 you hold your map so that the
62
crossroads on it line up with the crossroads on the ground in front of you. Your map is then oriented.
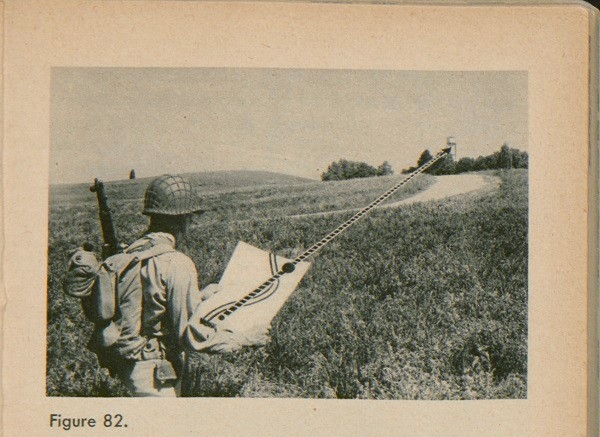
If the objects on the ground are not as simple as crossroads, such as in figure 82, you can still line up your map by inspection. You must know your approximate positions on the map, and then turn your map in front of you until the distant object (the tower) on the ground lines up with the same object on the map and with your position on the map. The dotted line in figure 82 illustrates this lining up process. Your map is then oriented.
By Compass
A second way to line up your map, and a much easier method, is by using the compass. First you must know that the top of your map points in the general direction of north. In the margin of the map, or on the map itself,
63
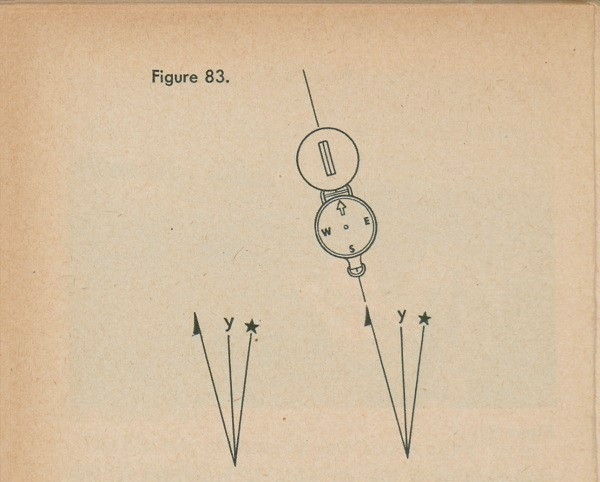
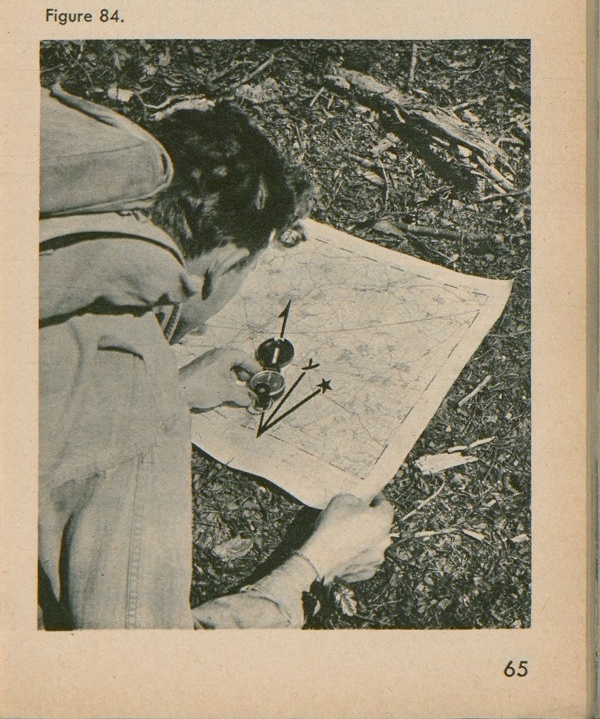
you will always find a small diagram which looks like figure 83(1); this is called a declination diagram. The only line on that diagram in which you are interested now is the one with the half arrowhead. That is called the magnetic north line, and is the line on your map with which you must line up the needle on your compass. You do it as in figure 83(2). Lay your map on a flat surface, extend the magnetic north line, and lay your compass down over it. Now turn your map, with the compass on it, until the north arrow on the compass and the arrowhead line on the diagram are in a straight line. Your map .is then lined up, or oriented, as in figure 84. If the declination angle is 3 degrees or less, however, this method will not work and should not be used.
On some maps you will find a device which you can
64
use to orient your map in place of the declination diagram. When you find this device on a map use it, because it gives you a long north line on your map to work with.
Here is the way you use this device:
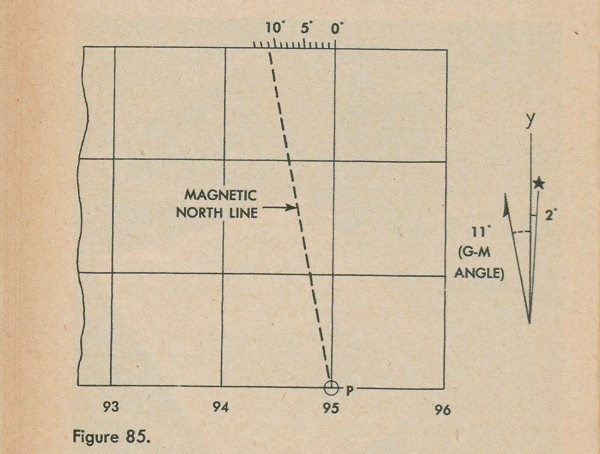
At the bottom margin of your map you will find a small circle marked P (See fig. 85). This is called the
65
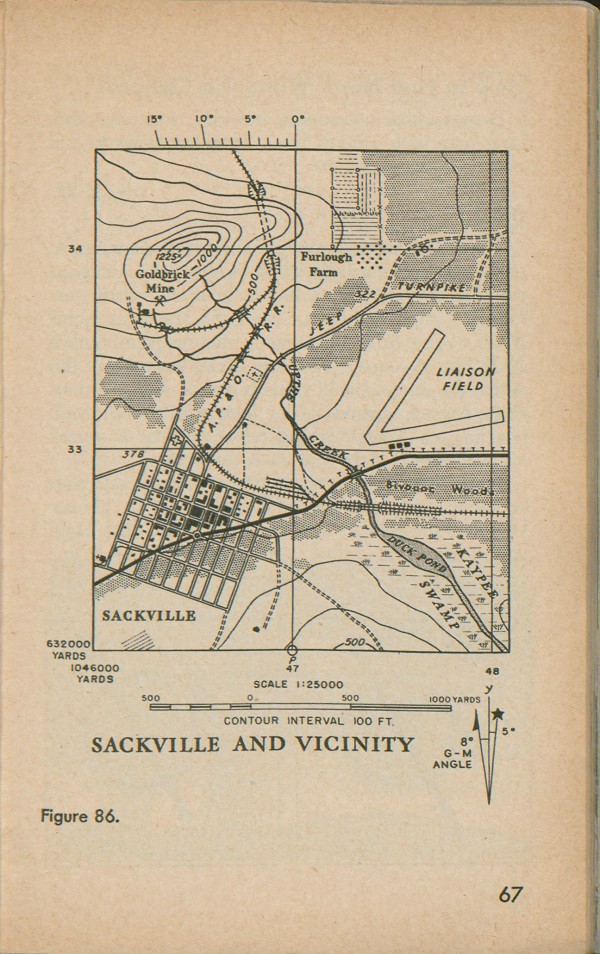
pivot point. At the top margin you will find a scale marked off in degrees. To find your magnetic north line with this scale, read the number of degrees, called the G-M angle, on the declination diagram between the magnetic north line and the plain line marked "y" (fig. 85), and draw a line from the circular mark P to that number of degrees on the scale, as in figure 85. This line is the correct magnetic north line, and that is the
line you use to orient your map with the compass. Figure 86 is the map of Sackville with the declination diagram and scale.
Before you use a map you should ask your platoon leader to check the magnetic north line on your map and see that it is correct.
66
67
How to Find North Without a Compass
Even without a compass, however, you can orient your map with a north line. There are ways to find north without a compass.
By Day
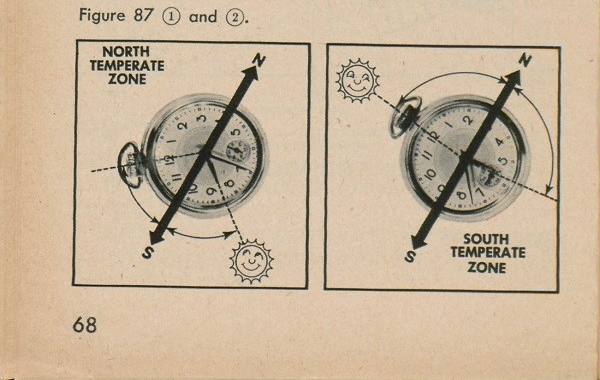
North Temperate Zone. In the north temperate zone, one way to find north is with an ordinary watch in good running order. Simply point the hour hand at the sun. Halfway between the hour hand and 12 o'clock is due SOUTH (fig. 87 (1)). Directly opposite from south is NORTH, of course. The only tricky thing about this is that the watch should read on sun, or standard time. If your watch is running one hour ahead (such as on wartime, or daylight-saving time), use the 1 o'clock number instead of the 12 o'clock number.
South Temperate Zone. In the South Temperate Zone we use the watch, too, but a bit differently. In this case you point the 12 o'clock on the watch at the sun. Halfway between 12 o'clock and the hour hand is due
68
NORTH (fig. 87 (2)). Again, be sure it is standard time. If your watch is on wartime or daylight-saving time use the 1 o'clock number on the watch instead of the 12o'clock number.
At Night
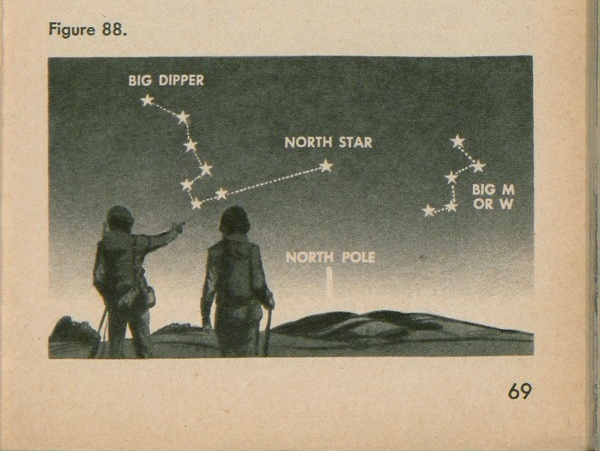
Northern Hemisphere. At night we must use another way to find north without a compass. We do this by means of the stars. In the northern hemisphere one way to use the stars is to find the Big Dipper. The Big Dipper is made up of seven fairly bright stars in the shape of a dipper with a long curved handle, as in figure 88. If you can see the Big Dipper, use as pointers the two stars which form the side of the cup farthest from the handle. These point in the direction toward which you would pour from the dipper. These pointers aim at a bright star which is about five times the distance between the two stars of the Dipper cup. This bright star
69
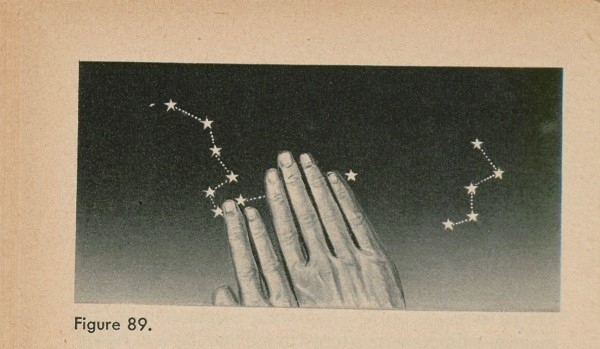
is the North Star, and is directly over the North Pole.
If you hold a finger away from your eyes so it just fits between the two pointers, and then, keeping your hand the same distance from your eyes, measure 5 finger widths away from the end pointer, your farthest finger will just touch the North Star (See fig. 89).
Sometimes, however, you cannot see the Big Dipper, although you may be able to see other stars. In that case we use a star pattern called the big "W” or the Big "M." Look at it in figure 88. Notice that it is on the other side of the North Star from the Big Dipper. The top of the "W" points about at the North Star. On a clear' night you will always be able to see, in the northern hemisphere either the Big Dipper or the Big "W." Sometimes you will be able to see both. In either case, you will be able to find the North Star.
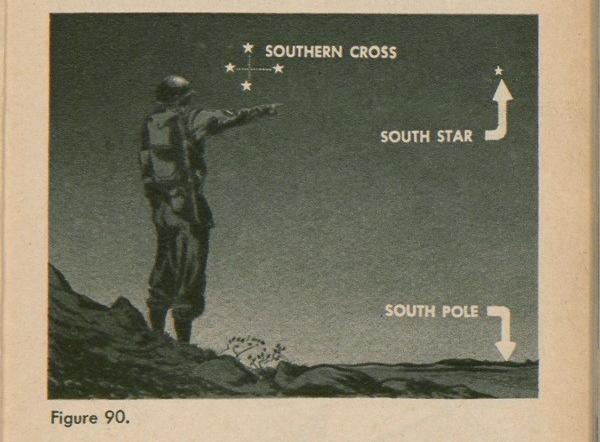
Southern Hemisphere. In the southern hemisphere you find true South in the direction of the South Pole Star. This is not as bright as the North Star and often you won't be able to see it at all. Look first for the Southern Cross, which is made by four stars in the form
70
of a cross, as in figure 90. These four stars look like a kind of kite. Now if you figure the length of the kite from tip to tail and put a straight tail on the kite 4 ½ times as long as the length of the kite, the end of the tail will be about at the South Pole Star, which is directly over the South Pole. By using the width of your finger as a measuring stick, as with the Big Dipper (fig. 89), you can find where this star is.
71
YOUR MAP AND COMPASS GO TO WORK
We know enough now about the compass and the map to start to use them together in a practical way.
Finding the Azimuths of Things on a Map
We have learned how to find the azimuth of an object on the ground by sighting with the compass. Now we come to the problem of learning to find the azimuth of something on a map.
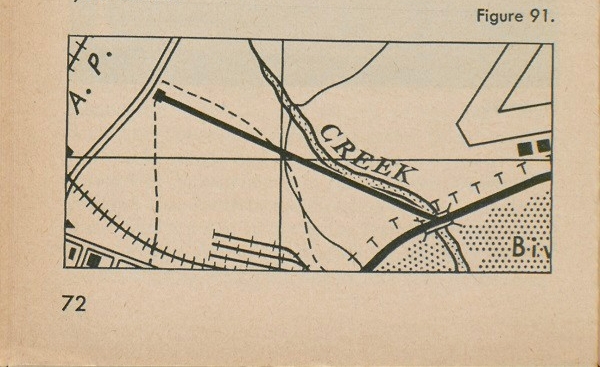
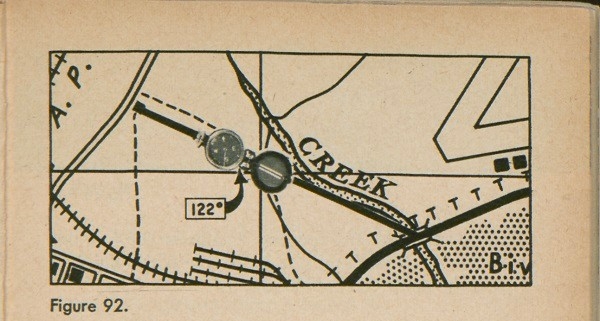
Figure 91 is a section of a map with two points on it, a house and a bridge, where the highway crosses the creek. The question is, what is the azimuth from the house to the bridge? The first thing to do is to draw a line lightly on your map between the house and bridge as in figure 91. Then orient the map. Next, lay your compass flat on the pencil line so that the hair line of the compass cover points at the bridge. You read the azimuth 122° on the compass, as in figure 92, and you have your answer.
72
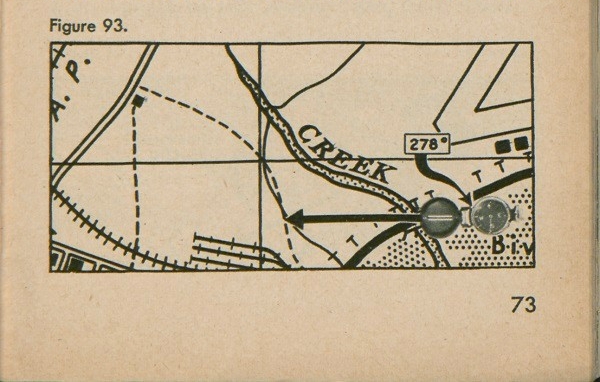
Suppose that you wanted to show on a map that a machine gun was on the path at an azimuth of 278° from the bridge. To find the correct point on a map, you would proceed as follows: First, orient your map; then lay your compass so that the tip of the compass cover is directly over the bridge (fig. 93). Read the azimuth of 278° on the compass and pivot the compass, keeping the cover tip at the bridge, until the hair line in the cover lines up with that azimuth. Make a mark at both ends of the lined-up compass, the cover tip, and the
73
eyepiece. Remove the compass and draw the line between the two marks until it crosses the path (fig. 93). That is the point you are looking for.
Finding Yourself on the Map
One of the most important things to be learned from the map and compass is finding your location on the map. If your location is somewhere between the airfield
and the creek on the Sackville map to find your exact location:
First: Orient your map with a compass.
Second: Find two things on the ground in front of you which you can also find on your map, anything you can draw a bead on.
Third: With your compass, take an azimuth on a

74
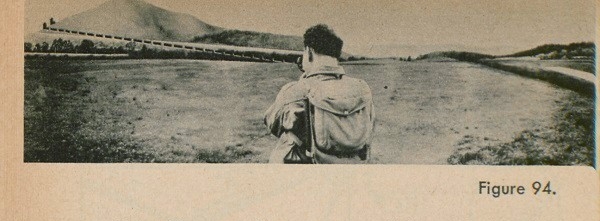
point, for example the building at the mine. Sight through the compass, line up the building with the hair line in the compass (fig. 94), and read the azimuth through the-glass eyepiece, which is 305°
Fourth: Lay your compass on your map, with the tip of the cover at the mine (fig. 95). Be sure that your map is oriented with the north arrow of the compass. Then pivot the compass slowly until the azimuth of 305° lines up with the hair line. Make two marks on the map, one at each end of the compass, remove the compass, and connect the two marks with a line.
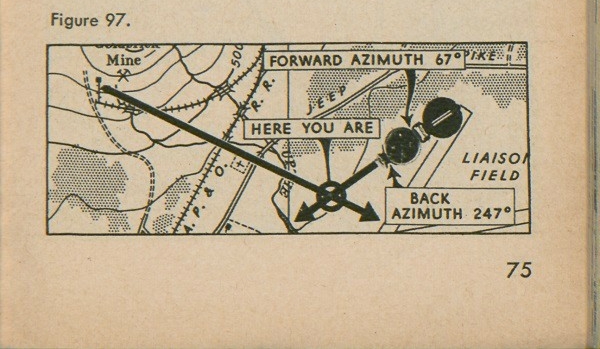
Fifth: This azimuth is a forward azimuth; however, we are back of the house, therefore, we want a back azimuth. To get this a line is carried straight back, as in figure 95. If we put the compass on the line again, we can see that the back azimuth of 305° is 125°.
75
You are somewhere along this line on your map, but you still need to know exactly where.
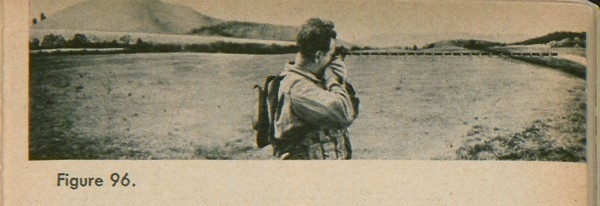
Repeat the procedure with a second point, for example the tip of the left-hand runway of the airfield (fig. 96). A forward azimuth reading shows it to be 67°. Lay the tip of the compass cover at the tip of the runway on your oriented map, line up the hair line with 67°, make your two marks, and draw your line straight back. This line will cross the first line you drew, at your exact location. (See fig. 97.) Notice that the back azimuth is 247°
How to March on an Azimuth
Suppose you are somewhere southeast of Sackville and your platoon leader tells you to go to a certain bridge. He points out the bridge on the map and draws a line on
76
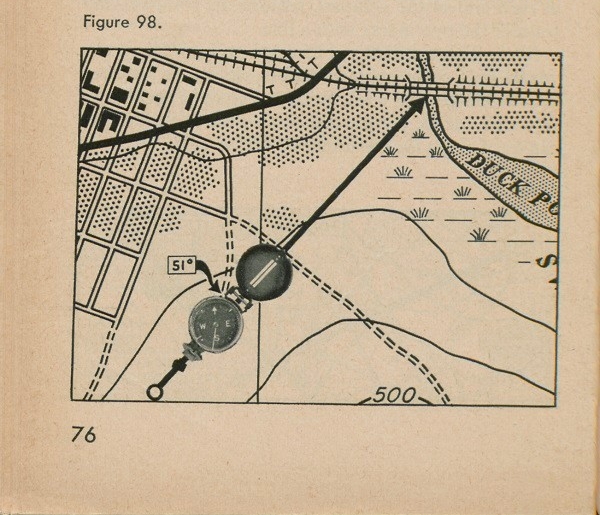
the map from your position to the bridge. By laying your compass on the oriented map you find that the bridge is on an azimuth of 51° from where you are (See fig. 98). Your job is to get to the bridge. That means that you must march along that azimuth.
First you take your compass, sight into it along 51°, and discover that you cannot see the bridge at all from where you are. You know, however, that it is somewhere up there ahead, along that line on which you are sighting. You can see a house right on your line of
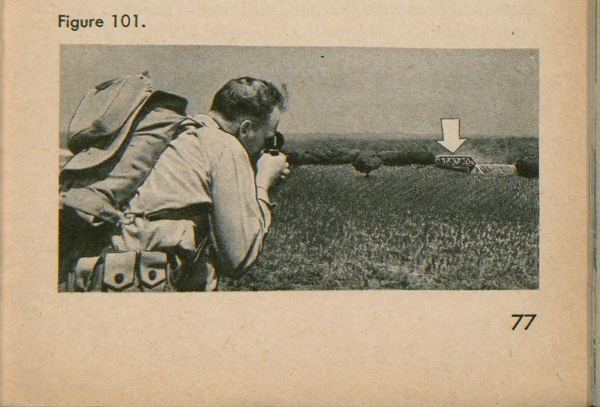
77
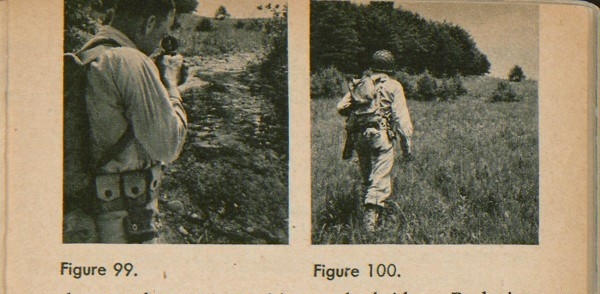
sight, so you walk to the house, go around it, and sight once more on your azimuth. You still can't see the bridge, but you notice that the edge of the woods (fig. 99) is on a line with your sight. So you head for the edge of the woods (fig. 100), and when you get there you find the bridge in front of you (fig. 101).
If it so happened that you could not see the bridge from the edge of the woods, you would do the same thing, picking out a tree, fence, or other object along your line of march, until you finally reach a point where you could see the bridge.
Taking a Back-check
The ground may not be level and straight, so it is wise to expect to find obstacles in the way and for things to go wrong. For example, suppose, after you have taken your first sighting on an azimuth, you run into a pond and you lose your compass. That's not good, but if you had taken a few safety steps, you would still be all right. One of these safety steps is to take a back-check. This would allow you to get back on your original line of march after you had detoured the pond. It works this way.
When you started turning off your course to get around the pond (fig. 102), if you had looked back and noticed that your starting point at A was right in line
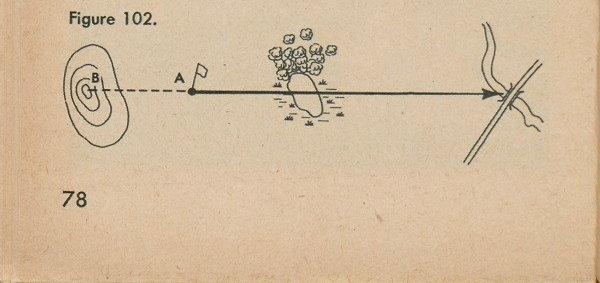
78
with that hill at B, you would be able to come back around the pond to where the starting point and the hill were in line again. You would then be back on your original azimuth. Keeping your starting point and the peak lined up as you went forward would take you to your first aiming point. When you got there you could figure out your original line by taking a back-check and carrying that line forward to choose another aiming point to walk to. You would finally arrive at your bridge even though you had lost your compass. This is a good point to remember.
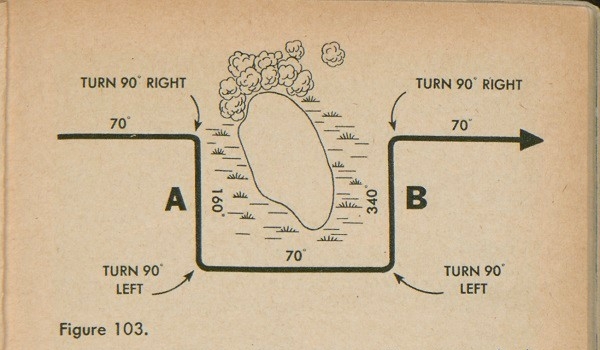
It may not always be possible to take a back-check, especially if it is dark or if an obstacle interferes with your line of vision. If this is the case, it is possible to get back on the original azimuth by marching at right angles four times around the obstacle, as in figure 103, counting the number of paces we take and making sure that we march the same number of paces on lines A and B.
The only problem here is how to march at right angles. We can find this direction with our compass. This is the easiest way. A right angle has 90°, which is
79
¼ of the way around our compass dial, or the distance between any two of the four main directions: N. E. S. and W To go off at 90° from your course, just line up one of these points on your azimuth and follow the mark 90° from it. Figure 103 makes clear your course. If, however, you pave lost your compass as we previously supposed, you must estimate the 90° turns.
Using the Compass at Night
There are a number of lines and dots on the compass which we have not talked about so far because they are used mainly at night.
The lensatic compass has two glass faces, one under the other. The topmost glass face rotates, the under one does not. The top glass rotates with a clicking sound; each click means it has turned 3°. On the top glass are two lines visible at night. One line is about four times as long as the other. These two lines are 45° apart. On the under, or stationary glass face, are three dots and a short line, each 90° from the luminous marks on either side of it, or one-quarter of the way around the face of the dial. On the azimuth dial itself the letters W. E. and S. and the arrow for north are visible at night. On the inside of the cover, lined up with the hair line sight, are two more luminous dots.
We cannot see the numbers on the azimuth circle at night, but these dots and lines are enough to allow us to read the compass.
Setting off Your Azimuth at Night
Before we can start off on an azimuth, the first thing to do is to arrange the compass so that the azimuth can be seen at night. We want to get to the same bridge we
80
81
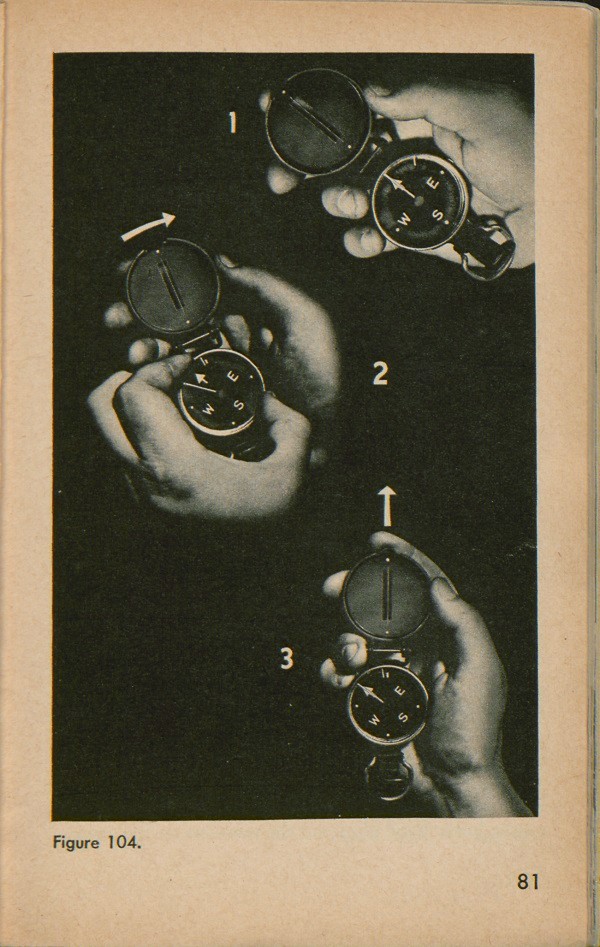
walked to in daylight, on an azimuth of 51°. If it is too dark to read the numbers on the compass dial and we are forbidden to use a light, we prepare the compass in four steps:
First: Face in the general direction in which you are going.
Second: Line up the north arrow and the long line on the revolving face with the short mark on the fixed glass face. The compass should look as it does in figure 104(1).
Third: Hold the movable glass dial still by gripping the knurled brass ring with one hand, and turn the compass under it to the right 17 clicks. Since each click means 3°, that would add up to 51°. The compass would then look as it does in figure 104(2).
Fourth: Turn the whole compass until the north needle lines up with the long line, and there you are, figure 104(3). Your azimuth is the line formed by the two dots on the inside of the cover and the short line on the fixed glass. You follow that line. If you can prepare your compass before it gets dark or if you are allowed to use a light to adjust it, you set your compass as follows:
First: Rotate the whole compass until 51° on the dial is directly under the short luminous line on the lower fixed glass.
Second: Holding the compass in that position, rotate the upper movable glass until the long luminous line is over the north arrow of the dial. Your compass is set on a 51° azimuth. Now all you have to do to march on this azimuth in the darkness is to open the compass and rotate it so the north arrow is directly below the long, luminous line. Follow the line formed by the short line on the lower fixed glass and the two dots on the cover.
82
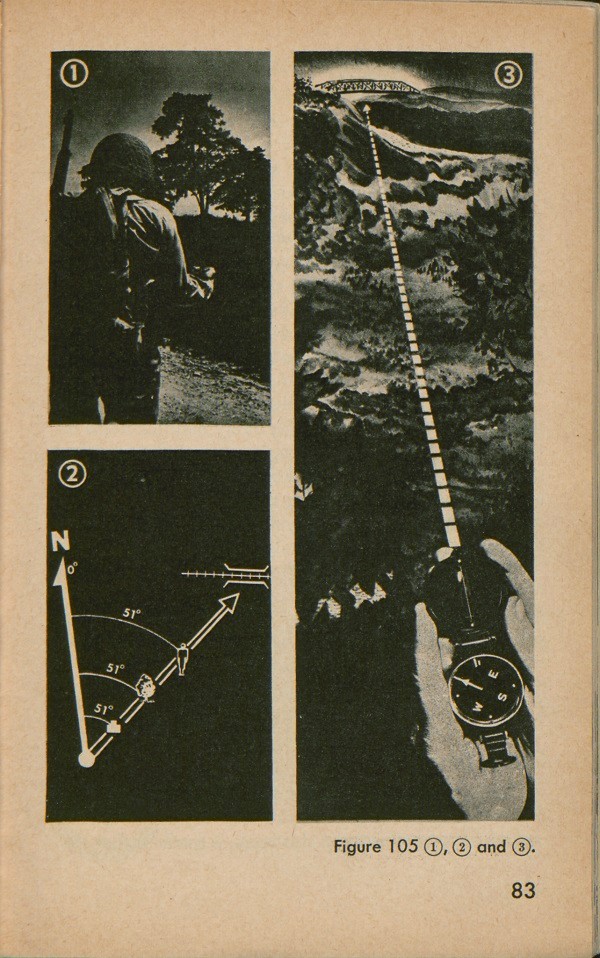
83
Following a Compass Line at Night
To follow an azimuth at night, we must be able to pick up aiming points ahead of us, just as we do in the daytime. At night this is not easy to do. You cannot see very far ahead, and your aiming points, if you see them at all, will be very near to you. You must take readings on many more aiming points at night than in the day. If it is so dark that you cannot find an aiming point, send another man out a little ahead of you. Direct him to move either to the right or left, until he is on your line of sight. Be sure he does not move until you have reached him. Then do the same thing all over again until you can find some aiming point in the area ahead.
Because you must take so many compass readings at night, it is best to lay aside only easily handled items of metal equipment. But when, because of the need for speed or silence, you must take a reading with metallic equipment on you, sling your rifle over your left shoulder and hold the compass in your right hand in front of you and away from such metal items as you can.
Notice the way the compass is held at night (fig. 105 (1)). You do not aim through the eye-piece as you do by day. You simply point the compass in the direction you are going, stand behind the compass, and line yourself up with an aiming point which is on a line with the three luminous pointers on the compass (fig. 105 (3)) Then walk to your aiming point.
Other Compasses
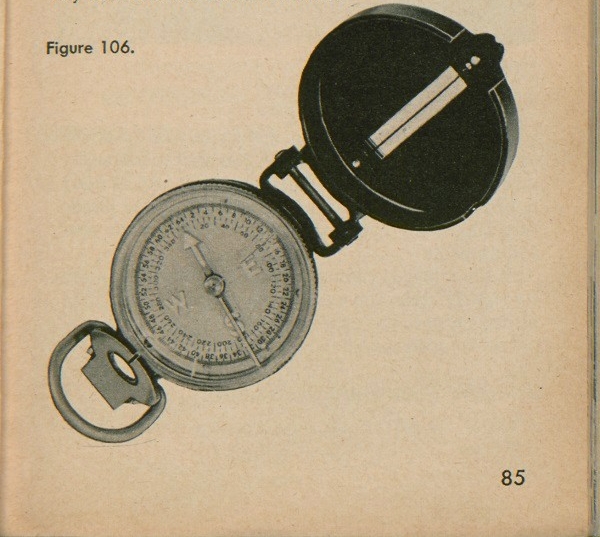
There are other types of compasses used by the Army. A newer lensatic compass, figure 106, very much like the one we have been using in this book, is made so that the
84
azimuths on the dial are visible at night. The other main differences are that the numbers are printed in black instead of white and there is an additional scale on the dial called a mil scale. The mil scale is not used for ordinary compass work.
The wrist compass (fig. 107) is a simple compass which you may often have. It has a fixed arrow on the glass cover and a plastic outer scale which may be rotated. Printed on this outer scale are the four main directions and the divisions for each five degrees from 0° to 360°. The north needle is a straight line. At night you can see the north end of the needle and a dot at the south send, the arrow on the glass, the letters N. E. S. and W, on the plastic ring, and four 45° dots, each halfway between two direction letters.
85
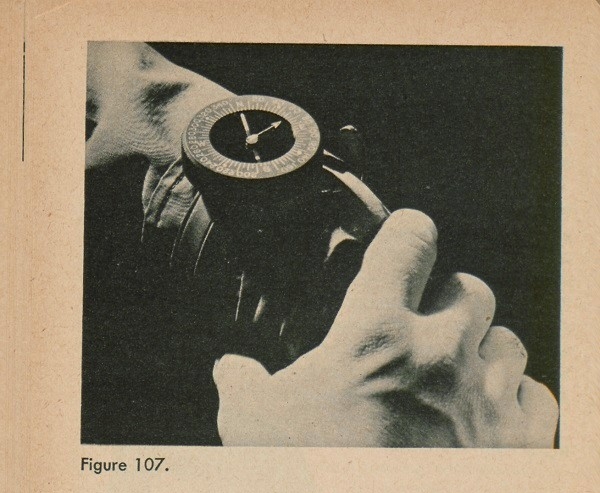
To use the wrist compass in the daytime set the arrow on the glass cover on the azimuth you want to follow, by turning the plastic ring. Then turn your arm or body until the needle is lined up with the N. on the plastic ring (fig. 107), and simply follow the arrow to your aiming point.
At night, if you cannot see enough to read the numbers on the scale, you estimate the degrees between the directions, since there are no clicks on this compass, and use the compass just as you do in the daytime.
Bringing Back the Information
When you are sent out on a reconnaissance or scouting
86
assignment you will find information which must be sent back to your commander. That is your mission. It is necessary, then, to know how to send back this information.
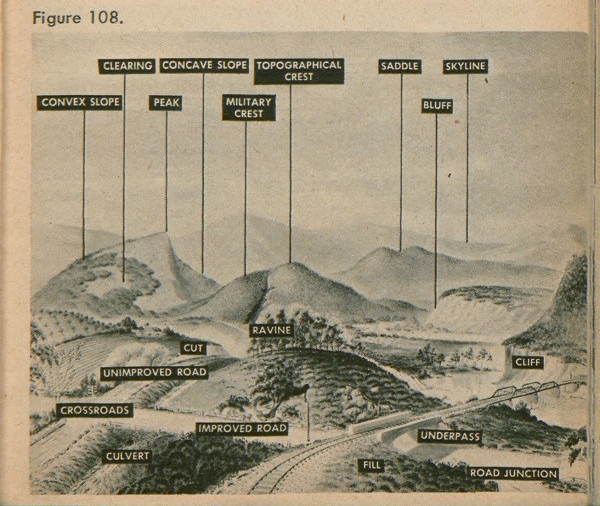
First of all, we must know the names of things on the land. It is not necessary for anyone to know what names things are called by, until he has to tell someone else about them. Then it is very important that he know exactly what the names of land forms are. Figure 108 is a sketch showing the names of various land forms. Learn these names. It is important that you be able to describe things accurately and in the right words so that the men you work with can understand what you mean.
Overlays
An overlay is used to send back information obtained
[85]
88
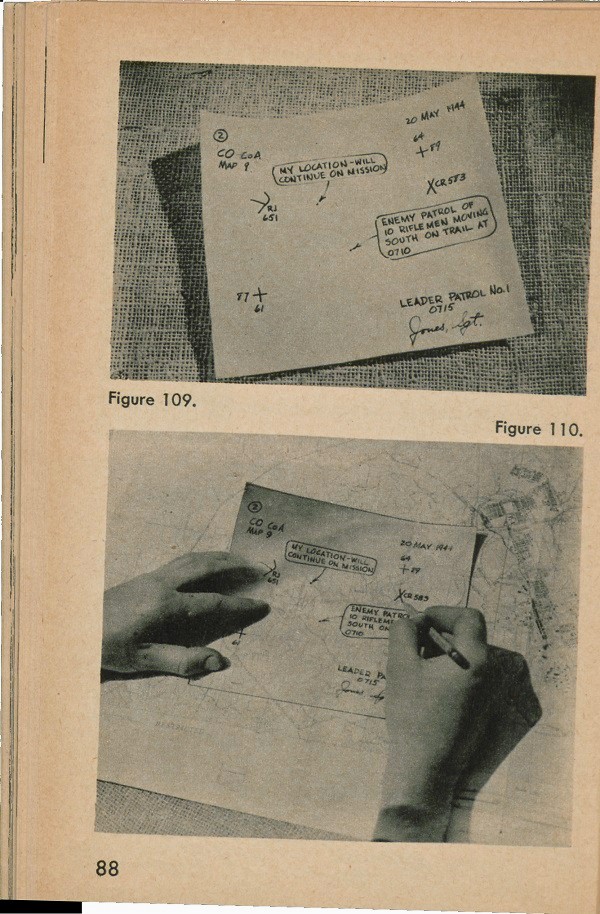
by reconnaissance. An overlay is simply a tracing, on a plain piece of paper, of a section of a map. To make an overlay, lay a piece of paper over the section of the map you are interested in, and draw on it the corners of the grid squares, as in figure 109. These crosses are called register marks and they are put on the overlay to show whoever uses it just where to place. Since there is always a chance that anyone using the overlay would not know where to place it on his map, the register marks should be numbered with the numbers of the grid lines. Once the register marks are on the overlay, you need only to indicate on it, the objects you are concerned with. Write your message right on the overlay, with the usual information that is commonly put on ordinary written messages.
The person who gets the overlay then lays it on his map so that the register marks line up on the grid lines, and is able to use the information received.
89
ON THE ROAD
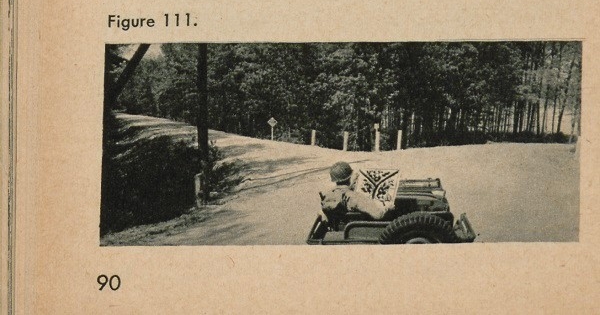
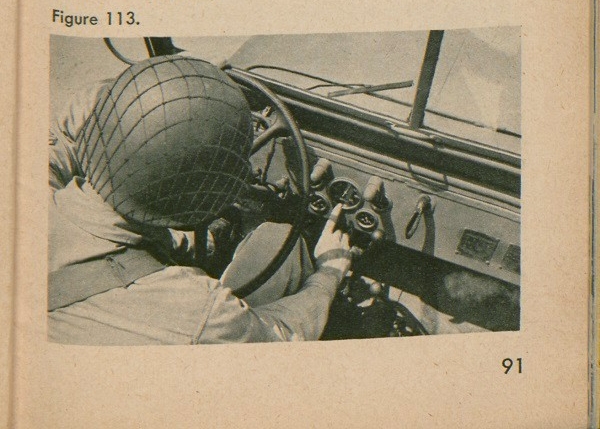
It is very easy to get lost when you drive along a highway, even in the United States where there are all kinds of signs and directions about for the use of the motorist. It is even easier to lose your way in strange country and in wartime. Maps, and compasses are important instruments to keep you on the right road. You must keep your map oriented, preferably by inspection, if you can find the right roads on your map (fig. 111). Besides that, you must check yourself at all times. You must watch your mileage gauge at all important points, and keep a record of it in a notebook or on your map, so that you always know where you are.
The mileage gauge is especially important in a case like figure 112. Here the driver finds two left intersections on the road, a mile apart. His map is out of date and shows just one road. Which one should the driver take? By measuring the distance from his starting point to the junction on his map the driver can find out how
90
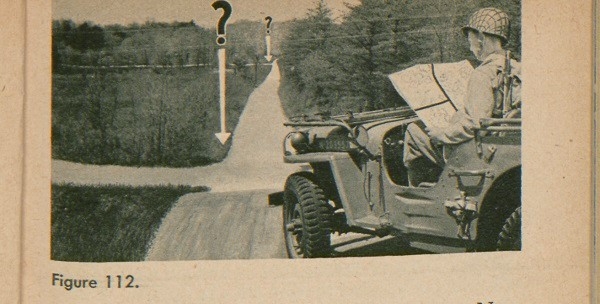
far he should have traveled before taking the turn. Now if he had been careful enough to watch his mileage gauge before he started on his trip he would be able to figure out how far he had come and he would know which of the two roads was the right one. If he had failed to note his mileage gauge, he would not know which road to take.
91
AERIAL PHOTOGRAPHS AND PHOTOMAPS
Maps Made From the Air
The maps you have learned to use are topographic maps, with the ground features drawn to scale. Another kind of map, and one you are likely to see often, is a photomap, made by photographing the ground from an airplane. Your photomap may be a single aerial photo, or several put together to represent a larger area. It will have on its margin various items of information, the most important of which are the arrow indicating magnetic north, and the scale. The photomap may have a grid on it. If it has, you use it as you use the grid on a topographic map.
Photomaps are Up-to-Date
In some ways photomaps are not as easy to use as drawn maps. They do not indicate elevations clearly, because they do not have contour lines. Roads enter a wood, disappear beneath the trees, and reappear going in a different direction. On the other hand, the information on photomaps is more likely to be up-to-date. Probably your photomap was made from pictures taken only a few days ago. If it shows a wood or a road, you know it is there, while a wood shown on a topographic map have been cut down after the map was made, or a new road may have been built.
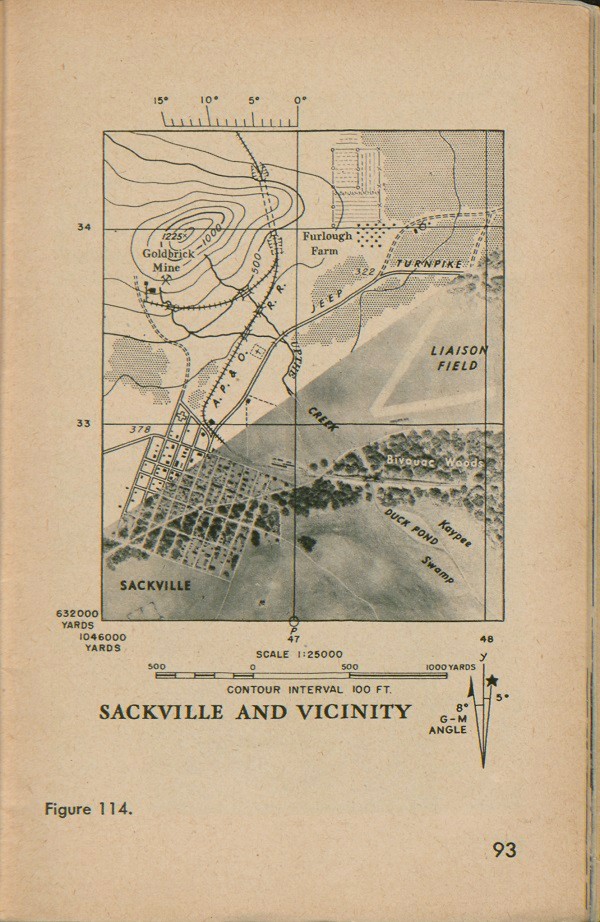
Figure 114 is a map of Sackville, half as a topographic map and half as a photomap. The photomap is at about the smallest scale you are likely to use. Notice the differences between the two kinds of map. By comparing
92
93
the two-maps you can easily follow the roads, the railroad, and the river and you can see how the hilly terrain is shown by the contour lines on the topographic map.
Shadows Must Fall Toward You
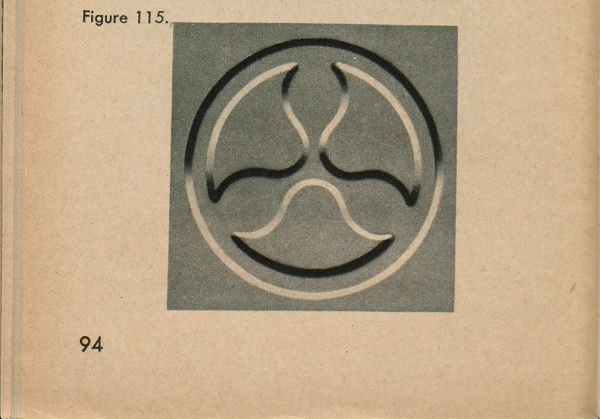
To read a photomap or an aerial photograph, hold the photograph so that the shadows of objects fall toward you. Figure 115 is a picture of a trefoil with heavy shadows. As it appears here, you can see that the object seems to go down into the page. Now look away from the picture, turn the whole book upside down, and look at the picture again. Notice that the trefoil now appears to be coming up out of the page. There is only one correct way to look at an aerial photograph.
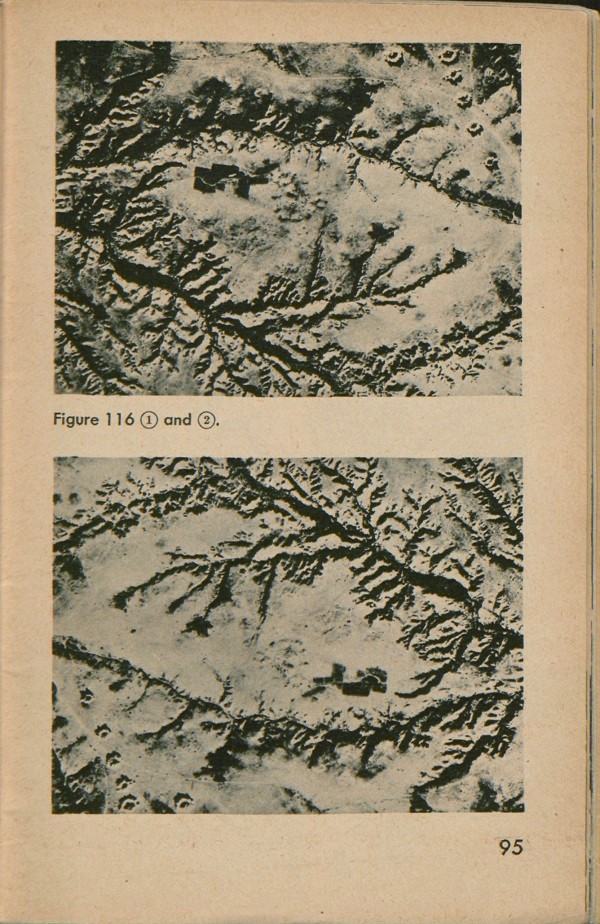
Figure 116 shows what happens when you hold an aerial photograph the right way and the wrong way. In the upper part it is viewed correctly; the shadows fall toward you. You see a barren area near the Mareth
94
95
Line in Tunisia, cut by deep stream lines. The lower portion shows the same area, but now the stream lines have become ridges. The earth heaped up by exploding bombs (upper right-hand corner) has sunk below ground level and you see deep holes (lower left).
Aids in Reading Photomaps
One of the qualities which help you identify things on a photomap is tone. This means shades of gray formed by comparative roughness or smoothness of surfaces. Rough surfaces, such as woods and brush, look dark.
Tall grass looks darker than close-clipped grass. Smooth surfaces, such as concrete roads, look light.
Color has some effect too. Thus, a roof painted' white or some light color looks light, while a black or dark colored roof may look dark, though both roofs may be smooth. Things that look dark or light to your eye look pretty much the same to the camera.
The shape of an object helps tell you what it is. A
96
wood is irregular in shape, an orchard is regular, though both have trees. Roads and railroads both are long and narrow, but roads curve more sharply than railroads and have other roads joining them at right angles, something you never would see on a railroad.
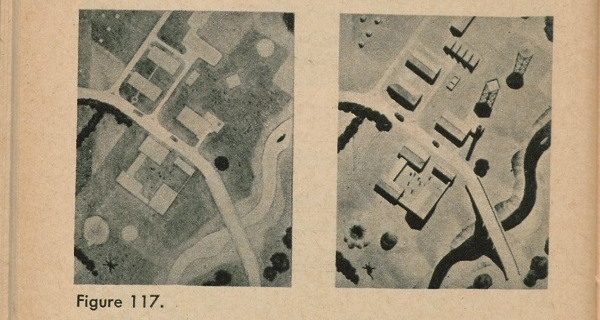
The shadow of an object usually is a helpful telltale. Looking straight down from a plane the camera makes the top of a silo and the top of a water tower look alike; but the silo's shadow is a solid patch running away from its base, while the tank's shadow is a smaller dark patch some distance away, perhaps with the shadows of its supports also showing.
Shadow may tell you how high an object is, if there is another shadow of a familiar object nearby. If you compare the length of a steeple's shadow with that of a telephone
[97]
pole you have some idea how high the steeple is.
Shadows are especially useful for information purposes because an object may be camouflaged without hiding its shadow. Figure 117 illustrates how much can be learned from the shadows of objects.
Often you can identify an object by its relative size, for instance, a chicken house from a barn, or an irrigation ditch from a canal. The width of a road may be judged by comparing it with the width of vehicles on it.
Sometimes the relation of an object to nearby things gives you a clue to what they are. A large building with a baseball diamond near it is likely to be a school. A similar building with railroad tracks running close by it is more likely to be factory or warehouse.
Other objects may be recognized by their appearance on photomaps. Any light patch in a darker area may be fresh-turned earth, a plowed space, or a foxhole (that is why you conceal the fresh earth of your foxhole).
A small cluster of buildings may be a farm or a small village. If the buildings are of fairly uniform size and lie on both sides of a road probably it is a village. If they are mixed sizes, and most of them on one side of the road, it is likely to be a farm.
A hedge may look like a brush-grown fence, but it will have a more uniform width from being trimmed.
Military objects and activities in an area are noticeable in aerial photographs, both because of the shape and layout of the objects and because of their tracks.
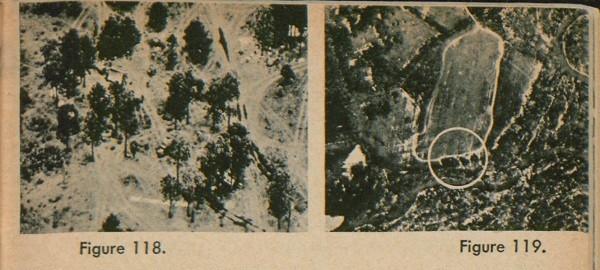
For example, in figure 118, the mess made by an army unit in bivouac is very noticeable. One look at this photograph and you can tell what is here. Field Artillery guns are often in groups of four. When four track patterns are made in an area likely to hold artillery, the
98
marks are visible on an aerial photograph (fig. 119).
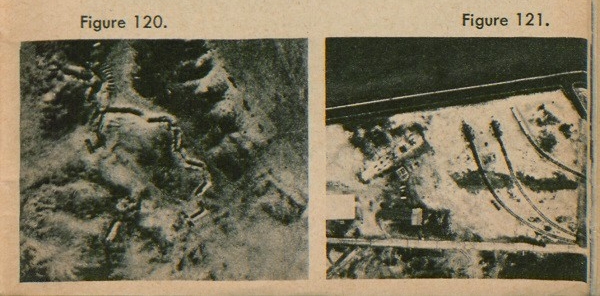
Figure 120 shows what trenches look like in an aerial photograph, while figure 121 shows clearly a battery of railroad artillery.
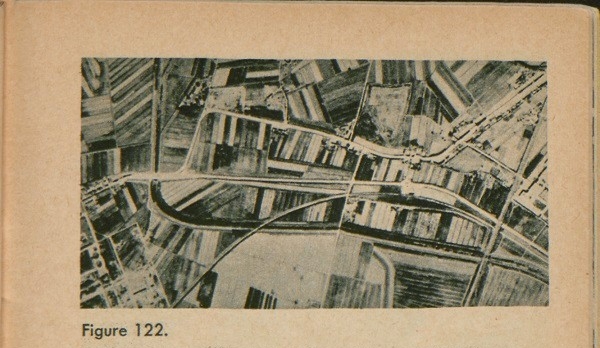
Growing crops appear in roughly rectangular patches of different shades of light and dark, with the edges sharply marked. Figure 122 is such an area, the kind you often find in European countryside.
99
100
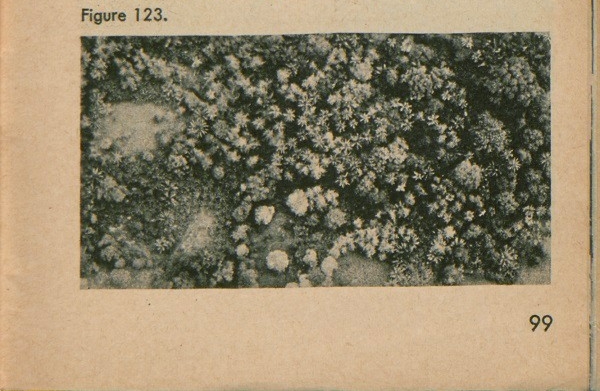
Different kinds of trees and woods can be detected in an aerial photograph. Figure 123, for example, is an aerial view of jungle terrain.
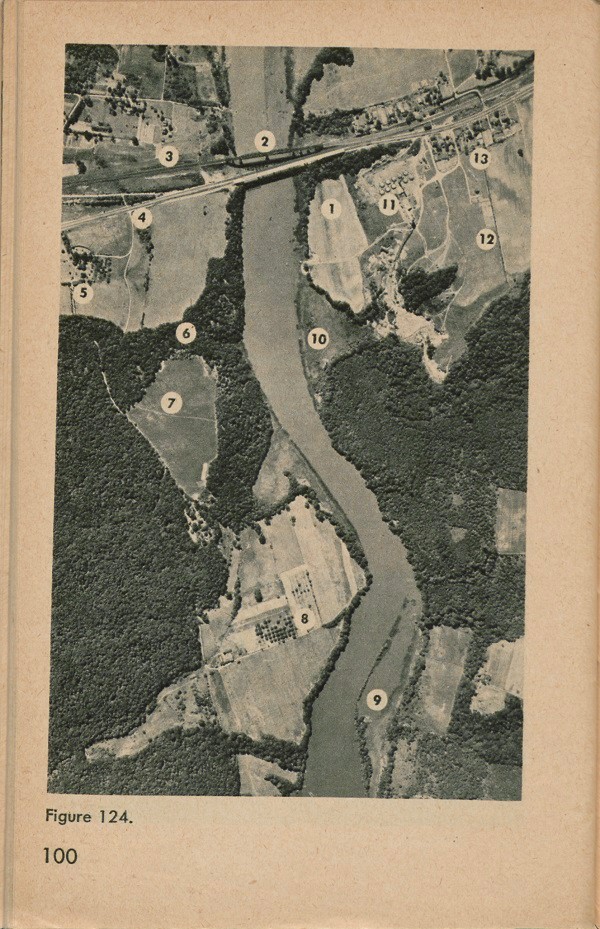
Figure 124 shows a number of objects and forms in an aerial photograph. These are identified as follows:
No. 1 is a plowed field.
No. 2 is a bridge. There is another bridge just below it. Note the shadow of its spans on the water.
No. 3 is a railroad.
No. 4 is at the crossing of a large highway and a country road. Roads are usually light-toned and even in width.
No. 5 is a building. It is hard to see without a magnifying glass, but you can see its shadow.
No. 6 is a neck of woods, bordering on a meadow. The denser the woods, the darker it appears.
No. 7 is a footpath crossing the meadow. You can tell it from a road, because it is so much narrower than the light-colored lines which are roads.
No. 8 is an orchard, with evenly spaced trees.
No. 9 is a mud flat. Usually a mud flat is darker than the water, and has light spots caused by pools of standing water.
No. 10 is a small stream, identified by its meandering course. When a small stream flows through a wood, you can tell it is there, even though you cannot see it, by the wavy line of heavier vegetation along it.
No. 11 is a brick factory. The spoked round buildings are kilns.
No. 12 is a fence line. Usually the texture of the ground on two sides of a fence is different, so one side is lighter than the other. Also, a fence line is darker than the space around it, because brush grows close to it.
No. 13 plainly is a village. You can see several of its streets, which make squares.
Grid coordinates
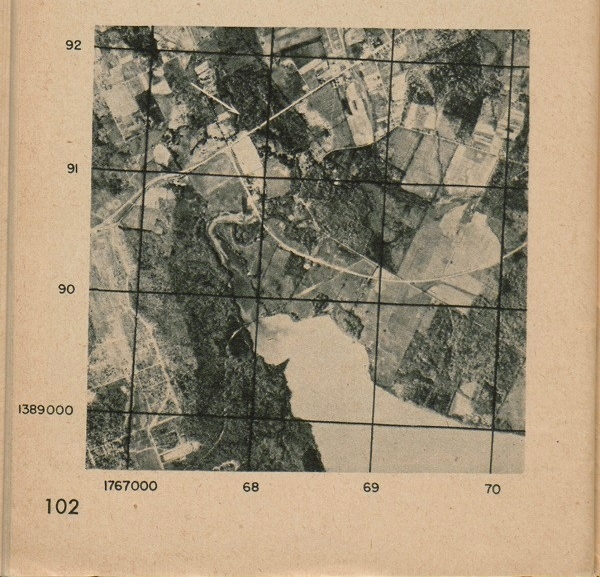
Your photomap usually will have a grid like the one you have learned to use on a topographic map (fig. 125); but sometimes you may be given an aerial photo
101
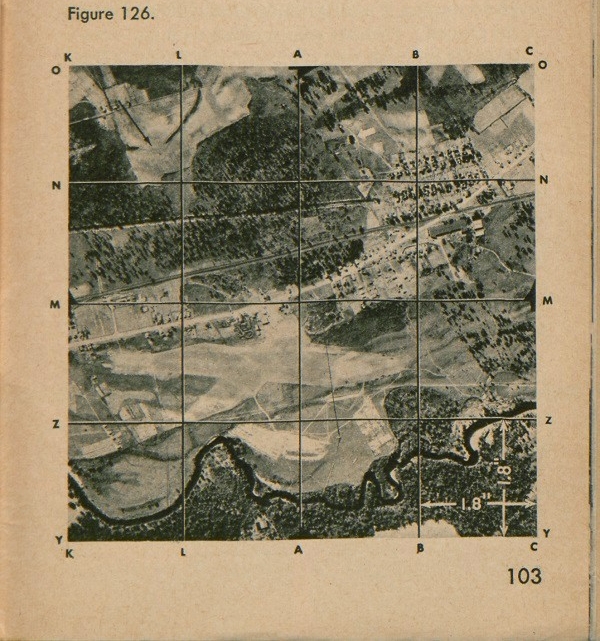
with a grid like the one shown in figure 126. These grid lines are always 1.8 inches apart, no matter what the scale of the map. The grid lines in fig. 126, however, are not 1.8" apart, because we had to reduce the size of the map to get it in this manual. Here you see the grid lines identified by letters instead of by numerals. The first step in locating a point on this grid is to give the letter of the vertical and then the horizontal line crossing at the lower left corner of the square in which the object lies. Then, by eye, divide the sides of the square into tenths. Now, just as you learned before, count right
102
on the bottom line of the square the number of tenths the point is from the left grid line of the square, and then up the number of tenths it is above the bottom grid line of the square. Notice that the north arrow in photomaps does not always point to the top of the map.
For example, there is a large building in square AN. It is about four tenths right from line A and about four tenths up from line N. The coordinates of the building, therefore, are AN44, without either decimal or dash.
This type grid is only for locating points. Since lines
103
are not spaced at fixed ground distances apart, you cannot use them to scale distance as you can those on topographic maps.
To Orient an Aerial Photograph
If you have a topographic map of the same area, turn your photograph until roads and other features on it lie exactly parallel to those on the map; then draw a north arrow exactly parallel to the one on the map.
If you have no topographic map, orient your photograph by turning it until its roads parallel those shown on the ground. Then lay your compass on it and draw a line in the direction your compass needle points when the dial is at rest. That gives your magnetic north line.
A rough-and-ready way to orient your aerial photograph is by its shadows. In the North Temperate Zone, shadows fall true north at noon, northwest in the morning, and northeast in the afternoon. If the note in the photograph's margin tells you the photograph was taken between 1000 and 1200 hours, orient the map by pointing the shadows a little west of north. If made between 1200 and 1400 hours, point them a little east of north. If the photo time was earlier than 1000 or later than 1400 hours, point its shadows a little more west or east of north.
If you are south of the equator, simply reverse the above directions.
You learn the time the area was photographed by reading the information in the top margin. You'll see, among other things, something like this: 12:28:1330. That means the ground was photographed at 1330 hours on December 28. The hour figure -1330- is the one you I use in orienting your aerial photograph by its shadows.
104
THE ARMY ON THE MAP
When the army moves onto the land, it also moves onto the map of that land. There are symbols on a map for the activities of the army, and these signs make sense, just as the ordinary signs on a map make sense. In this chapter are a number-but not all-of the more important military symbols. In FM 21-30 you will find more information on this subject.
Kind of Unit
The symbols for different kinds of army units are not only very simple, but they are connected with the nature of the military activity itself. You will notice this by comparing the photographs with the symbol which illustrate the unit or activity.
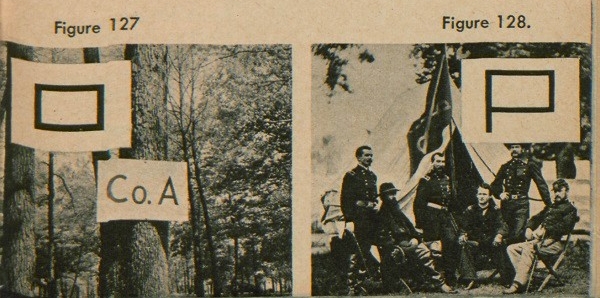
The basic symbol for an army unit is a rectangle (fig. 127). We put a little staff on the rectangle (fig. 128) and make a flag out of it; that means a command post or headquarters. The flag represents the unit commander's flag, which always used to be at his headquarters tent.
[105]
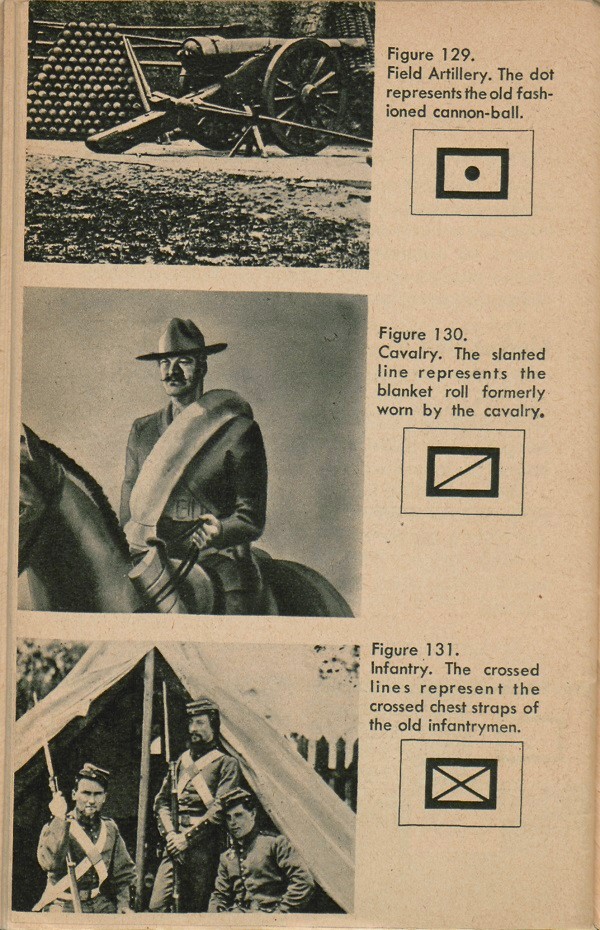
[106]
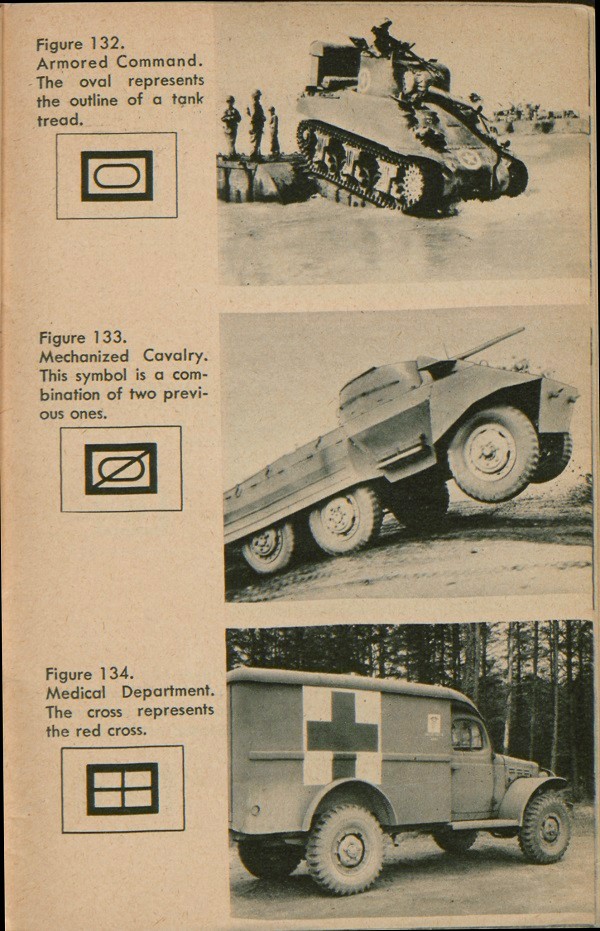
[107]
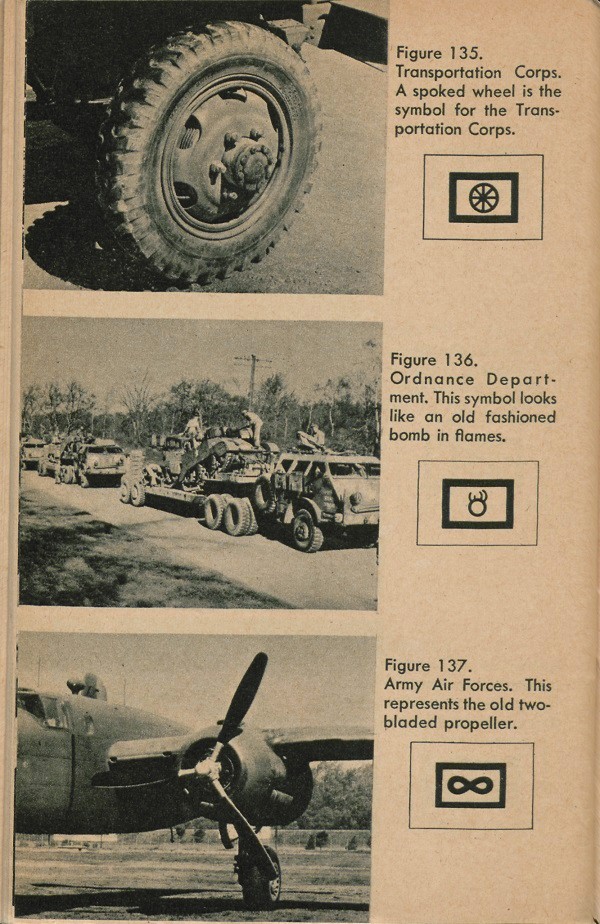
[108]
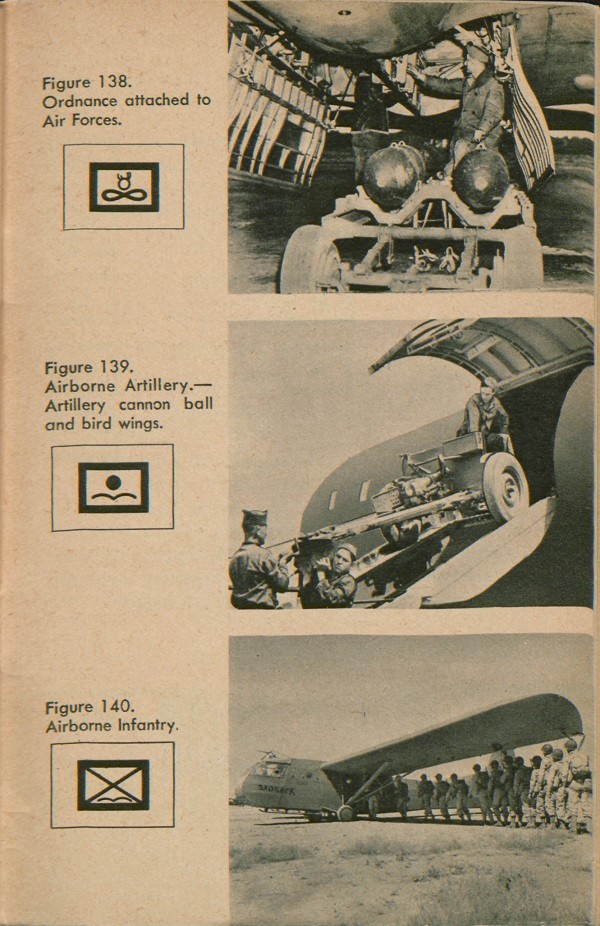
[109]
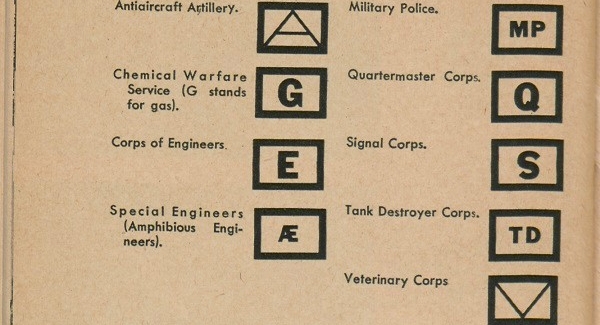
Some arms are shown simply by abbreviations, as in the following list:
Size of Unit
The size of a unit is also shown by little signs. A squad is shown by a single dot (fig. 141), a section by two dots, and a platoon by three. A company is shown by a single line (fig. l42). The following list shows you these signs, in order, as the unit gets bigger:
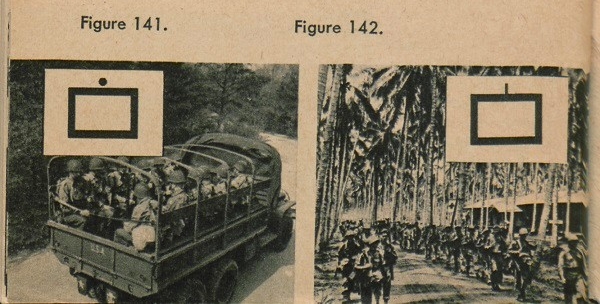
[110]
Squad ..........................................................................................•
Section .......................................................................................••
Platoon .....................................................................................•••
Company, troop, battery, or flight ...........................................I
Battalion or squadron ...............................................................II
Group, regiment, or combat team ..........................................III
Brigade, combat command, or wing (the "X" is just like the one star on the brigadier general who commands such a unit) .............................................................................................X
Division, or command of an Air Force (two "X' s," like the two stars on a major general, who commands a division) ......................................................................................XX
Corps or Air Force (three-star general) ..................................XXX
Army (for a four-star general) ................................................XXXX
Using the Unit Signs
We combine these signs, a rectangle, and numbers and abbreviations to show exactly what unit we mean. For example:

This is a troop unit.
This makes it Infantry.
This makes it a battalion of Infantry-
This makes it a battalion of airborne Infantry.
This makes it a parachute battalion of airborne Infantry.
This tells what battalion of parachute Infantry it is-the 3rd Bn. of the 502nd Infantry.
111
Other Symbols
Following are some of the more common symbols which stand for kinds of military activity.
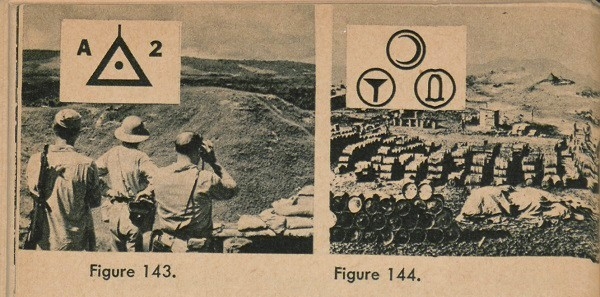
An observation post is simply a triangle, and we indicate whose observation post it is by the same marks as we use with the rectangle. For example, the sign for the observation post of A battery of the 2d Artillery Battalion is shown in figure 143. Supply points are indicated by circles (fig. 144). Inside the circles, other symbols show what kind of supplies are there. For example, in figure 144, the crescent-moon means food, because food is usually brought up during the night for the next day; the oil funnel stands for gasoline and oil; and the shell stands for ammunition.
[112]
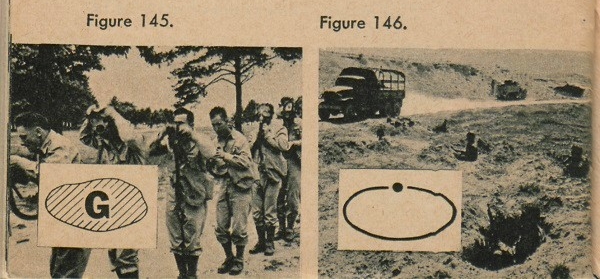
Figure 145 shows the symbol for gassed areas. To show a unit defense area, we draw a line around it with the sign for whatever unit it is. For example, a squad defense area is shown as a line with the squad symbol in it (fig. 146).
Following is a selected list of other military symbols:
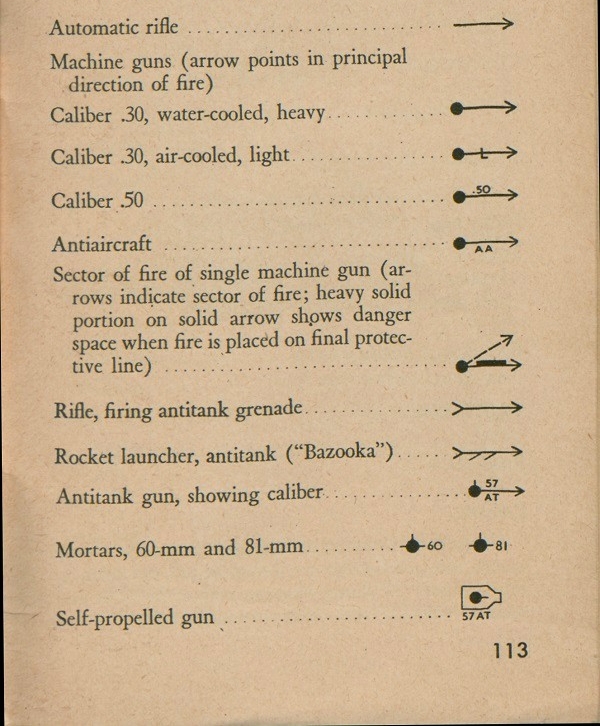
Automatic rifle
Machine guns (arrow points in principal direction of fire)
Caliber .30, water-cooled, heavy
Caliber .30, air-cooled, light
Caliber .50
Antiaircraft
Sector of fire of single machine gun (arrows indicate sector of fire; heavy solid portion on solid arrow shows danger space when fire is placed on final protective line)
Rifle, firing antitank grenade
Rocket launcher, antitank ("Bazooka")
Antitank gun, showing caliber
Mortars, 60-mm and 81-mm
Self-propelled gun
113
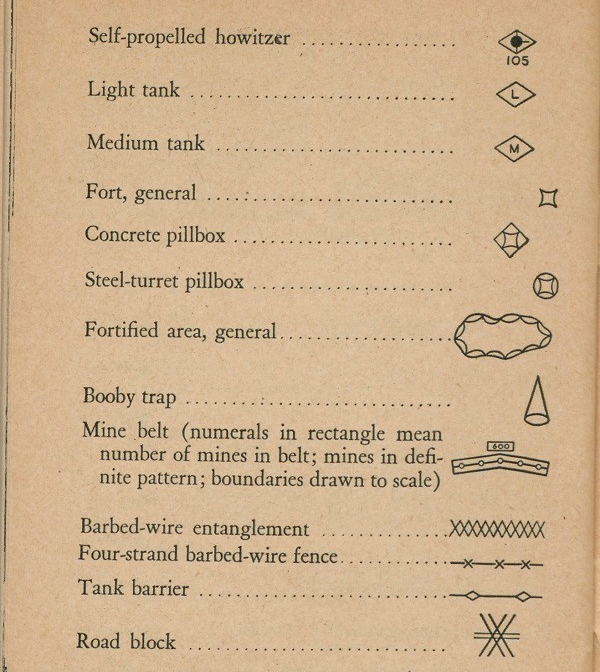
Self-propelled howitzer
Light tank
Medium tank
Fort, general
Concrete pillbox
Steel-turret pillbox
Fortified area, general
Bobby trap
Mines belt (numerals in Rectangle mean number of mine in belt; mines m definite pattern; boundaries drawn to scale)
Barbed-wire entanglement
Four-strand barbed-wire fence
Tank barrier
Road block
Colors
On military situation or operation maps, the enemy troops and installations are shown in red, our own, in blue. Figure 147 shows what our map of Sackville and vicinity looks like with military symbols on it.
114
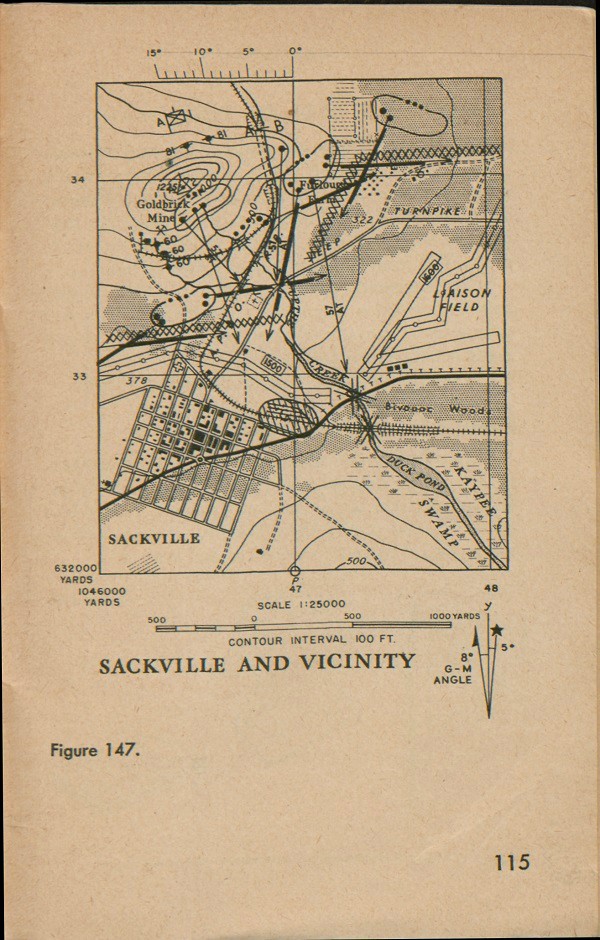
115
TAKING CARE OF YOUR MAP
In the field your map is as important as your weapons. Take as good care of it. Fold it small enough to slip into your shirt to protect it from rain. Figure 148 shows you how to fold it with face outward. Folded this way, you can read parts of it without unfolding the whole map. The accordion fold makes it easy to use.
When you mark your map mark it lightly. It may have to last you a long while. Many marks on it will confuse you. Erasures of heavy lines will smear it and make it difficult to read.
Try to avoid soiling it with mud or other matter.
Keep It From the Enemy
Keep your map out of the enemy's hands. Any marks on it may give him valuable information. If in danger of capture, burn it. If you can't burn it, tear it into small bits and scatter them widely. If you can't do either, fold it as small as possible and bury it.

116
[END]
