The Navy Department Library
U.S.S. San Francisco (CA-38)
Gunfire Damage - Battle of Guadalcanal 13 November, 1942
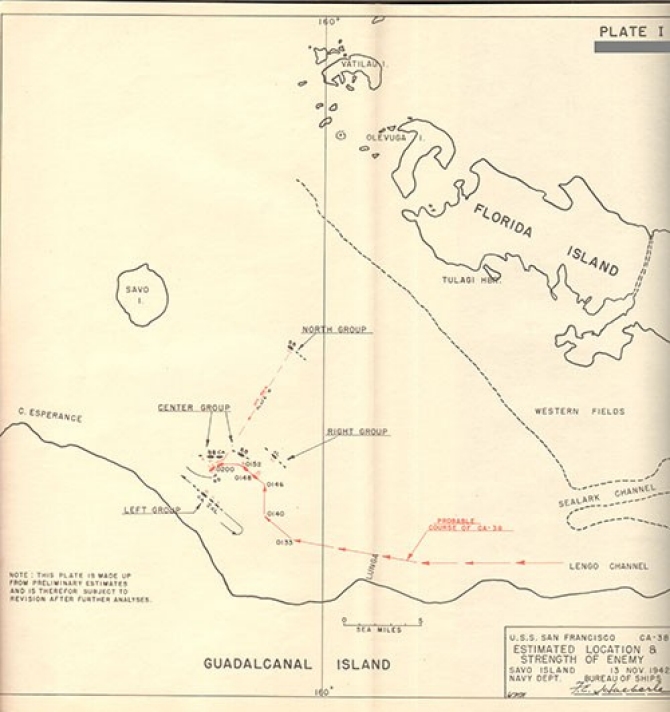
NAVSHIPS 26 (424)
CONFIDENTIAL
U.S.S. San Francisco
(CA38)
Gunfire Damage
Battle of Guadalcanal
13 November, 1942
(CA38)
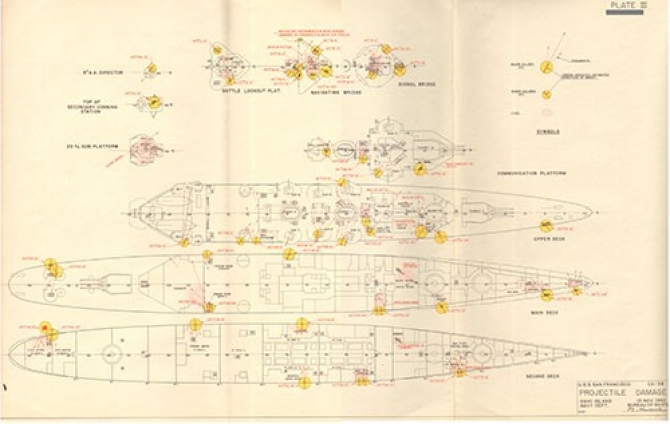
Gunfire Damage
Battle of Guadalcanal
13 November, 1942
The Commander-in-Chief, United States Fleet and Chief of Naval Operations directs that this report be shown only to those persons to whom the report would be of value in the performance of their duties.
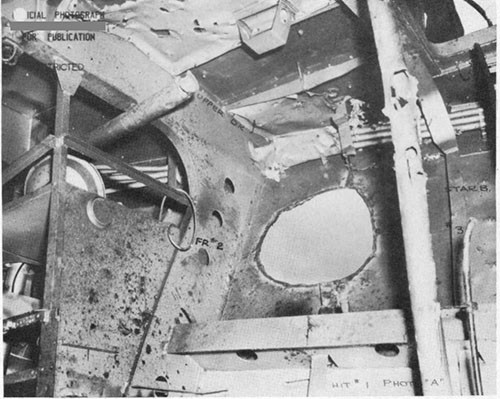
Steps shall be taken accordingly to insure that the report will be seen by those persons responsible for design, construction and repair of naval vessels, as well as for their operation, but by no others.
Preliminary Design Section
Bureau of Ships
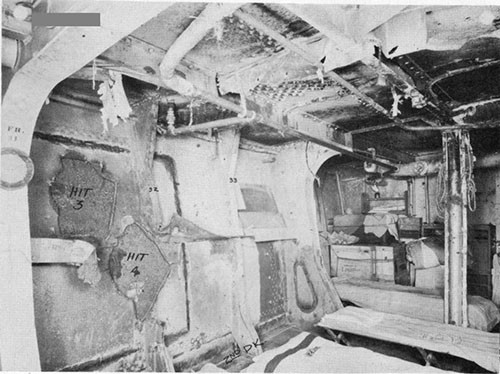
Navy Department
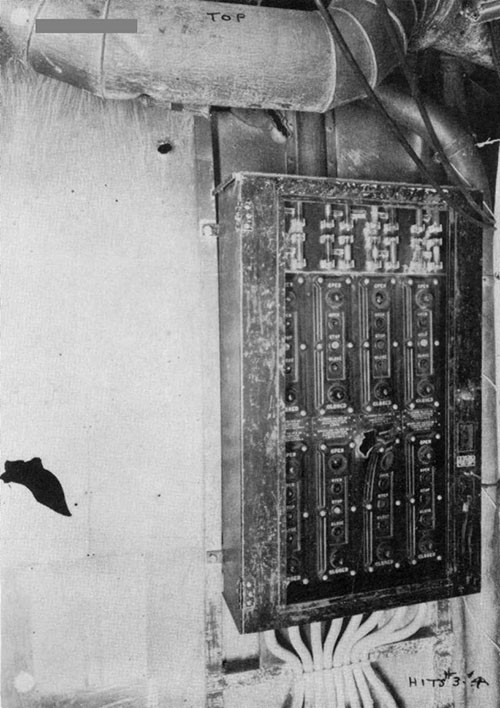
20 March, 1942
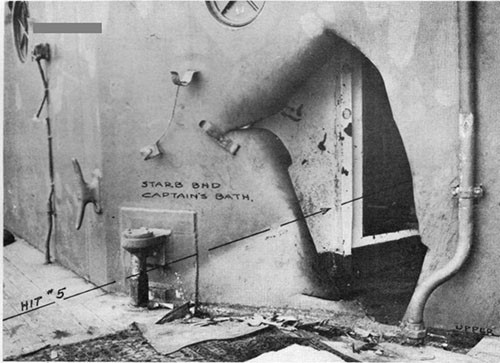
GUNFIRE DAMAGE
November 12-13, 1942
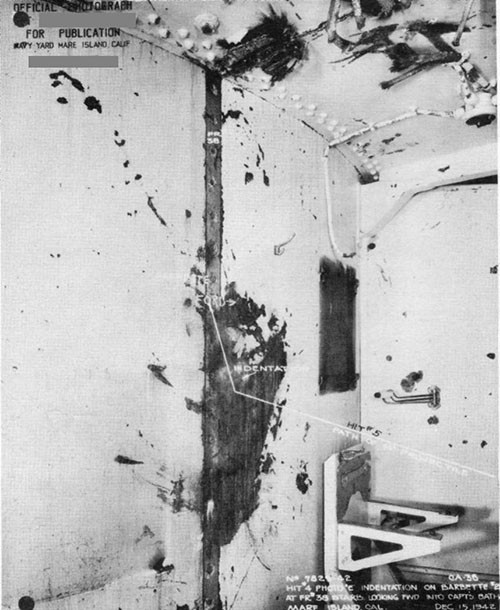
| Class | Heavy Cruiser, CA38 | Length (W.L.) | 578' |
| Launched | March, 1933 | Beam (W.L.) | 61' |
| Displacement (Standard) | 10,000 tons | Mean Draft (std. displ.) | 19' 5" |
References:
(a) Comdt. M.I. ltr. CA38/A16(27-D3-576530) dated December 22, 1942.
(b) Com. 14 conf. ltr. to VCNO, C-S78/ND14, Serial 03569 of 21 December 1942.
(c) Comdt. M.I. ltr. L11-1 (conf.); CL47/L11-1(E3-4) dated February 8, 1943.
(d) Discussion with engineering officer of CA38.
| Section | Page | |
| I | Narrative | 1 |
| II | Summary of Damage | 3 |
| III | Structural Damage: | |
| Part I - Plane Crash | 5 | |
| Part II - Gunfire (by hits) | 5 | |
| IV | Electrical Damage | 17 |
| V | Discussion | 19 |
| Plate | |
| I | Estimated Location and Strength of Enemy |
| II | Outboard Profile Showing Hits |
| III | Deck Plans Showing Hits and Locations of Fires |
| Photo No. | |
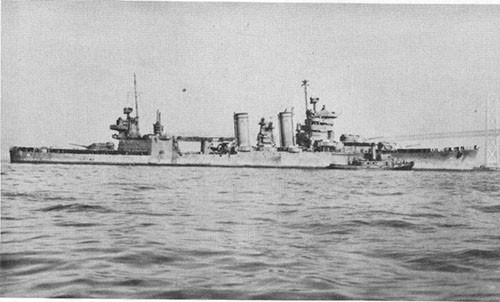
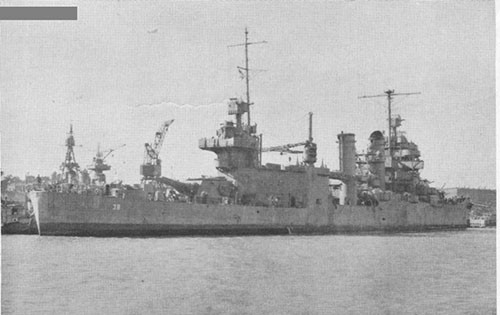
| 1. | SAN FRANCISCO on arrival in the United States for repairs. |
| 2. | View from starboard quarter showing damage from plane crash. |
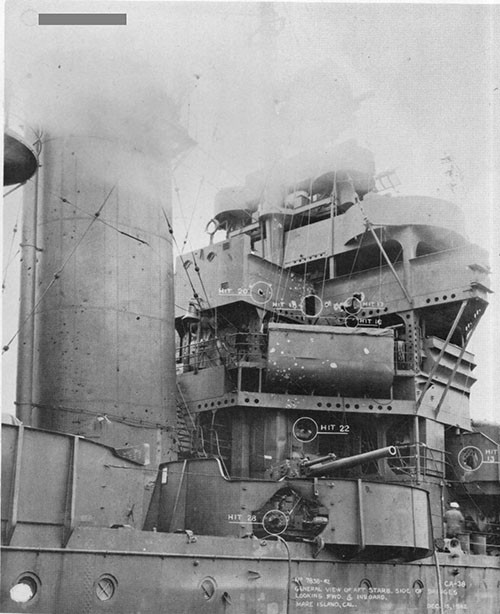
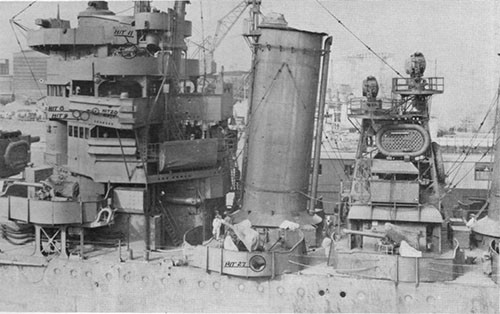
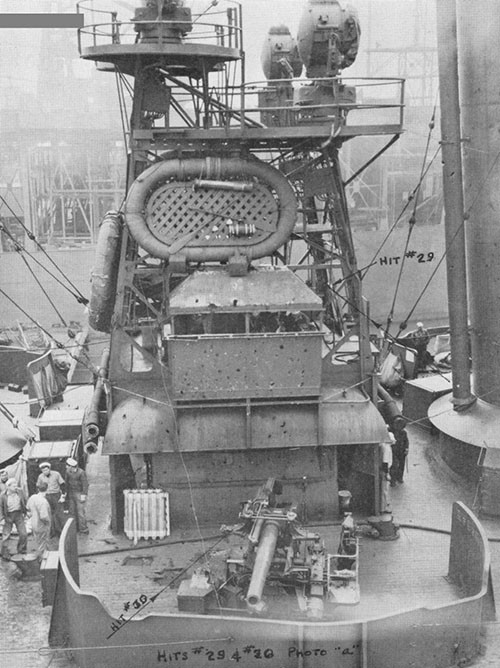
| 3. | Forward superstructure from starboard side. Note hit on 5" gun No. 3 in foreground and fragment damage to the stack. |
| 4. | Port side of forward superstructure. |
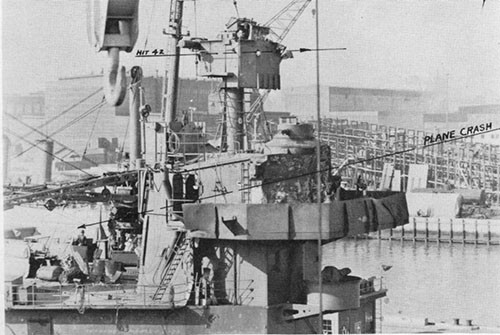
| 5. | Superstructure aft showing location of plane crash and damage from Hit No. 42 on 5" director. |
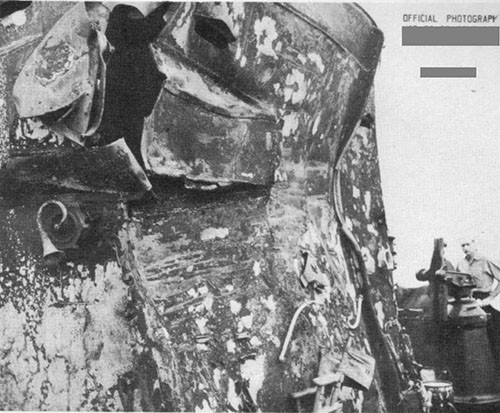
| 6. | Close-up of damage to after 8" director housing. |
| 7. | Hit No. 1 (5.5") looking outboard and to starboard. |
| 8. | Hits No. 3 (6") and No. 4 (6") looking outboard and aft at starboard shell. |
| 9. | Fragment damage to flooding panel which caused flooding of turret II magazines. |
| 10. | Hit No. 5 showing point of entry of 14" shell into Captain's bath. |
| 11. | Turret II barbette at point where 14" shell (Hit No. 5) struck it showing approximate path of projectile. |
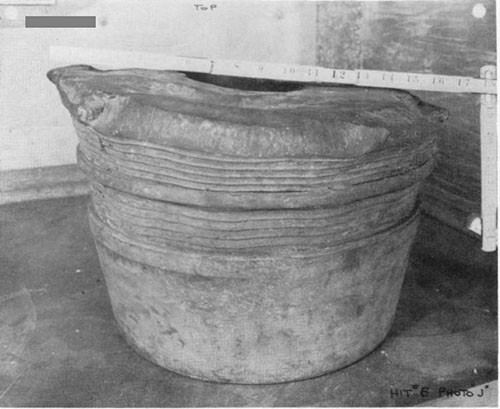
| 12. | Turret II barbette showing point of impact of 14" projectile (Hit No. 6). This dent is approximately 1-1/2" deep in 5" S.T.S. |
| 13. | Base of projectile recovered in armory (Hit No. 6). This fragment measures about 12-1/2" across the base, and was apparently mushroomed by impact with a barbette (Photo No. 12). |
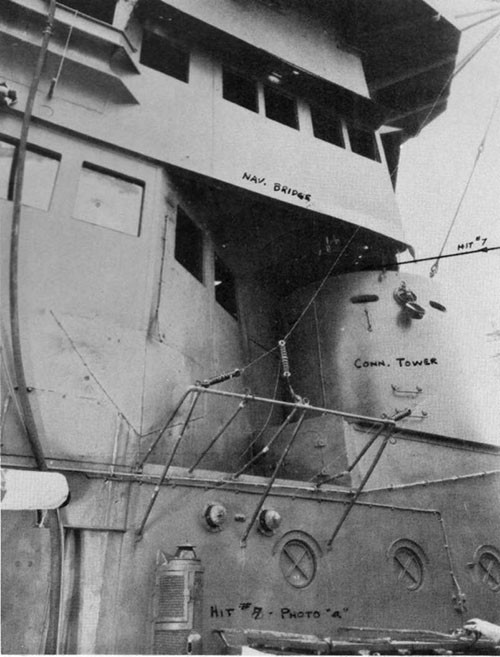
| 14. | Conning tower showing location of hit No. 7 (8"). |
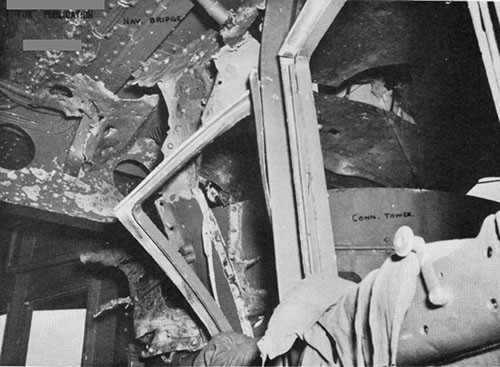
| 15. | Close-up of damage from Hit No. 7. |
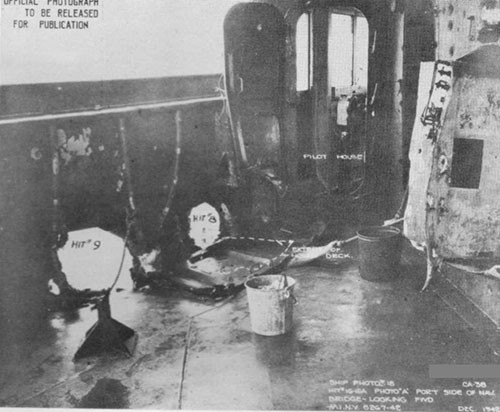
| 16. | Hits No. 8 (5") and No. 9 (5") on the port side of the navigating bridge. Hit No. 9 extends about 1-1/2 Ft. below the deck level. |
| 17. | Port side of signal bridge looking inboard and aft and showing fragment damage from Hit No. 9. |
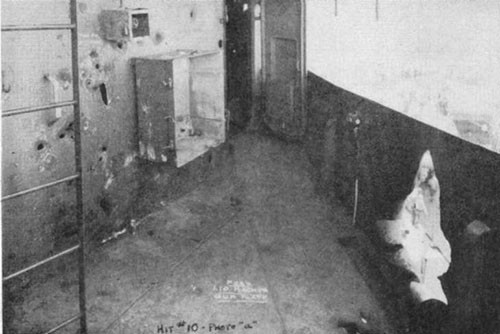
| 18. | Hit No. 10 (6") showing hole in 20 1b. S.T.S. splinter shield and splinter holes in starboard (10 lb. S.T.S.) bulkhead of 1.1 clipping room. |
| 19. | Hit No. 11 (5") on port 1.1 gun looking outboard. This mount was apparently trained forward at the time of the hit. |
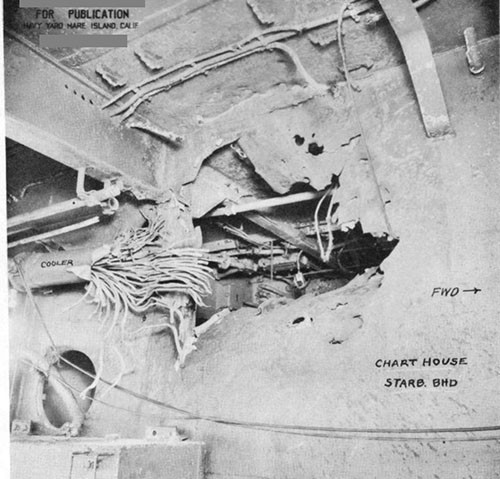
| 20. | Hit No. 12 (5-1/2") looking inboard at the starboard bulkhead of the chart house and showing damage to the circulating water cooler for the starboard 1.1 mount. |
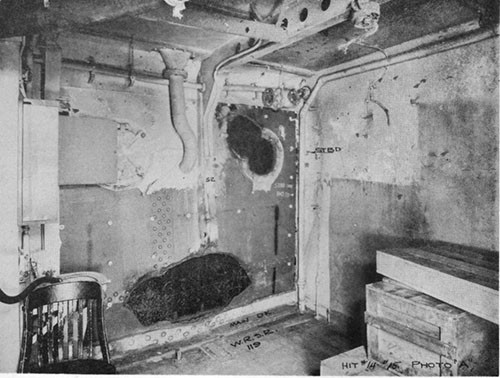
| 21. | Hits No. 14 (6") and No 15 (5.5") looking outboard at starboard shell. |
| 22. | Fragment damage from Hits No. 14 and No. 15. |
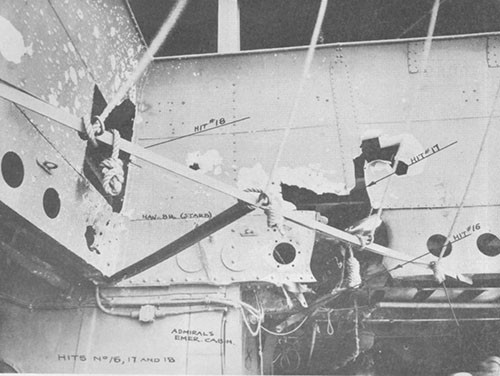
| 23. | After end of nav. bridge showing Hits 16 (6"), 17 (6") and 18 (5"). |
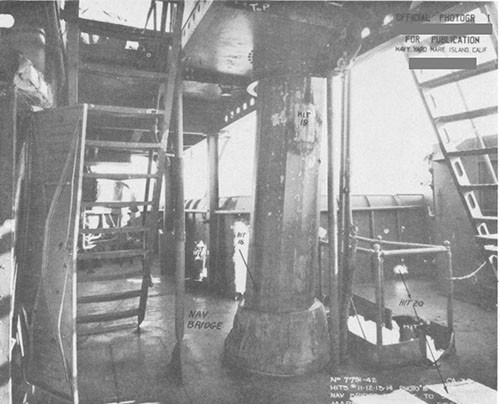
| 24. | After end of nav. bridge looking to starboard and showing Hits 17, 18, 19 (5"), and 20 (5"). Hit No. 19 apparently exploded after passing through the mast, and Hit No. 20 apparently passed on out the port wing of the bridge without exploding (see Photo No. 4). |
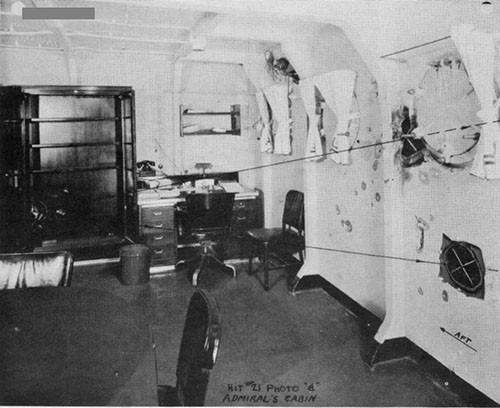
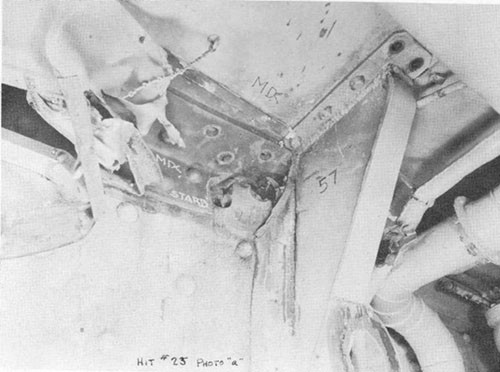
| 25. | Admiral's cabin looking aft and showing path of Hit No. 21 (5"). Note single entry point and two exit holes with minor fragment damage. |
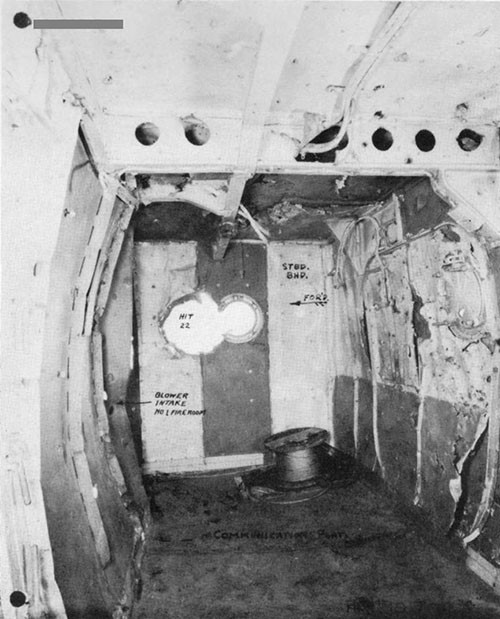
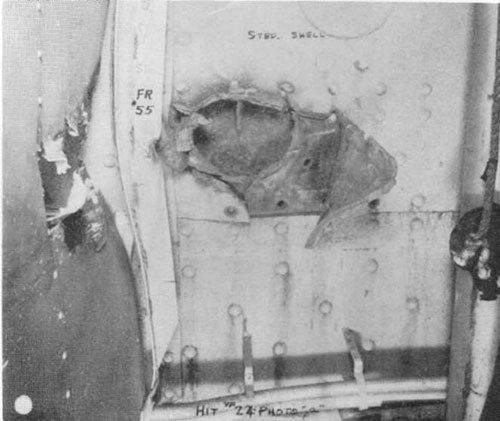
| 26. | Hit No. 22 (6") showing damage inside the Captain's office. |
| 27. | Hit No. 23 (6") on starboard side of galley. |
| 28. | Hit No. 24 (6") showing hole through two thicknesses of 35 lb. S.T.S. |
| 29. | Hit No. 25 (6") showing hole through two thicknesses of 35 lb. S.T.S. |
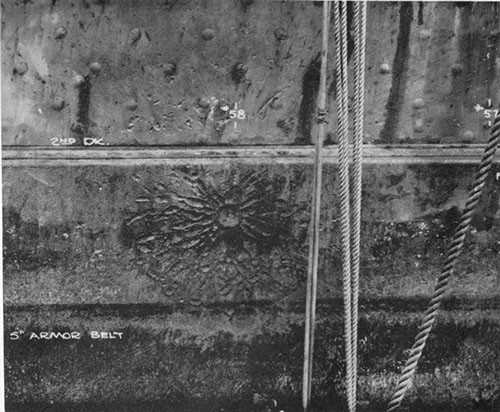
| 30. | Hit No. 26 (6") showing damage to 5" armor belt. |
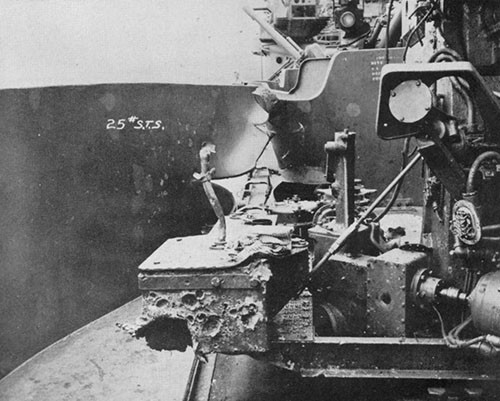
| 31. | Hit No. 28 (6") on splinter shield of 5" gun No. III. The gun was trained around so that the heavily damaged platform in the foreground was directly opposite the hole in the splinter shield (Photo No. 3). |
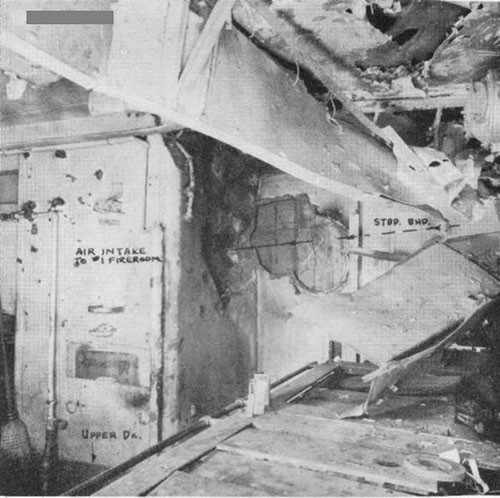
| 32. | Showing Hits No. 29 (6") and No. 30 (6"). Note the extensive fragment damage from Hit No. 30. |
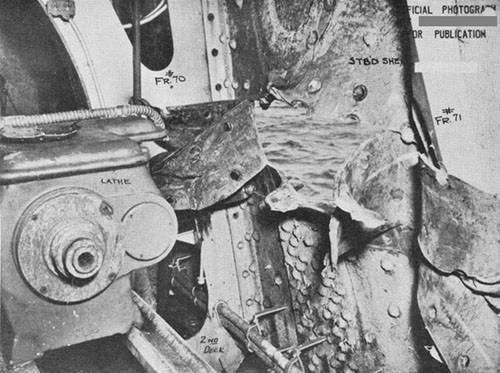
| 33. | Hit No. 31 (8") looking outboard at starboard shell which consists of two layers of 30 lb. S.T.S. |
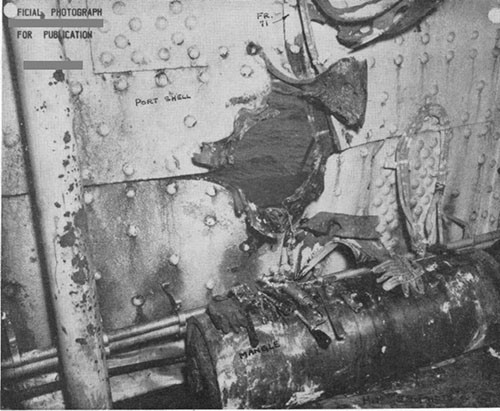
| 34. | Hit No. 32 (8") looking outboard at the port shell (two layers of 30 lb. S.T.S.). The 1" thick mangle cylinder below the hole had a large hole blown in it. |
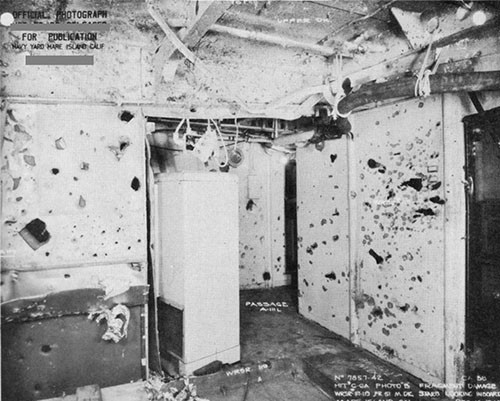
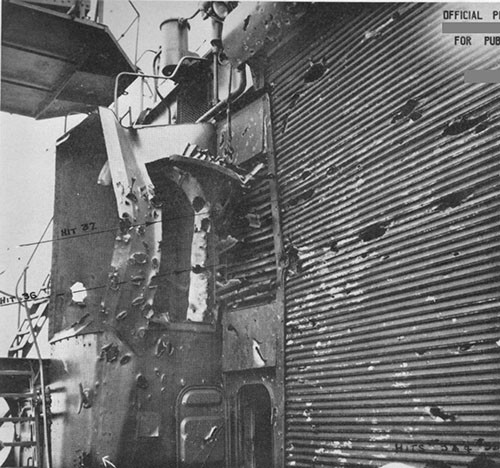
| 35. | Hits No. 36 (5 1/2") and No. 37 (5 1/2") showing extensive fragment effect on light plating. |
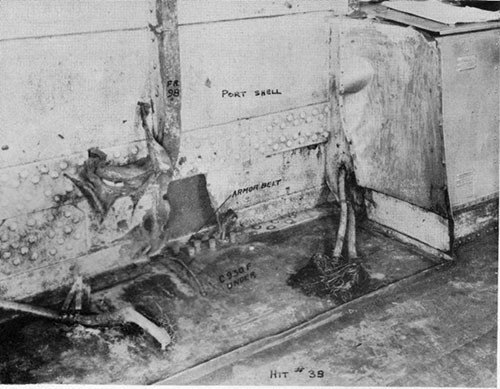
| 36. | Hit No. 39 (8"). This projectile struck just below the top of the armor belt seen in the photograph. |
| 37. | Hit No 40 (5") looking outboard to starboard. |
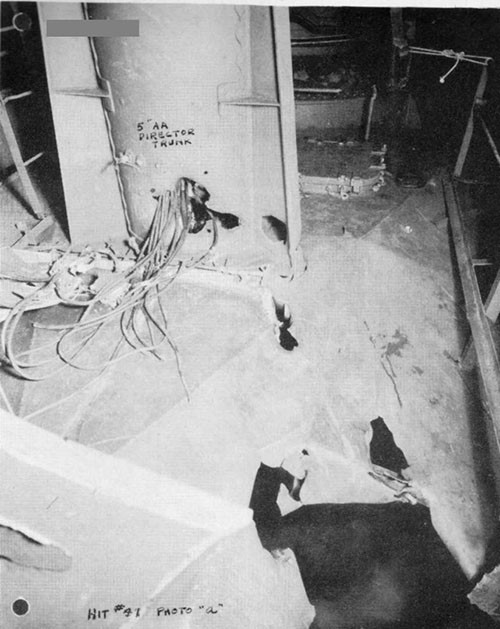
| 38. | Hit No. 41 (8") looking aft on top of battle II. Note large fragment holes in 30 lb. 5" director trunk. |
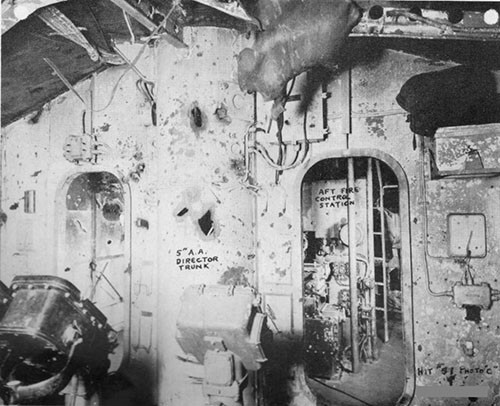
| 39. | Hit No. 41 (8") taken immediately below Photo No. 37 and showing more fragment holes in 5" director trunk. |
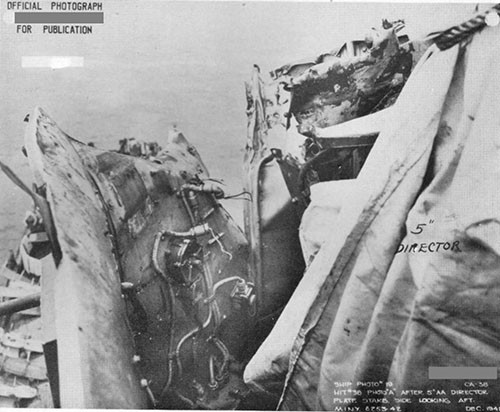
| 40. | After 5" AA director screen showing effect of Hit No. 42 (5"). |
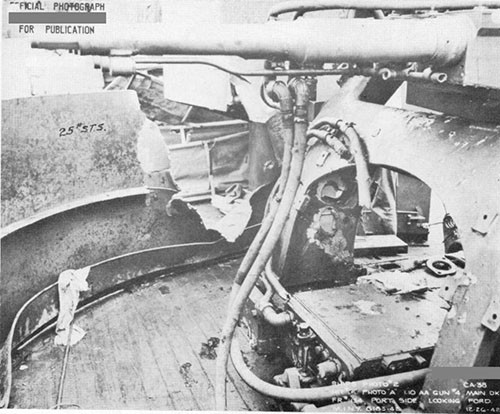
| 41. | Hit No. 43 (8") showing effect on 25 lb. S.T.S. splinter shield and the after port 1.1 gun mount. |
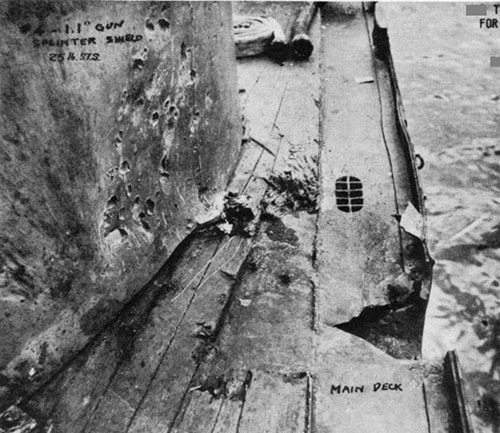
| 42. | Hit No. 44 (8"). Note rejection of most fragments by 25 lb. S.T.S. splinter shield. |
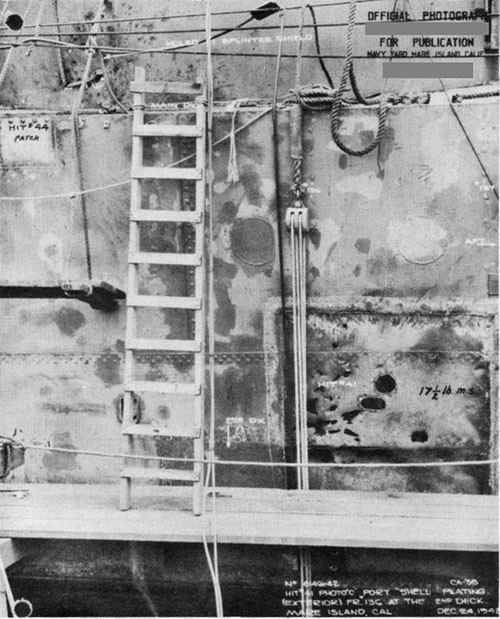
| 43. | Hit No. 45 (8") looking at port shell plating. This hit (probably a ricochet) exploded just before hitting the ship. |
1. U.S.S. SAN FRANCISCO was covering landing operations on Guadalcanal on 12 November 1942 when attacked by Japanese torpedo planes. The covering force, including the SAN FRANCISCO got underway in order to execute evasive maneuvers. During the subsequent engagement, at 1415, a Japanese torpedo plane started an approach off the starboard quarter. This plane was taken under fire by the McCAULEY MCCAWLEY and set afire. It jettisoned its torpedo prior to the release point and then crashed against SAN FRANCISCO's after control station and fell into the water on the port side. The resulting fire destroyed the after control station, damaged battle II, and caused the loss of about thirty-five officers and men who were manning these stations. The loss of the personnel, in addition to the damage to the after 8" director, was particularly serious in the action which followed that night.
2. Landing operations were halted on the evening of the 12th and all ships withdrew from the area. Combatant units were reassembled and returned to the area during the evening. About midnight, SAN FRANCISCO, in company with one heavy cruiser, three light cruisers, and eight destroyers entered Lengo Channel. The force speed was 18 knots. The sky was overcast, the moon
had set, and the night was dark. Visibility was fair to good and the wind was about 10 knots from the southeast. A slight sea was running. SAN FRANCISCO's planes had been sent to Tulagi, all inflammables removed from exposed stations, and the vessel was ready in all respects for night action.
3. At 0125 an enemy force was discovered about 27,000 yards to the northwest. After action was finished and up to the present time the best estimates of the strength and distribution of the enemy force are that it comprised four main groups with one considerably to the north of the other three. At the start of the engagement the existence of the northern group was suspected. The presence of this group was actually not verified until after the engagement. The enemy's forces were probably distributed as shown on Plate I. It will be noted that the left force consisted of 1 CA, 2 CLs, and 2 or 3 DDs; the center force consisted of 2 BBs (KONGO class), 1 CA, and 3 DDs; the right force consisted of 1 CL (NATORI class), with 3 or 4 DDs; and the north force consisted of 1 BB with 3 DDs. Thus, a total of 3 battleships, 2 heavy cruisers, 3 light cruisers, and 11 or 12 destroyers were present. The above estimates check fairly well with the distribution of the numerous hits made on SAN FRANCISCO as described in this report.
4. When the Japanese were discovered, the U.S. force was on course 280°. The latter turned northwest, then north, and then again northwest. The right hand group of the enemy was first engaged as shown on Plate I. The SAN FRANCISCO fought the enemy from 0148 to 0222 at ranges varying between 1,000 and 8,000 yards with the majority of salvos being fired at somewhat less than 5,000 yards range. The Japanese were apparently intercepted just prior to bombarding Guadalcanal inasmuch as they used only bombardment ammunition during the action. Many torpedoes were fired by the Japanese but none hit SAN FRANCISCO.
5. At 0148 SAN FRANCISCO commenced firing on an enemy cruiser, then on the starboard beam and a member of the Japanese right group, with a range of 3,700 yards. Fire was maintained on this target until orders were received to cease fire. At 0151 fire was reopened on a small enemy cruiser (or large destroyer) on the starboard bow at a range of 3,300 yards. This target was probably also in the right group. At this time an enemy battleship was sighted bearing about 30° relative and fire was immediately shifted to it using an initial range of 2,200 yards. This was probably the leading battleship of the center group. Two main battery salvos were fired. This target was also under fire at close range from another unit of the U.S. force. No fire was returned by the battleship. Orders were then received to cease firing. At 0200 SAN FRANCISCO resumed firing at an enemy battleship, probably the second battleship of the center group, on the starboard bow. At about the same time the SAN FRANCISCO was taken under fire by an enemy cruiser on her starboard side and a destroyer which had crossed her bow and was passing down her port side. At this time SAN FRANCISCO was making 17 knots. Shortly after 0200 SAN FRANCISCO was under enemy fire from three directions. The port 5" battery engaged the destroyer but was put out of action except for gun No. 8. The starboard 5" battery was put out of action by the first or second salvo which hit from the battleship on the starboard side. At the time of these latter hits SAN FRANCISCO was swinging left. The main battery continued firing on the battleship as long as it could bear.
6. The sequence of events from this point until the end of the engagement is uncertain. Many hits were received from both the battleship and cruiser on the starboard side and several from the destroyer on the port side before the latter was put out of action. All officers on the navigation bridge except the communication officer were either killed or badly wounded by these hits. Steering and engine control were lost and were shifted to battle II. Almost immediately battle II was put out of action by a direct hit from the port side (No. 41, Plate II) and control was again lost. In the meantime, control had been established in the conning tower by the communication officer when it was found that this station was still operative. Shortly thereafter, a shell hit the top of the conning tower from the starboard side (Hit No. 7, Plate II) and steering and engine control were again temporarily lost. This was due to the fact that power was deliberately cut to this station following the hit because it was uncertain how much damage had been done. The circuits were found to be in good order, however, and power was restored. During the interval, conning was continued by giving orders to central station over the 1JV phones. By this time all exterior communications (TBS, radio, search lights, blinker guns, and fighting lights) were out of commission and it was impossible to communicate with other ships of the force.
7. It is apparent that SAN FRANCISCO was in between two groups of Japanese ships, probably the center and left groups indicated on Plate I) and that heavy fire was being received from both sides. She was also apparently under fire from the northern group as indicated by the angle of fall of Hit No. 5 (14"). By 0300 the action had dwindled to sporadic firing by both the Japanese and the U.S. force. The SAN FRANCISCO had lost all contact with the other vessels of the U.S. force. No illumination was available and identification of surface vessels was impossible. As the enemy's fire ceased, SAN FRANCISCO also ceased fire and withdrew to the east through Sealark Channel.
8. During the engagement outlined above, SAN FRANCISCO sustained approximately 45 separate hits, plus numerous small machine gun or fragment hits. The most extensive damage was apparently done by the secondary (6") battery of the second battleship in the center group. One 14" hit was made by this battleship and one was apparently made by the battleship in the northern group, its angle of fall being about 13° from about 120° relative. The caliber of these two shells was determined by fragments recovered. Several hits made on the port side (Plates II and III) indicated shells heavier than 6" and these were probably from the heavy cruiser shown in the left group. The destroyer which passed down the port side probably made a few 5" hits and some small caliber hits with automatic weapons. Judging from the performance of our own projectiles against various weights of plating, and from the disposition and armament of the forces involved, it is estimated that 10 hits were
8", 15 were 6", 5 were 5 1/2", and 13 were 5" in addition to the two 14" hits mentioned above. Structural damage from these hits, though extensive, was fortunately not of a serious nature. It would undoubtedly have been more severe if it were not for the fact that special bombardment ammunition was used as stated in paragraph 4. No A.P. or H.E. major caliber hits were received so far as can be determined. Minor caliber hits were apparently common projectiles with both instantaneous and delayed fuses.
9. About 22 different fires were started during the engagement. All of these fires were brought under control quickly by prompt action of fire fighting parties. Fires were started in the following locations as indicated on Plate III:
Paint Locker
Sail Locker
A-206-L
Communication Platform
Captain's Cabin
A-109-L
Wardroom
A-111-L
Chart House
Signal Bridge
Half Deck under Signal Bridge
Officers' Galley
Captain's Office
Drill Gun Platform
Hangar
Battle II
Auxiliary Signal Station
C.P.O. Quarters (1.1" Clipping Room, Port)
Armory
Navigator's Office
Athletic Gear Locker
Laundry
10. The most important material damage to SAN FRANCISCO was to electrical wiring circuits. Damage to electrical circuits serving the forward and after superstructures necessitated complete cutting off of power to these areas, rendering inoperative the main battery director aft and steering and engine control forward. Electrical control to turret II was rendered inoperative by flooding of magazines. Electrical circuits in turret I were not damaged and were used throughout the engagement. They were, however, later rendered inoperative when water seeped into the connection boxes. Numerous branch circuits throughout the ship were severed but power feeders generally were intact.
11. No hits were received below the waterline and only three as low as the second deck, two of these being on the armor belt. Several compartments were flooded, however, by a fragment from Hit No. 3 (see Plates II and III) which shorted a magazine flooding switchboard and caused the 8" powder magazines and handling room for turret II to flood. Due to confusion at the time and loss of communication, flooding of these magazines was not secured until they were completely flooded to the overhead. Some water flooded through ventilation ducts up to the second deck between bulkheads 28 and 48-1/2 where water was 3 ft. deep (Ref. (a)). Five-inch magazine A-417-M was inadvertently flooded to a depth of about 3 ft, but flooding was stopped in time to allow its use. Some further flooding was caused on the second deck by water shipped through holes made by Hits No. 4, 31, 32 and 39 and on the third deck by Hit No. 45. This flooding ranged from 3 ft. to 10 inches deep.
12. Personnel casualties were heavy. During the night action a total of approximately 189 casualties in killed, seriously wounded, and missing were suffered. These casualties included the Admiral and his staff who were killed early in the action and the Captain and Executive Officer who died shortly after. Men manning secondary battery and anti-aircraft stations suffered especially due to the fragmentation of shells. Previously, thirty-five trained control personnel had been lost because of the plane crash.
13. Although SAN FRANCISCO suffered heavy personnel casualties and extensive, though not vital, material damage as described above, she continued in the battle to its conclusion. Two of her three turrets remained in operation. Five-inch AA guns No. 3, 4, and 5 were put out of action by damage from hits during the engagement. The other five guns, however, were operable although personnel casualties prevented their immediate use. All means of exterior communication were out of commission. Some difficulty was experienced in the operation of the after engine room due to heat as discussed in paragraph 66, but the main machinery plant itself was undamaged.
14. The plane which crashed in flames on the afternoon of November 12 struck the after 8" director platform from the starboard quarter and bounced off, crashing in the water on the port side. In passage it struck the after starboard corner of the 20 lb. S.T.S. splinter shield around the machine gun platform and bowed it forward as shown in Photo No. 5. The after starboard 20mm gun was badly damaged, the after port corner of the director housing was crushed and torn apart, and the two port 20mm guns and stands were torn loose and demolished. The forward port section of the splinter shield was torn loose where the plane went over the side. Controls of the smoke screen generator were sheared off. The subsequent fire, and water damage from fire fighting, damaged all instruments and equipment in the 8" director and after fire control station. Some instruments in battle II were also damaged by fire but battle II as such was largely back in operation by nightfall.
Note: Hits sustained in this engagement are numbered for convenience from forward aft without regard to time, size, or source. It must be remembered that the sizes of these hits, except for Nos. 5 and 6, are all
estimated. These estimates are made from what is known of the disposition and caliber of guns firing on SAN FRANCISCO and from the effects of the shells as compared with the performance of our own shells on light plating. Electrical damage, which was extensive to topside circuits, is treated in a separate section.
15. This hit was probably a 5.5 inch projectile which struck about 3 ft. below the upper deck on the starboard bow at frame 2-1/2. It apparently exploded on impact, tearing a 2 foot hole in the shell which is 10.2 lb. mild steel. Upper deck plating between frames 2 and 4 and the hatch between frames 3 and 4 were holed and buckled. Fragments penetrated bulkhead No. 4 in numerous places and passed out through the port shell in three places. A fire was started in the paint locker, compartment A-102-A, where a small quantity of paint in buckets caught fire, but it was quickly extinguished.
16. This projectile hit at frame 10 starboard at the point where the shell and upper deck plating connect. The shell exploded on impact tearing out a 5 ft. x 10 ft. section of the shell strake and a 5 ft. x 6 ft. section of the upper deck plating between frames 9 and 12. Considerable buckling occurred in adjacent plating and in bulkhead No. 9. Sections of frames and beams No. 10 and No. 11 were shot away and buckled. Fragments spread in a general direction aft and to port riddling partition bulkheads of the warrant officer's washroom and doing considerable damage to piping and other equipment between bulkheads 9 and 15. The liquidometer gauge for the starboard gas tank was broken by a fragment. Explosion and fragments started a fire in the sail locker.
17. The course of the fragments from this hit indicates that it came from about 055° relative. It is estimated to have been an 8" projectile from the heavy cruiser in the center group.
18. These are estimated to have been 6" projectiles. They hit between frames 31 and 32 on the starboard side between the main and second decks. They exploded on impact, tearing out holes roughly 28" x 31" and 24" x 26" in the 17.5 lb. mild steel shell plating. Sections of frame 32 and main deck longitudinals were torn away and all interior bulkheads, furniture, and equipment between frames 29 and 36 were demolished or riddled by fragments. A fire was started in A-206-L.
19. A fragment from one of these hits penetrated the forward flood and sprinkling control panel in A-206-AL and caused a short circuit. This caused turret No. II handling room and the three adjacent 8" magazines to be flooded and sprinkled as discussed in paragraph 11.
20. A 14" special bombardment projectile hit between frames 36 and 37 on the starboard side at the point where the upper deck and starboard shell connect. This projectile ripped through upper deck plating and tore out a hole in the starboard bulkhead of the Captain's bath, continuing on until it struck barbette No. II where it was deflected aft and upward, demolishing the after bulkhead of the Captain's bath and splintering the communication platform in two places between frames 38 and 45. It was deflected downward by the communication platform and passed through the after bulkhead of the Captain's stateroom, apparently exploding in the Captain's cabin where fragments and blast did considerable damage and a fire was started. A good deal of damage was done in wardroom-stateroom No. 111 directly below the point of impact on the upper deck and a fire was started in A-109-L.
21. This projectile was apparently traveling upward about 10° when it hit the barbette. It tore a long path through the deck plating from the point of impact at the side as shown on Plate III, and it is probable that this deflected it upward. The characteristics of the projectile itself are discussed in paragraph 63.
22. A projectile similar to Hit No. 5 struck at frame 41 at the connecting point of the starboard bulkhead of the deck house and the communication platform. This projectile apparently had an angle of fall of about 13° (corresponding to about 17,000 yds. for our 14" guns, full charge) indicating that it came from a battleship at considerable range bearing about 120° relative. The projectile tore out a section of the communication platform and the starboard bulkhead of the Captain's stateroom, passed through the stateroom and struck the barbette of turret No. II about 3 ft. below the communication platform. It made a dent about 14" in diameter and 1-1/2" deep in the 5" Class "B" barbette armor and was reported to have opened the keyed butt between the after section and the forward starboard section of the barbette armor. The base of the projectile passed downward and aft through the bag room and Admiral's pantry, through the upper deck plating into the wardroom, and through the main deck plating on the port side at frame 47. It was finally stopped on the second deck where it buckled the after bulkhead in the armory at frame 48-1/2. Considerable
damage to equipment, furniture, ventilation trunks, and partitions was done along this path. Fires were started in the wardroom and in the armory. It is not apparent from the evidence at hand where this projectile exploded or broke up. Photo No. 13 shows a portion of the base which was recovered.
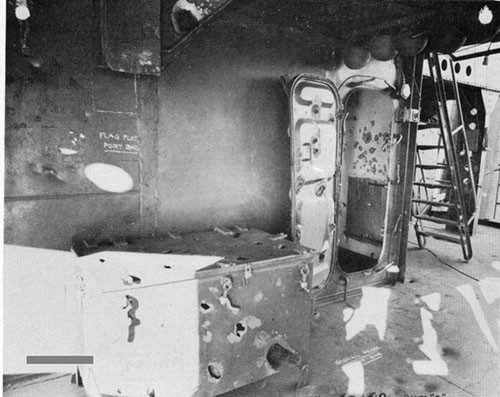
23. The projectile which struck the top of the conning tower (paragraph 6) is estimated to have been an 8" hit from the heavy cruiser in the center group. It exploded, blew out a section of the deck in the pilot house and ruptured the girder between the conning tower and bulkhead 49 under the navigation bridge. Blast and possibly fragments demolished two sections of the signal bridge windows. Two large fragments penetrated the forward bulkhead of flag plot. Blast, fragments, and the subsequent fire from this hit damaged all equipment and instruments in the pilot house and put this station out of action.
24. Two hits were made on the port side at the navigating bridge level, one just above the navigating bridge deck and the other right at the deck level. It seems probable that these were both 5" projectiles from the destroyer which crossed SAN FRANCISCO's bow and passed down the port side. These projectiles exploded on contact with the 10 lb. mild steel windscreen. The after hole was considerably larger than the forward hole extending about 1-1/2 ft. above and below the deck level. Fragments spreading inboard penetrated the port bulkhead of the chart house and doors to chart and pilot house. The water cooling tank for the port 1.1 gun was damaged. Fragments spreading below the navigating bridge deck penetrated and damaged lockers, doors and the bulkheads of flag plot and the Captain's emergency stateroom. All equipment and fixtures on the port side of the navigating bridge and signal bridge were badly damaged as a result of these two hits.
25. This projectile struck the 20 lb. S.T.S. splinter shield around the battle look-out and machine gun platform at frame 50 on the starboard side. It is estimated to have been a 6" shell and it exploded on impact tearing a 2 ft. x 3 ft. hole. Fragments penetrated the machine gun platform and the outboard (10 lb. S.T.S.) and inboard bulkheads of the starboard 20mm clipping room. Equipment and fixtures on the bulkheads were damaged by fragments.
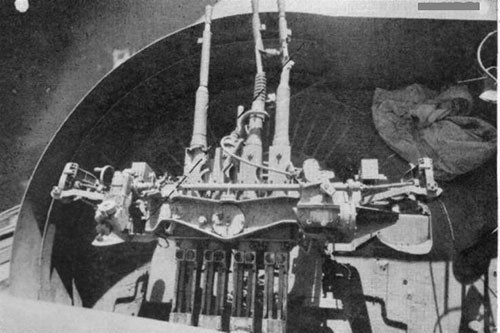
26. On the same level as Hit No. 10 but on the port side, the forward 1.1 gun was hit directly by a shell estimated to be a 5" projectile from the enemy destroyer previously mentioned. The gun was apparently trained forward at the time and the projectile struck it on top from the port quarter, cutting the sight yoke, breaking one barrel and bending the others as shown in Photo No. 19. It seems to have deflected inboard and exploded shortly after impact with the gun. Fragments riddled the outboard and inboard bulkheads and equipment in the port 1.1 clipping room.
27. A large section of the starboard bulkhead of the chart house was torn away by a hit which exploded on impact and ruptured the cooling coil tubing and piping for the starboard 1.1 machine gun. Fragments blown into the chart room riddled the interior bulkheads, damaged furniture and equipment, and started a fire. Echo sound instruments, wind direction and velocity indicator, and the latitude and longitude indicator were damaged. It is estimated that this was a 5-1/2" projectile.
28. An estimated 6" projectile struck the splinter shield of No. I-5" AA gun at frame 52 starboard. The projectile exploded on impact tearing out a 3 ft. diameter hole in the 25 lb. S.T.S. plating. Fragments penetrated the booby hatch and ammunition hoist at frame 52, the ready service locker at frame 47, and gouged the wooden deck on the communication platform.
29. Two projectiles exploded on impact with the shell abreast wardroom stateroom 119. One (estimated 6") exploded at frame 52, and the other (estimated 5.5") exploded between frames 52 and 53. Compartment bulkheads and the wardroom refrigerator were completely demolished, and fragments riddled the bulkheads of adjoining staterooms and the exhaust ventilation trunk from the evaporator room. A fire was started by these hits.
30. A 6" projectile exploded on impact with the after girder supporting the navigating bridge at frame 52 starboard tearing out a section of coaming. Fragments riddled the starboard bulkhead of the Admiral's emergency cabin between the signal and navigating bridges. The port flag bag, equipment, and fixtures in the vicinity of this hit were badly damaged by fragments, and a fire was started.
31. Another hit, also estimated to be a 6" projectile, struck just above Hit No. 16 at the level of the navigating bridge and tore out a 2 ft. x 3 ft. hole in the after windshield and a section of the navigating bridge plating. Fragments damaged all equipment in the vicinity of this hit including the starboard pelorus and Captain's target designator.
32. A projectile estimated to be 5" struck the starboard side of the navigating bridge extending aft at frame 54, blowing out a section of the windshield and foremast. Fragments from this hit pierced the port windshield, piping stanchions, S.C. radar antenna and the 1.1 ammunition hoist.
33. Another projectile pierced the foremast tearing a hole through the mast about 2 ft. below the battle look-out platform. This is estimated to have been a 5" projectile and apparently it exploded after passing through the foremast. Fragments penetrated the port 1.1 gun cable box and the machine gun and battle look-out platform above. Fragments damaged other equipment and fixtures under the battle look-out platform and on the port side of the navigating bridge deck.
34. Another projectile, estimated to be 5", struck the after extension of the navigating bridge just above the deck at frame 55 starboard. It penetrated the windshield, tore out a section of the brass navigating bridge deck and ripped through the hatch coaming around the ladder to the signal bridge below. This apparently did not explode, but passed on through and out the port side of the navigating bridge just forward of and below the 24" search light (Photo No. 4).
35. A projectile, estimated to be 5", hit at frame 54 starboard just above the upper deck. It pierced one corner of the ready service locker of 5" AA gun No. 3, continued through the exhaust blower trunk from the evaporators, through the after inboard corner of the Executive Officer's stateroom, bounced off the deck at about frame 52, through the washroom at frame 50, the forward inboard corner of the Chief of Staff's stateroom, and out through the port bulkhead of the Admiral's cabin at about frame 47 (Photo No.25). Apparently the projectile was broken in two or had a low-order detonation inside the Admiral's cabin for there were two large holes and some fragment holes where it passed out, but only one hole where it entered. Considerable damage to equipment and fixtures resulted along the path of this projectile.
36. An estimated 6" projectile struck at frame 55 starboard above the communication platform. This projectile apparently exploded just inside the starboard bulkhead of the Captain's office (5 lb. plate). The forward and after bulkheads of this compartment were bulged outward and badly distorted and the after 10 lb. bulkhead of the blower intake to No. I fireroom was ruptured. All fixtures and equipment in the office were demolished and a fire was started in the papers and records. Photo No. 26 indicates that paint did not burn in this compartment.
37. Another 6" shell struck the starboard bulkhead of the officers' galley directly below Hit No. 22 and it also apparently exploded just inside the bulkhead. The starboard
blower intake to No. I fire room was ruptured here as well as by Hit No. 22 above and all equipment and fixtures in the galley were demolished. Some fragments passed out the port bulkhead of this compartment. This hit also started a fire.
38. This hit struck between frames 55 and 56 on the starboard side 3-1/2 ft. above the second deck. The projectile apparently exploded on impact blowing a 16" hole through two thicknesses of 35 lb. S.T.S. shell plating. Frame 55 was buckled, the interior of the athletic gear lockers was damaged by fragments, and a fire was started. From the weight of plating involved and the size of the hole, it is estimated that this was a 6" projectile.
39. This hit produced very much the same results as Hit No. 24 and it is also estimated to have been a 6" projectile. It struck just below the main deck at frame 57 starboard and exploded on impact blowing out a 6" hole through two thicknesses of 35 lb. S.T.S. plating and the lower main deck stringer angle. Frame 57 was buckled and torn loose and considerable fragment damage was done in the Navigator's office and library. A fire was started in the Navigator's office.
40. Another projectile, probably 6" and possibly in the same salvo as Hits 24 and 25, hit about 12" below the second deck and made an indentation in the 5" S.T.S. armor belt approximately 4" in diameter and 1" deep. The effect of this hit is shown in Photo No. 30.
41. On the port side the 25 lb. S.T.S. splinter shield of 5" AA gun No. 4 was struck at frame 61, probably by a 5" shell. The projectile exploded on impact blowing a hole in the splinter shield. The trimmed hole is shown in Photo No. 4. One large fragment penetrated the after section of the splinter shield and others, including some deflected by the splinter shield, pierced No. I stack and upper deck bulkheads of the search light tower. Some fragment damage was done to the gun mount.
42. On the starboard side the 25 lb. S.T.S. splinter shield of 5" AA gun No. 3 was struck by a shell which blew out a large hole and put the gun out of commission by fragment damage, some of which is shown in Photo No. 31. Fragments from this hit also penetrated No. I stack and the upper deck bulkheads. This is estimated to have been a 6" projectile.
43. A hit was also made on the drill gun platform at frame 65. The projectile hit the ready service locker and carried away the ladder to the search light tower. The forward port and starboard legs and brackets of the search light tower were badly riddled by fragments and a fire was started. This was possibly a 6" projectile.
44. A direct hit was made on the sight bracket of 5" AA gun No. 5 at frame 67 starboard as shown in Photo No. 32. The projectile exploded on impact doing considerable damage to the gun mount. Fragments pierced upper deck plating, air intakes to fire room No. II, and bulkheads on the upper deck under the search light tower as shown in the photograph. This is estimated to have been a 6" projectile.
45. Another hit similar to Hits 24 and 25 was made between frames 70 and 71 on the starboard side 3 ft. above the second deck. This projectile blew a 36" x 16" hole through two thicknesses of 30 lb. S.T.S. shell plating. Web frame 70 and frame 71 were torn loose and frame 71 was badly bent. Fragments penetrated and damaged a 14" lathe in the machine shop just inside the point of impact and other equipment and fixtures in the compartment were damaged by fragments. This was probably an 8" projectile.
46. On the port side at frame 71, 3 ft. above the second deck, another hit was made with approximately the same results as Hit No. 31. The projectile blew an 18" hole through two thicknesses of 30 lb. S.T.S. and a section of frame 71, and penetrated a 1" thick mangle cylinder in the laundry. The shell was buckled inboard considerably and frame 71 torn apart and buckled. Bulkheads and equipment in the laundry were damaged by fragments and a fire was started. This was probably an 8" projectile from the heavy cruisers in the left group.
47. Also on the port side, a hit was made between frames 74 and 75, 15" above the main deck. This projectile exploded on impact blowing a 20" irregular hole through two thicknesses of 30 lb. S.T.S. shell plating. The main deck bounding angle and frame 75 were buckled. Fragments were absorbed by supplies stowed in the ship's service locker and no fragment damage was done to surrounding structures. This performance is strikingly similar to Hit No. 32. The projectile was probably also an 8" projectile, possibly in the same salvo.
48. The starboard 26 ft. motor whale boat suffered a direct hit at frame 83 and was completely demolished. Fragments spread to the port side, gouging a hole in the quarter deck and damaging the port motor whale boat and lockers on the upper deck. The forward side of the starboard catapult tower was heavily penetrated by fragments. This was probably a 5" projectile.
49. The upper part of the starboard catapult tower was struck at frame 87, probably by a 5" projectile. It struck the edge of the airport on the outboard side and exploded in the photographic compartment blowing a large hole on the inboard side of the tower and rupturing the upper part of the supply ventilation trunk to the forward engine room. Equipment and fixtures in the photographic compartment were wrecked.
50. Two hits were made on the after engine room ventilation supply trunk at frame 95. It is estimated that both of these were 5 1/2" projectiles. One exploded on impact with the forward side of the trunk and the other apparently penetrated the starboard side and exploded inside. Fragments from these two projectiles riddled the inboard side of the trunk, penetrated the hangar door and some passed out through the port side of the hangar. Supply ventilation to the after engine room was stopped and a small fire was started in the hangar.
51. The exhaust trunk from the after engine room at frame 95 port was struck by a projectile which apparently exploded on impact with the blower motor, tearing a large hole in the trunk and demolishing the blower. Fragments did considerable damage to the trunk and W.T. doors. This was probably a 5" projectile from the destroyer previously mentioned.
52. A second hit (see Hit No. 26) was made on the armor belt at frame 98 on the port side. This projectile struck at the second deck level, exploded on impact, and made an 8" wide by 2" deep dish in the top of the armor belt, pulling it loose from the shell. It blew an 18" x 18" hole through the 30 lb. S.T.S. shell plating just above the armor, the second deck stringer angle, and the lower part of frame No. 98. Fragments and blast demolished the peacoat locker and riddled the access trunk to the after engine room. The top of fuel oil tank C-930-F was opened by pulled rivets in the stringer angle (Photo No. 36 - see paragraph 65). This is estimated to have been an 8" projectile from the heavy cruiser in the left hand group.
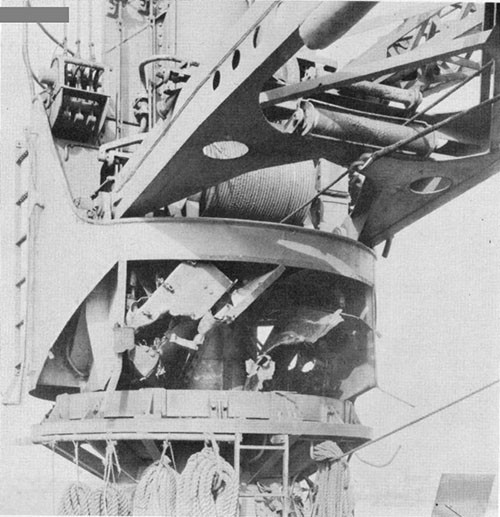
53. The starboard boat and airplane crane was hit on the outboard side above the hangar deck at frame 101 by a projectile from slightly abaft the starboard beam. The explosion and fragments demolished the control panels and wiring for hoisting and rotating motors. About 1/3 of the machinery housing was blown away. This is estimated to have been a 5" projectile.
54. On the port side another projectile, probably 8" from the left hand group of ships, struck the overhead of battle II at frame 109, exploded, and tore a 3 ft. x 4 ft. hole. The 30 lb. S.T.S. armored tube to the 5" director was penetrated by fragments in five places. The distance from the point of explosion to the armored tube is approximately 6 ft. Some fragments also penetrated to the after fire control station. Fragments and a fire started by the hit wrecked all instruments and equipment in battle II not previously damaged by the fire from the plane crash. This included gyro-repeaters, rudder angle indicators, engine revolution transmitter, own ships course repeater, engine order transmitter, compensating coil, and degaussing control panel.
55. The 5" AA director was struck at frame 110 probably by a 5" projectile from the destroyer. This projectile entered the forward port corner of the housing and passed out the after starboard corner. It apparently exploded before passing out as is evident from Photo No. 40.
56. The 25 lb. S.T.S. splinter shield around the after port 1.1 machine gun was struck at frame 133 above the main deck on the port side. This was probably another 8" projectile. It exploded on impact blowing out a 4 ft. x 5 ft. section of the splinter shield. Fragments penetrated the gun mount and the after section of the splinter shield. The starboard 1.1 mount and splinter shield were also damaged by fragments from this projectile.
57. Another projectile, probably 8", struck the port edge of the main deck at frame 134. The projectile exploded at the point where the shell plating and main deck connect, blowing out a small section of the main deck stringer and starboard sheer strake and cutting waterway angles and deck planking. The 25 lb. S.T.S. splinter shield around 1.1 gun No. 4 was dented and dished considerably. Some of the fragments penetrated, but as shown in the photographs, most of them were rejected. Fragments from this hit started a fire in the 1.1 clipping room immediately below it and ammunition kept exploding here until the fire was put out.
58. Another projectile, probably an 8" shell in the same salvo as Hits 43 and 44, struck the ship at the second deck level frame 136 on the port side. This projectile was apparently a ricochet which exploded just prior to hitting the ship, as the damage consisted of a series of fragment holes just above and below the second deck. Shell plating was buckled inward above and below the deck for an area of 6 ft. x 8 ft. Fragments in the CPO quarters riddled the ventilation ducts, lockers and equipment throughout the compartment, and started a fire. Frame 136 and deck longitudinals in compartment D-311-A below the CPO quarters were buckled and penetrated by fragments. Flooding of this compartment through the fragment holes damaged provisions and equipment. The circulating water pump motor was damaged by salt water.
59. Numerous small-caliber machine gun or fragment hits occurred at various places over the ship. This includes three hits on the after main battery director canopy (20 lb. S.T.S.) which did not penetrate. Other hits from small projectiles were located as follows; through the mainmast yard and shroud of the gaff outrigger, three holes in the starboard shell at frame 12 second deck, at frame 28 second deck and at frame 36 second deck, both on the port side, and at frame 30 at the main deck on the starboard side. There was also evidence of machine gun hits on the port wing of the navigating bridge. It is probable that most of these machine gun hits were made by the destroyer which passed down the port side of SAN FRANCISCO.
60. As previously stated, damage to electrical circuits was the most extensive and the most serious material damage done. A list of this damage follows:
Plane Crash - Badly damaged all wiring in the vicinity of the after main battery director. This damage was primarily due to fire. Most instruments in this area were considered salvageable.
Hits Nos. 1 & 2 - Severed degaussing and lighting cables.
Hits Nos. 3 & 4 - Damaged "A" calls, lighting and radio broadcast circuits by fragments and fire. Flooding of the magazines due to these hits damaged all electrical equipment and wiring in the flooded compartments.
Hit No. 5 - Severed and blew away degaussing, lighting and telephone cables.
Hit No. 6 - Telephone and lighting cables in the Captain's cabin and lighting cables in the wardroom and the armory were severed.
Hit No. 7 - Practically all circuits in the pilot house were put out of commission. Steering selsyn cable to the bridge, rudder angle indicator, auxiliary rudder angle indicator, telephone to the bridge, "E" calls between signal and navigating bridge, navigating lights, anchor lights, compass call boxes, whistle circuits, inter-radio communication, and sound powered telephone circuits were damaged and blown away.
Hits Nos. 8 & 9 - Sound powered telephone in the Captain's emergency stateroom, lighting and whistle circuits were cut.
Hit No. 10 - Starboard 1.1 director circuit and lighting circuits in the clipping room were cut.
Hit No. 11 - Lighting, 20mm "cease firing", smoke telegraph transmitter leads, 1.1 circulating water pump power circuits, and recognition light circuits were severed.
Hit No. 12 - Lighting circuits, degaussing control panel, "K" circuits and instruments, ship's service telephone, sound powered telephone, "E" calls, gyro alarm, and gyro repeater circuits were damaged by fragments.
Hits Nos. 14 & 15 - Radio broadcast, "A" calls, lighting, minor power leads, and speaker system cables were cut by fragments and damaged by fire.
Hits Nos. 16, 17, 18 & 19 - Lighting circuits, "A" calls, "E" calls, 24" search light cables, and sound powered telephone lines were cut. Remote control, GM-4 circuit, port 1.1 gun circulating water pump controller, and "cease firing" circuits to the 1.1 gun were damaged by fragments.
Hit No. 21 - Lighting, "A" calls, and radio broadcast circuits in the executive officers' stateroom were severed.
Hit No. 22 - Telephone and lighting circuits were cut.
Hit No. 23 - Lighting circuits, power circuits for ranges and blower in the officers' galley, and general alarm gong cable and bell were damaged by fragments and fire.
Hit No. 27 - A few cables on No. IV gun received minor damage from fragments.
Hit No. 28 - Practically all wiring on No. 3 gun was cut and blown away.
Hit No. 29 - Cables to all four 36" search lights were cut.
Hit No. 31 - Degaussing cables were damaged and power cables to lathe were cut.
Hit No. 32 - Degaussing and power circuits in the laundry were cut and various cables were damaged by salt water.
Hit No. 35 - Equipment and fixtures in the photographic compartment were wrecked.
Hit No. 39 - Degaussing cables were cut and blown away.
Hit No. 40 - Control panels and wiring for hoisting and rotating motors on the starboard boat and airplane crane were demolished.
Hit No. 41 - This hit effectively put battle II out of commission in very much the same manner as Hit No. 7 rendered the navigating bridge useless. All instruments including the compensating coil and degaussing control panel were damaged by fragments and fire. Practically all cable in the director trunk was severed by fragments.
Hit No. 43 - "Cease firing" and telephone cables under the main deck were cut by fragments.
Hit No. 44 - Degaussing cables were cut and damaged.
Hit No. 45 - Degaussing cable under the second deck was cut and water seeped into the cable from flooding.
61. From the above listed damage it is apparent that lighting, degaussing, "A" calls, radio broadcast, and telephone systems suffered particularly from the numerous hits. Nineteen different hits, for example, were specifically mentioned as cutting lighting circuits, and nine different hits as cutting degaussing cables. Approximately forty different kinds of circuits are listed as having been damaged, ranging in importance from anchor lights to director cables and communication lines between bridges and engineering spaces.
62. Very little information is available at this time regarding the damage control measures taken to control the fires and flooding. The fact that there were twenty-two or more fires and that these were successfully extinguished speaks for itself. It is understood that at the time of the engagement SAN FRANCISCO had completed about sixty percent of the paint removal program but that no particular trouble was experienced from paint except for a small quantity of liquid paint in the paint locker. Here a fire was started by Hit No. 1.
This fire was quickly extinguished. The absence of planes, dope, and other inflammables in the hangar area undoubtedly prevented serious trouble there. The fact that fire mains were intact and the engineering plant continued in full operation was probably the most effective contributing factor in quick control of the fires.
63. The nature of the fourteen inch projectiles which struck the SAN FRANCISCO is of interest in connection with the fires. Reference (c) reports that fragments recovered from hits five and six indicated projectiles slightly larger than fourteen inches. They were of incendiary type with a heavy base and thin (3/8") walls. The cavity was apparently filled with an explosive charge and a large number of small (3" x 1") safety-fused incendiary cylinders filled with powdered aluminum and magnesium. Apparently the explosive charge detonates, sets safety fuses afire, and scatters incendiary cylinders over a wide area. This started fires in many inaccessible places. There was no evidence of a base plug, and it is probable that the projectile had a nose fuse with a fuse adapter for nose loading. The 5" S.T.S. barbette armor defeated them easily. It was fortunate for SAN FRANCISCO that neither of these shells was armor piercing.
64. The fact that there were no hits below the water line has been mentioned previously. This was probably due both to the short range and consequent tendency of the shells to ricochet and to the use of bombardment ammunition which would explode on impact with the water. It is interesting to note that the mean point of impact is about 30 feet above the water line, at the level of the communication platform. It is estimated that not more than 500 tons of water, including that in the flooded magazines, were taken aboard. Probably the most serious difficulty arising from the flooding was loss of stability due to free surface created by water shipped through Hits No. 4, 31, 32, 39 and 45 as mentioned in paragraph ten, and water from fire fighting.
65. Flooding from Hit No. 39 in the crews' mess, C-204-L, was about 3 ft. deep with a small quantity of oil due to the opening of the wing fuel oil tank as described in paragraph 52. The hole was plugged, and water above the level of the hatch coaming was allowed to drain down the hatch into the after engine room and was pumped overboard from the engine room bilges. The remainder of the water in this compartment was handled by portable pumps and buckets. Other flooding (see paragraph 11) was handled in very much the same manner, as much as possible of the water on the second deck being run into the fireroom bilges, and the remainder being removed by portable pumps and buckets. Although in this particular case the ship appears to have retained sufficient positive stability for safe operation, flooding of this kind in a cruiser might easily cause a critical loss of stability due to free surface and the high location of the added weight. The damage control measures taken were sound, and similar measures should always be attempted under such circumstances.
66. Hit No. 38 stopped the exhaust blower to the after engine room, and hits 36 and 37 put the supply blowers out of commission. This caused considerable difficulty with heat in the after engine room. It was kept in operation, however, by frequent changes in the watch and brief visits to the engine room for inspection of gauges. The operating personnel wore plenty of clothing for heat insulation. Temporary repairs to enable partial ventilation improved this condition somewhat.
67. It is interesting to note that the conning tower on SAN FRANCISCO performed as designed. It suffered one direct hit (probably 8"), but maintained a topside station from which the ship could be conned when all other topside stations had been put out of action. It is important to note that personnel were stationed in the conning tower at the time of the hit. Apparently this hit did not incapacitate these persons for the performance of their duties as conning was continued from this station despite the hit.
68. The performance of this ship in sustaining and successfully combating such extensive damage is gratifying to say the least. Personnel casualties, as previously mentioned, were heavy and the success of her damage control measures indicates thorough preparation both in material readiness and training of personnel. Official recognition has been taken of the successful handling of this ship under extremely difficult conditions.


[END]
