
The Navy Department Library
USS South Dakota BB57 Gunfire Damage
Battle of Guadalcanal
14-15 November, 1942
War Damage Report No. 57
CONFIDENTIAL
U.S.S. South Dakota
(BB57)
Gunfire Damage
Battle of Guadalcanal
14-15 November, 1942
The Chief of Naval Operations directs that this report be shown only to those persons to whom the report would be of value in the performance of their duties.
Steps shall be taken, accordingly to insure that the report will be seen by those persons responsible for design, construction and repair of naval vessels, as well as for their operation, but by no others.
Preliminary Design Section
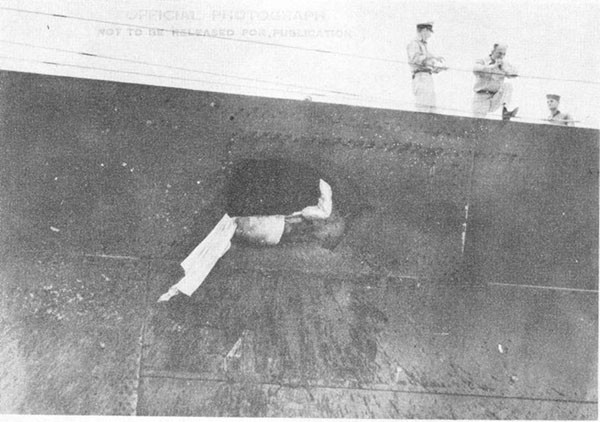
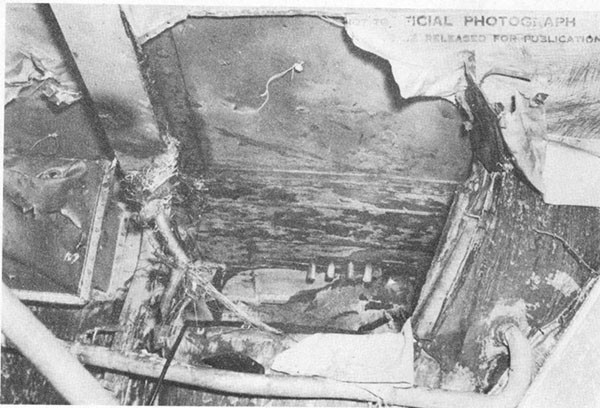
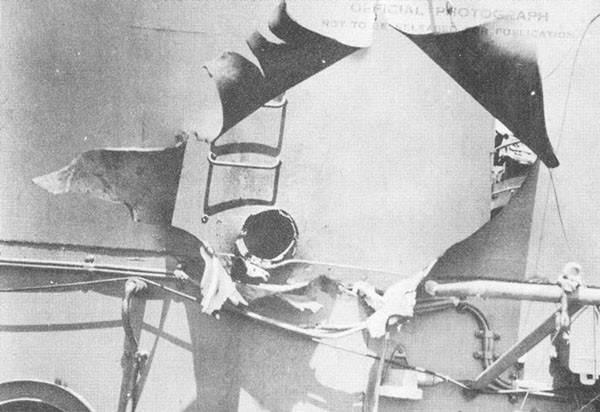
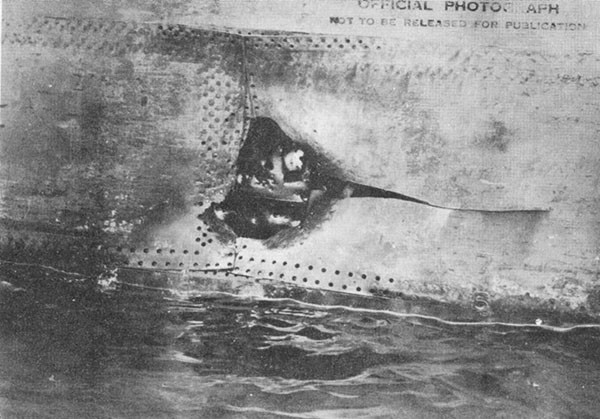
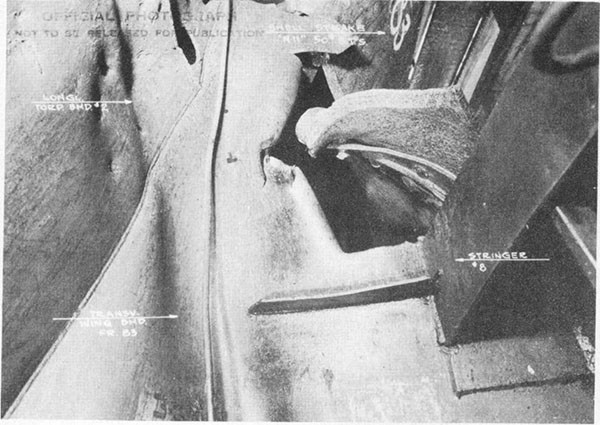
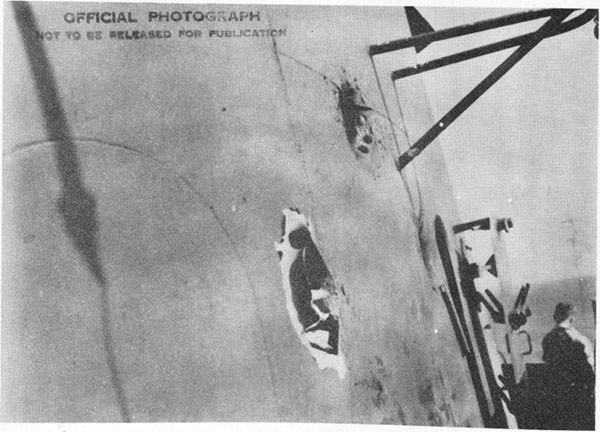
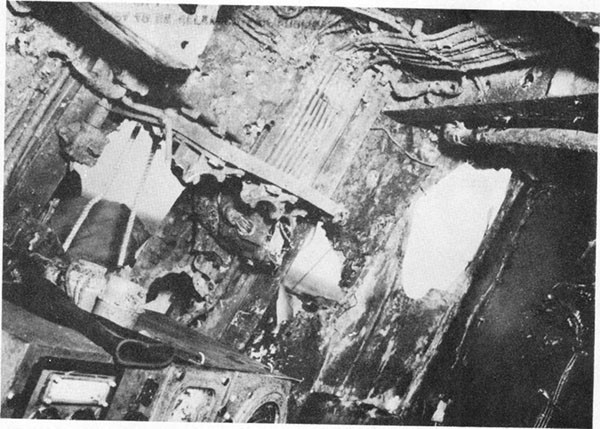
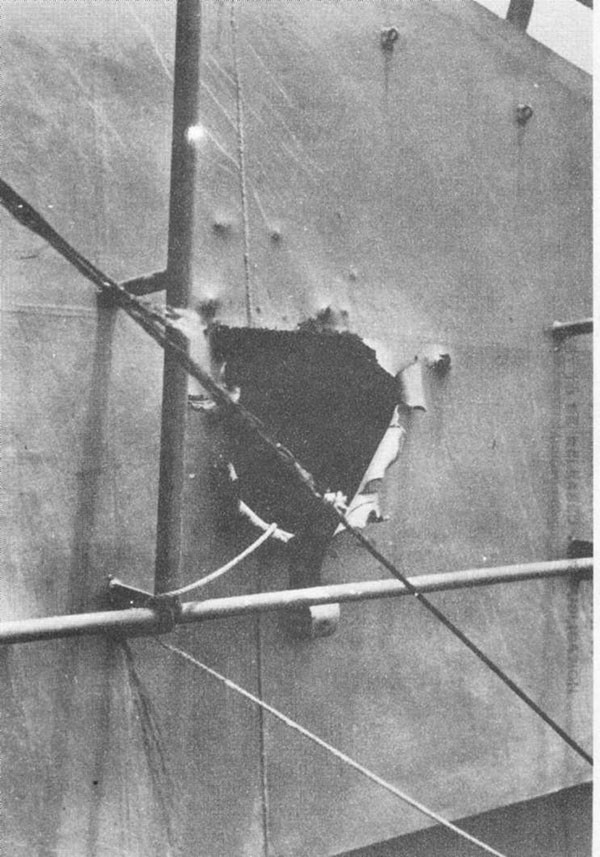
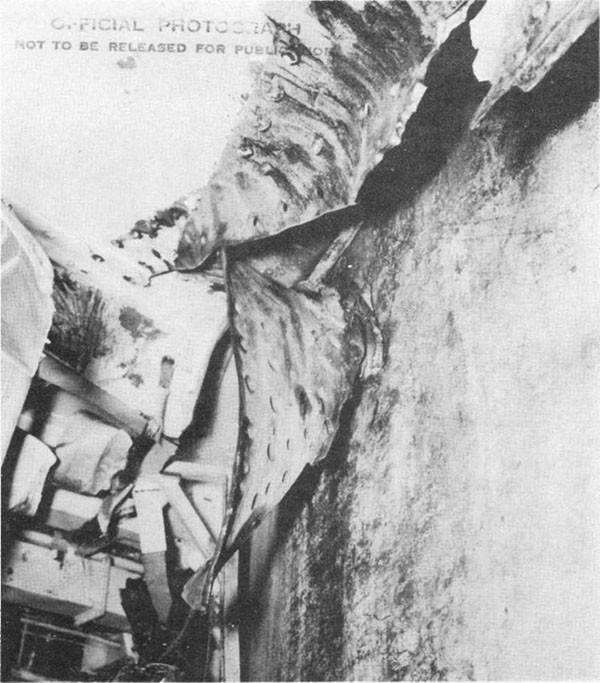
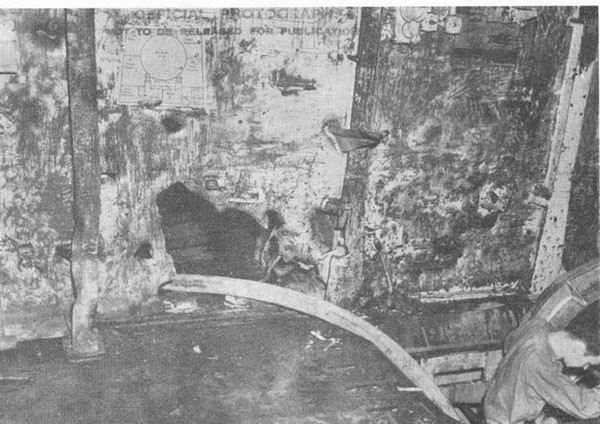
Bureau of Ships
Navy Department
1 June, 1947
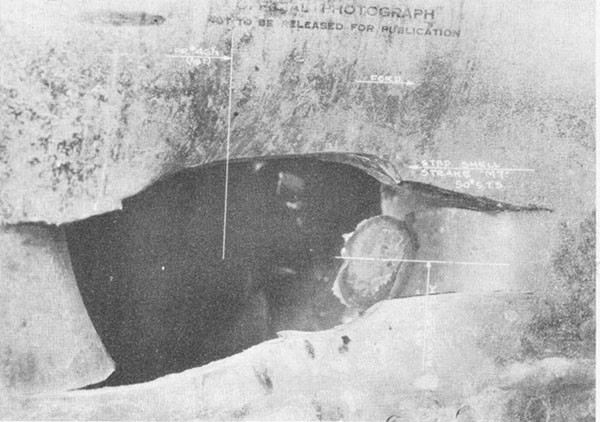
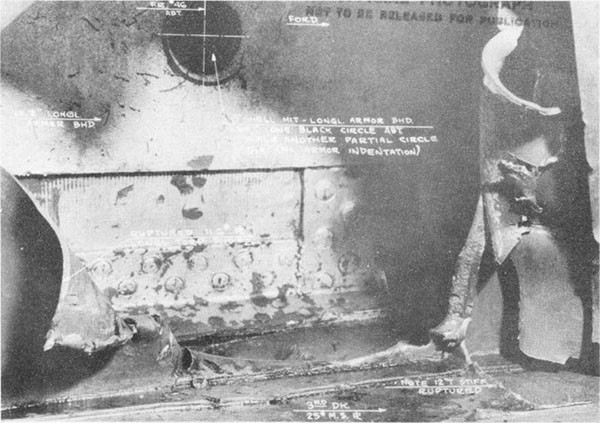
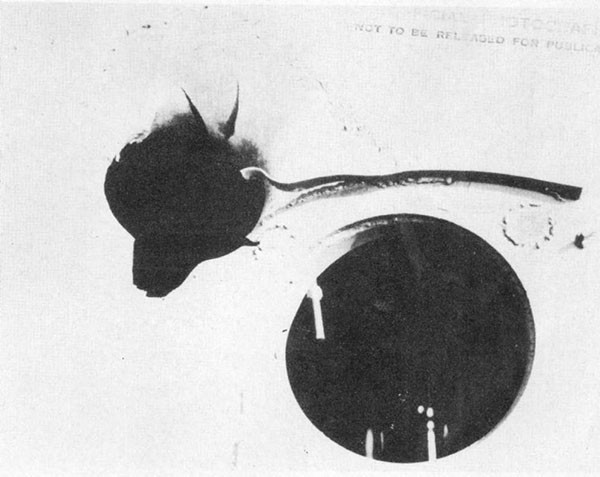
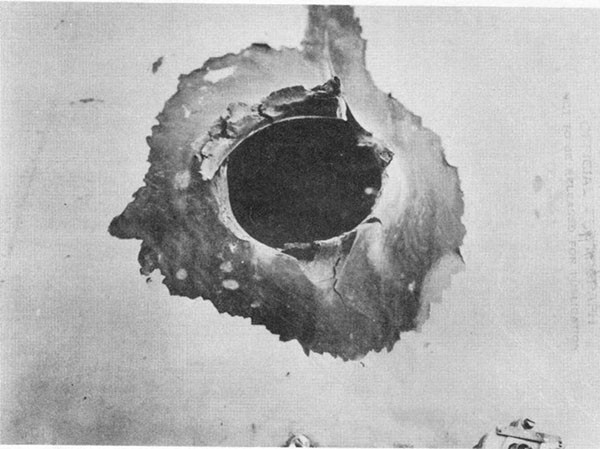
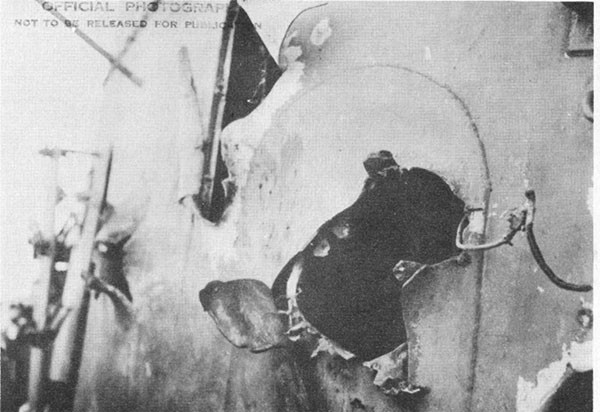
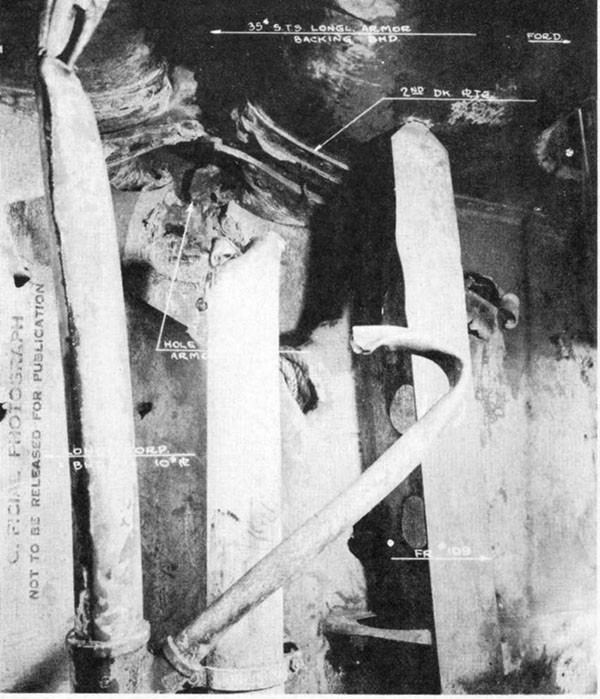
WAR DAMAGE REPORT No. 57
Printed By U. S. Hydrographic Office
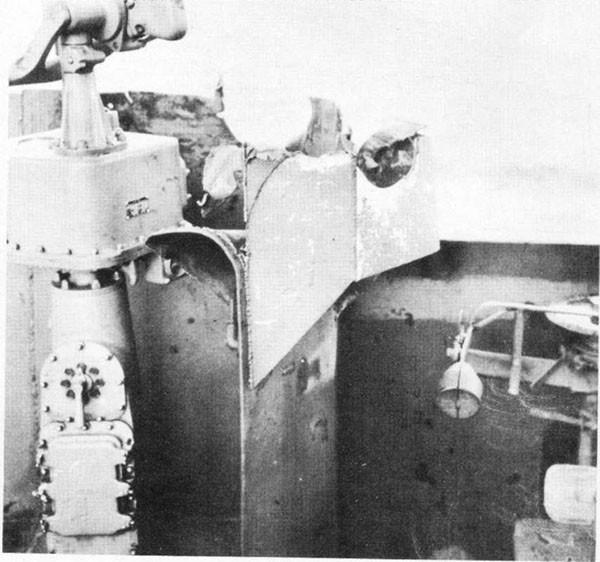
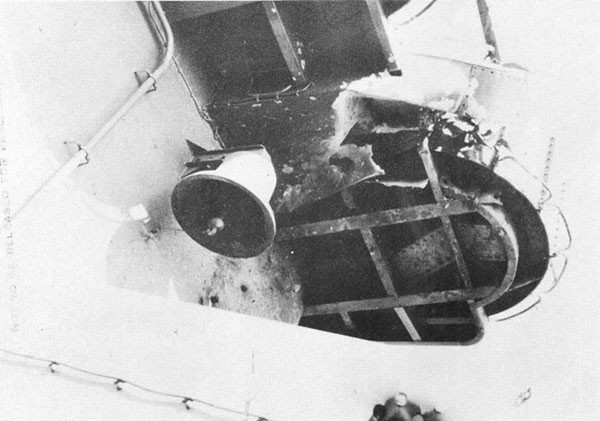
U.S.S. SOUTH DAKOTA (BB57)
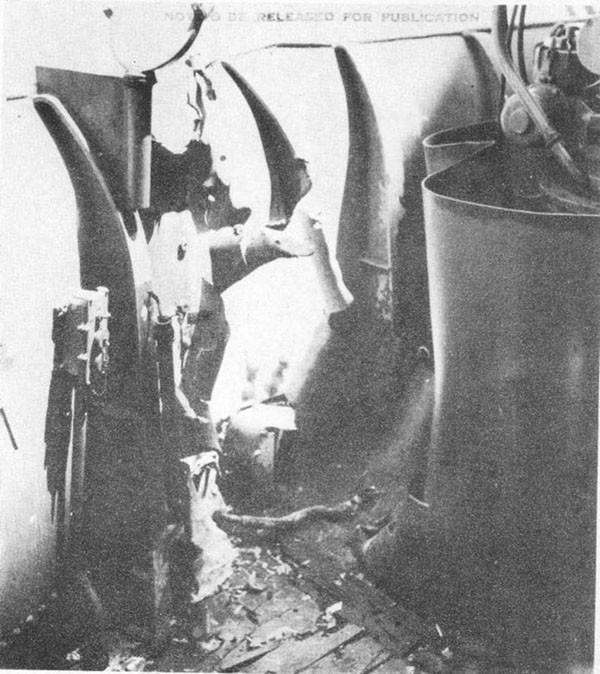
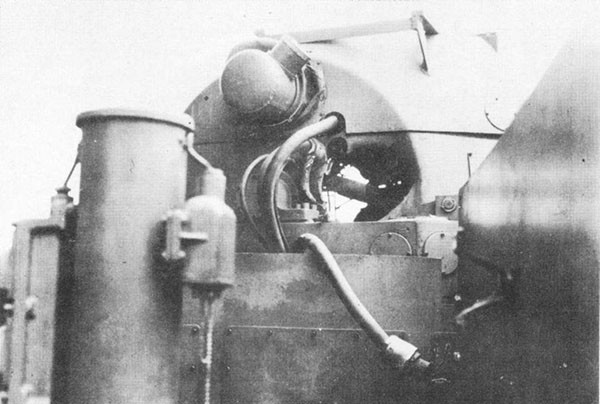
Gunfire Damage
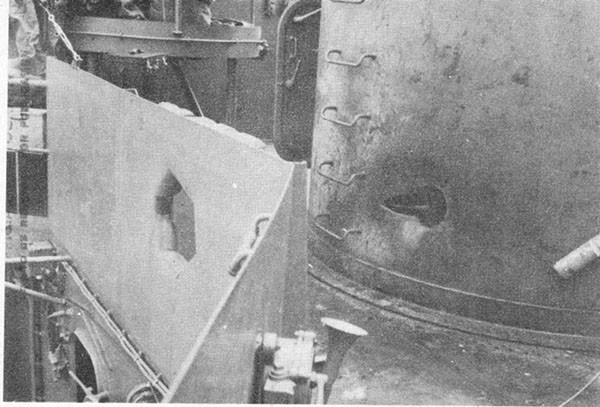
Battle of Guadalcanal
14-15 November 1942
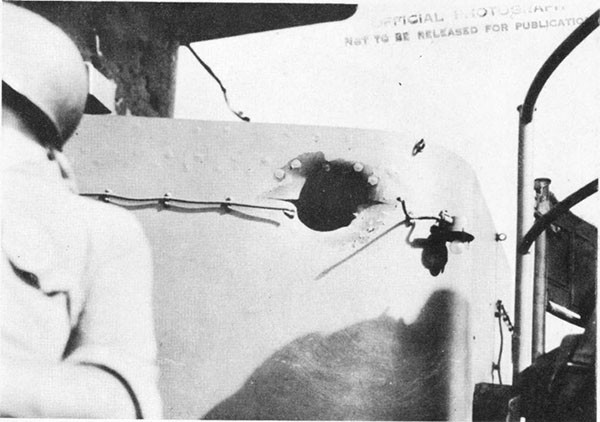
| Class | BB57-61 Class | Length (O.A.) | 680 Ft. 4 In. |
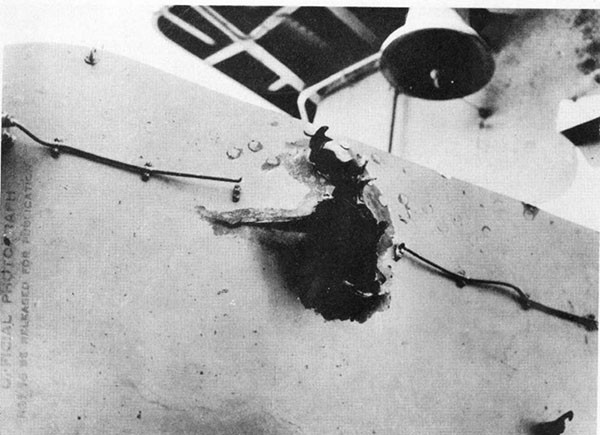
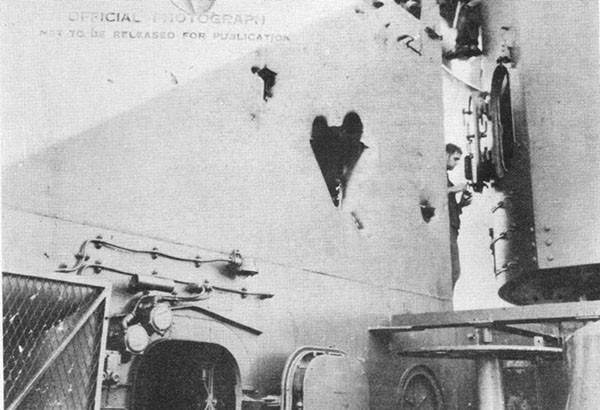
| Launched | 7 June 1941 | Beam (O.A.) | 108 Ft. 2 In. |
| Displacement (Standard) |
35,000 Tons | Draft (Mean) (Standard Displacement) |
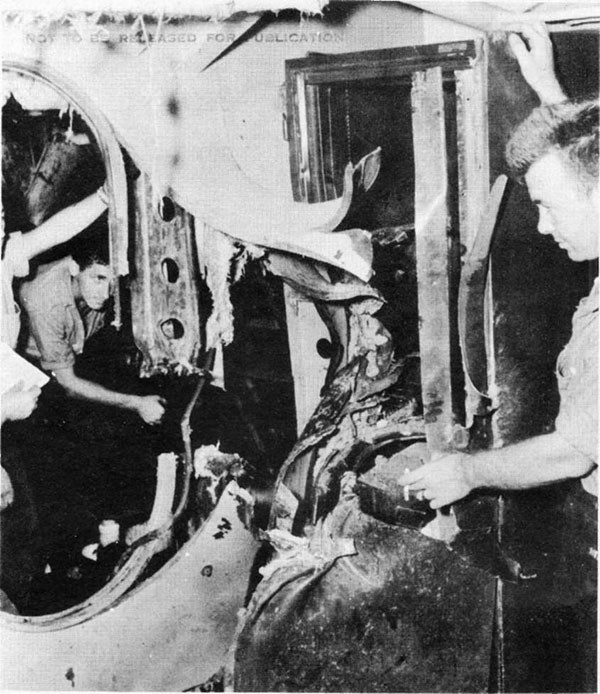
28 Ft. 6 In. |
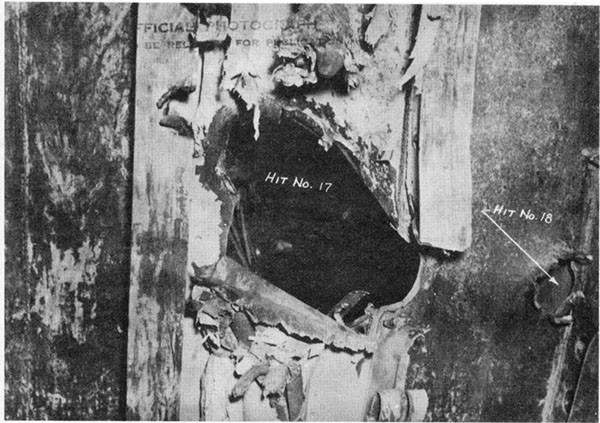
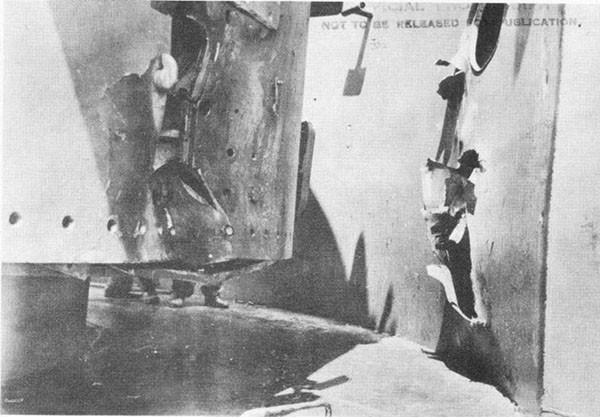
References:
(a) C.O. SOUTH DAKOTA ltr. BB57/A16-3/(0165), of 19 December 1942 (Action Report).
(b) COMDT NYNYK ltr. BB57/C-FS/(L-l-2-3), of 19 April 1943.
(c) INTERROGATIONS OF JAPANESE OFFICIALS, United States Strategic Bombing Survey (Pacific).
(d) C.O. SOUTH DAKOTA ltr. A16-3/S62/(0179), of 8 December 1942.
(e) U.S. Naval Proving Ground, Dahlgren, Va., Report No. 4-43, "Examination of a Japanese 8-Inch Common Projectile."
(f) U.S. Naval Technical Mission to Japan "JAPANESE PROJECTILES - GENERAL TYPES."
(g) C.O. SOUTH DAKOTA ltr. BB57/S16-3/S88, Serial 0181, of 28 February 1943.
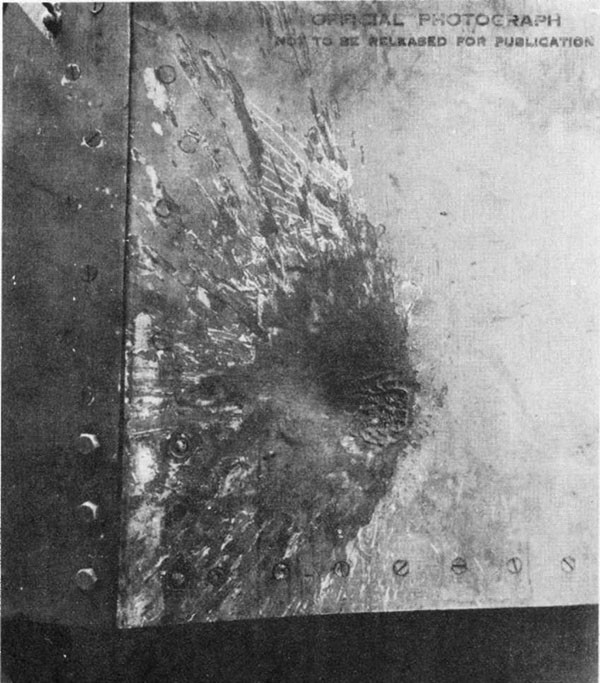
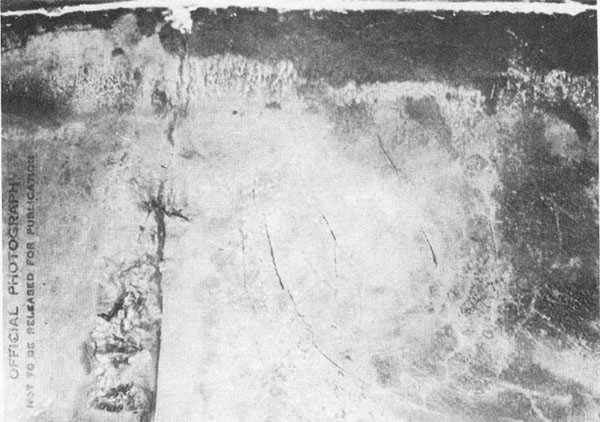
CONTENTS
| SECTION | Page |
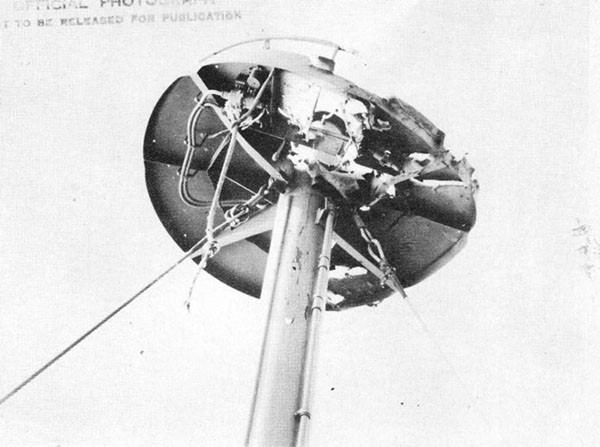
| I SUMMARY | 1 |
| II NARRATIVE | 1 |
| III DISCUSSION | 3 |
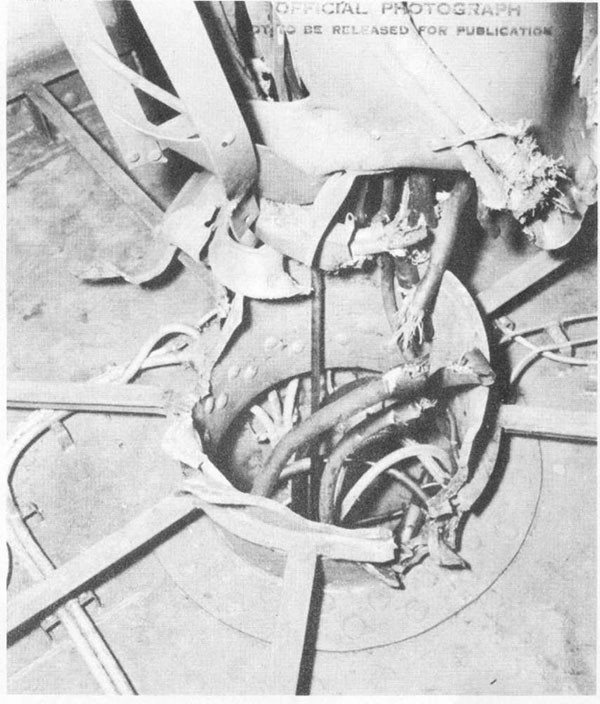
| A. Type of Projectiles | 3 |
| B. Structural Damage | 4 |
| C. Electrical Damage and Casualties | 11 |
| D. Fires and Firefighting | 13 |
| E. Conclusion | 14 |
LIST OF PHOTOGRAPHS
| PHOTO NO. | |
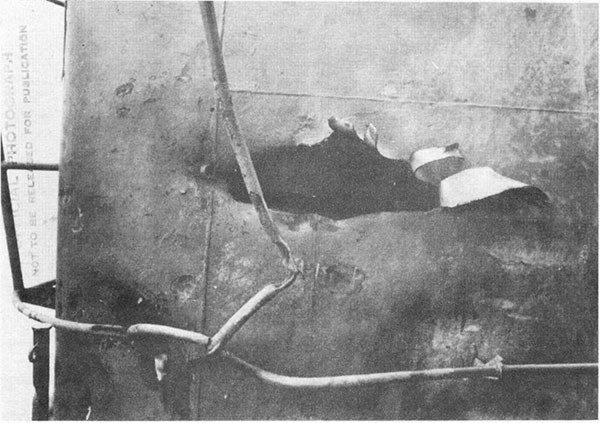
| 1. | Hit No. 2. Hole blown in starboard sheer strake at frame 30. Note patch plates which were installed over smaller holes below sheer strake. |
| 2. | Hit No. 2. Looking forward at underside of main deck through hole in starboard side of bulkhead 31. |
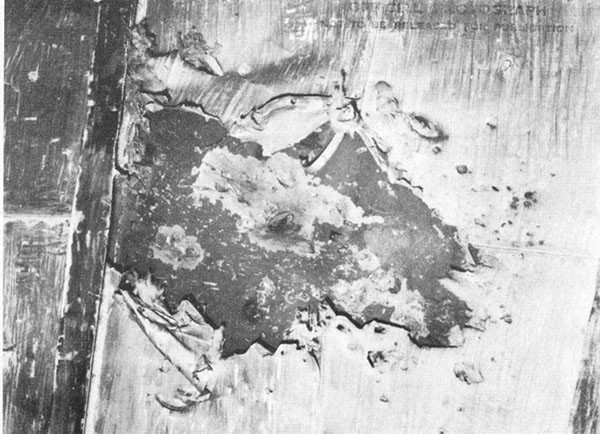
| 3. | Hit No. 4. Projectile entry hole at frame 46-1/2. |
| 4. | Hit No. 4. Looking inboard through hole in torpedo bulkhead No. 2 to the 12.2-inch longitudinal armor bulkhead. Note mark on armor left by projectile, third deck blown down and torpedo bulkhead blown outboard. |
| 5. | Hit No. 5. Damage to spray shield and splinter shield around 40mm director. |
| 6. | Hit No. 6. Projectile holes through starboard splinter shield and into 5-inch secondary battery director foundation. |
| 7. | Center column of 5-inch secondary battery director destroyed by hit No. 6. |
| 8. | Exit hole of hit No. 6 in port side of 5-inch secondary battery director foundation as viewed through hole in port splinter shield. |
| 9. | Entry hole of hit No. 7 in starboard side of 1.1-inch clipping room. |
| 10. | Exit hole of hit No. 7 port side of 1.1-inch clipping room. |
| 11. | Hit No. 8. Hole through Mk. 45 1.1-inch director. |
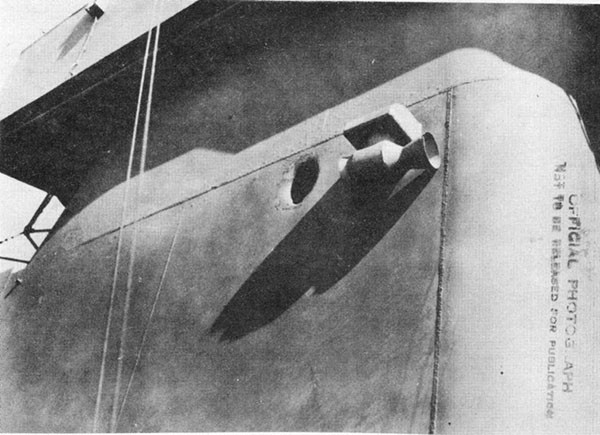
| 12. | Exit holes of hit No. 9 on port side of wind and spray shield around air defense forward. Entry hole on starboard side of spray shield can also be seen. |
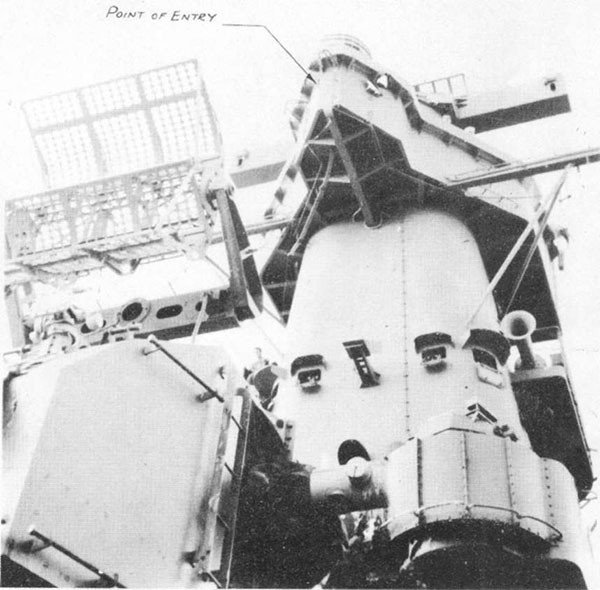
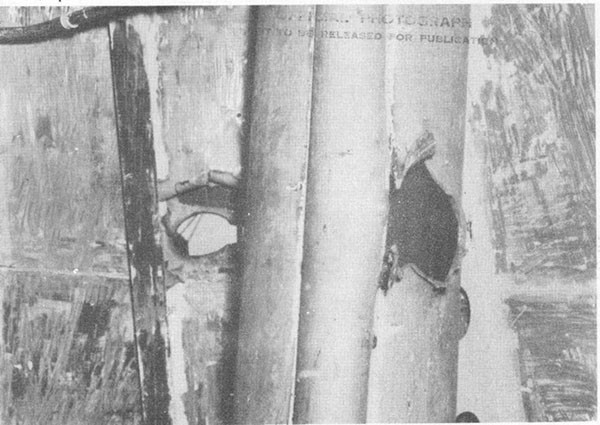
| 13. | Point of entry of hit No. 10 in starboard longitudinal bulkhead. |
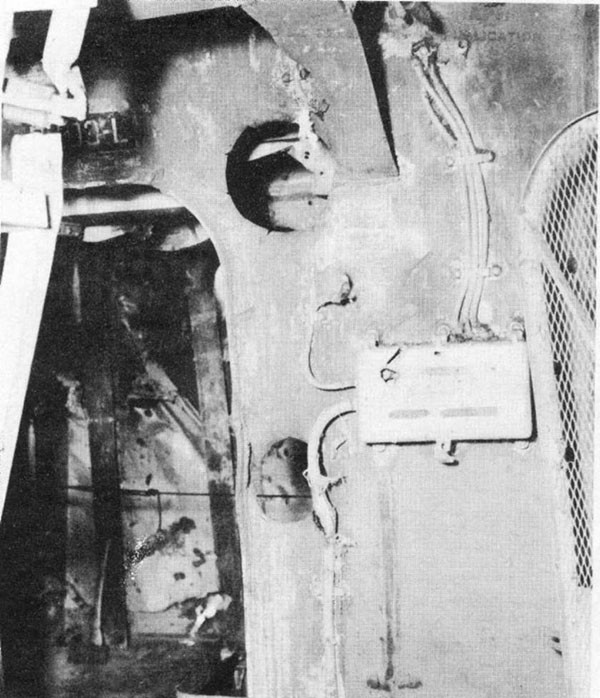
| 14. | Hit No. 10. Holes in centerline bulkhead. |
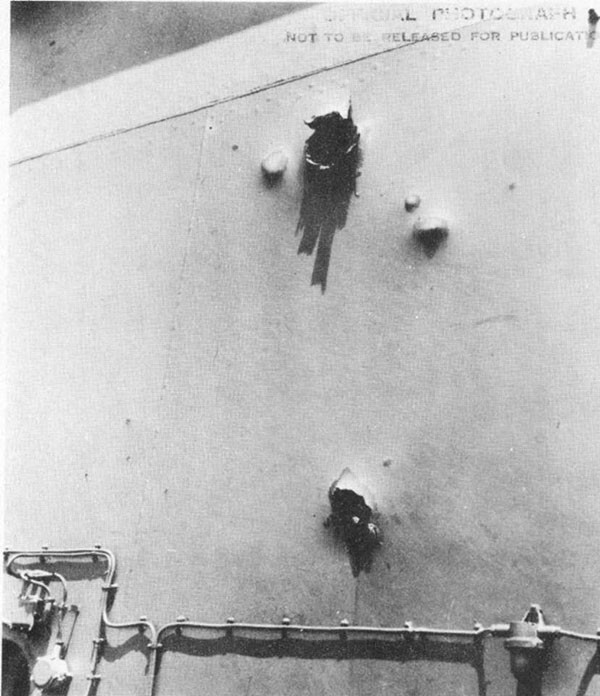
| 15. | Hit No. 10. Holes in port longitudinal bulkhead. |
| 16. | Hit No. 11 on starboard shell. Note fragment holes in torpedo bulkhead No. 2. |
| 17. | Hit No. 11. Damage to bulkhead 83. |
| 18. | Hit No. 12. Entry hole in starboard longitudinal structural bulkhead. |
| 19. | Hit No. 12. Exit hole in port longitudinal structural bulkhead. |
| 20. | Hit No. 12 showing damage to wind and spray shield around port target designator. |
| 21. | Hits Nos. 13, 14 and 15. Entry holes in starboard longitudinal structural bulkhead. |
| 22. | Hits Nos. 13, 14 and 15. Damage to port longitudinal structural bulkhead looking from radar plot. |
| 23. | Outside view of damage to port longitudinal structural bulkhead from hits Nos. 13, 14 and 15. |
| 24. | Hits Nos. 16, 17 and 18 on starboard side of W.R.S.R. 0203. |
| 25. | Hits Nos. 17 and 18 on structural bulkhead 9 feet to starboard of centerline. |
| 26. | Hit No. 17 on structural bulkhead 9 feet to port of centerline. Note damage to safe. |
| 27. | Hit No. 17. Port longitudinal structural bulkhead. Note damage to 5-inch mount No. 2 which stopped this projectile. |
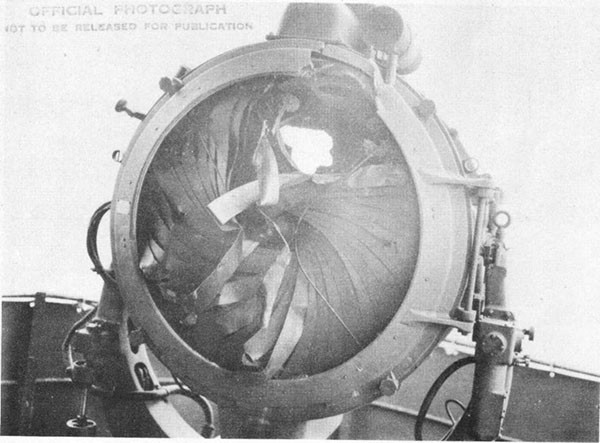
| 28. | Hit No. 19. Damage to searchlight No. 3. |
| 29. | Hit No. 22. Hole in starboard structural bulkhead and foremast housing in battle dressing room. |
| 30. | Hit No. 22. Damage to port structural bulkhead in battle dressing room. |
| 31. | Hit No. 23. Damage to starboard side of stack hood. |
| 32. | Hit No. 23. Damage to port side of stack hood. |
| 33. | Hit No. 24. Damage to 5-inch mount No. 5 from glancing hit by 6-inch projectile. |
| 34. | Hit No. 25. Damage to second deck and torpedo bulkhead No. 2. |
| 35. | Hit No. 26. Point of impact of projectile on barbette No. 3. |
| 36. | Hit No. 26. Damage to main deck around barbette. |
| 37. | Hit No. 26. Damage to bulkhead 129 above second deck. |
| 38. | Damage to bulkhead 81 and radio direction finder foundation possibly from detonation of hit No. 7. |
| 39. | Damage to radar platform apparently from a projectile that detonated on contact. |
LIST OF PLATES
| PLATE NO. | |
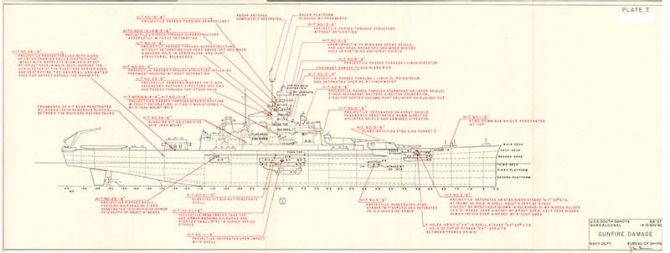
| I | Gunfire Damage |
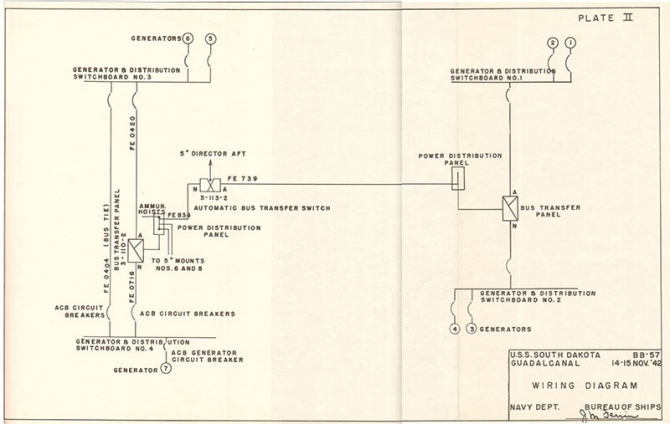
| II | Electrical Wiring Diagram |
SECTION I
SUMMARY
1. During the action off Guadalcanal on the night of 14-15 November 1942, SOUTH DAKOTA was hit by at least 26 projectiles. The most serious material damage was that sustained by electrical wiring circuits. Many interior communication and fire control circuits were severed, particularly in the superstructure where the damage was most extensive. All radio transmitting antennae and all radars, except the one on Main Battery Director II, were rendered inoperative. Short-circuits from this damage caused an overload on the I.C. switchboard which resulted in loss of power on fire control and interior communication circuits throughout the ship for approximately three minutes.
2. Minor flooding resulted from one hit below the waterline and two hits close to the waterline. The list of about 3/4° which developed was removed by shifting fuel oil.
3. Before receiving the first hit, SOUTH DAKOTA experienced electrical difficulties initiated by the shock of Turret III firing astern. Although not the direct result of enemy action, an analysis of this casualty has been included herein because the loss of power to Turret III seriously hampered SOUTH DAKOTA during the action.
4. In spite of numerous hits, SOUTH DAKOTA received only superficial damage. Neither the strength, buoyancy nor stability were measurably impaired.
SECTION II
NARRATIVE
5. SOUTH DAKOTA, WASHINGTON, PRESTON, GWIN, BENHAM and WALKE comprised Task Force 64 on the night of 14-15 November 1942. During the day of 14 November, numerous units of the enemy fleet, including battleships, cruisers, destroyers and transports had been sighted north and west of Guadalcanal. As it was probable that some of the enemy combatant vessels would bombard Guadalcanal during the night in preparation for the arrival of their transports, Task Force 64 was directed to take a position southeast of Savo Island by midnight of 14 November 1942 in order to be in a position to intercept the expected enemy bombardment group.
6. During the night the sea was calm. A two to six-knot wind was blowing from the southeast. Some low clouds increased in area giving an overcast at about 0200 on 15 November. Surface visibility, which was about twelve miles early in the evening, progressively decreased as the overcast developed. Action was expected and SOUTH DAKOTA
--1--
was at General Quarters and Material Condition AFIRM had been set. The firemain was divided into four sections with fire and flushing pumps 2, 3, 4 and 5 in machinery spaces B-l, B-2, B-3 and B-4 respectively, on the line.
7. At 0000 15 November, Task Force 64 was about thirteen and a half miles southeast of Savo Island on course 270° true. SOUTH DAKOTA was the second ship in column, astern of WASHINGTON. At 0007 three enemy vessels were sighted east of Savo Island at a range of about 18,000 yards. SOUTH DAKOTA estimated this force to consist of one battleship and two cruisers. Japanese sources reported that the battleship KIRISHIMA and cruisers ATAGO and TAKAO were present during the action and it is possible that these ships were present during the first phase of the ensuing action as well as the third phase. At 0018 SOUTH DAKOTA opened fire with the main battery on the second ship in formation at a range of about 15,700 yards. Firing on this target continued until 0024 when it disappeared from the radar screen. SOUTH DAKOTA shifted her main battery to another target and fired five salvos.
8. Just as SOUTH DAKOTA checked fire at 0033 she began to suffer a series of electrical failures initiated by the shock of firing. Power was progressively lost on the after half of the ship. By 0036 the short-circuit was isolated and power restored except on 5-inch mounts Nos. 6 and 8. Temporary repairs were made and power was regained on these mounts later. At no time was 440 volt power lost on Turrets I and II or any 5-inch mount except Nos. 6 and 8.
9. SOUTH DAKOTA changed course at 0036 to clear two of our damaged destroyers and then resumed base course which had been changed to 300° true. At 0040, Turrets I and II commenced firing on targets close to Savo Island which were tentatively identified as eight destroyers. Turret III was firing over the stern at a target at 0042. The blast from the guns of Turret III set fire to the planes, but the next salvo blew two planes overboard and extinguished most of the fires. At 0045 the target astern exploded and was lost on the radar screen and the main battery ceased firing. The SOUTH DAKOTA identified this target as a cruiser; however, other reports indicate that it probably was the destroyer AYANAMI.
10. The SG radar was inoperative from 0041 to 0046 which complicated station keeping and detection of new targets. One report of enemy vessels on the starboard bow at a range of 7000 yards had been overlooked in conn while directing fire on targets bearing 112° relative. Radar plot had just finished reporting the enemy bearing 070° relative, range 5800 yards, when SOUTH DAKOTA was illuminated at 0048 by four searchlights on the second ship in the enemy column. This force was reported to be four ships in column on an opposite course. SOUTH DAKOTA identified the first ship as a battleship and the second and third ships in column as cruisers. It is probable that the first ship was the battleship KIRISHIMA and the second and third ships the cruisers TAKAO and ATAGO. WASHINGTON opened fire on the leading ship of the enemy column almost immediately. About thirty seconds after illumination, the enemy opened fire concentrating on SOUTH DAKOTA. Simultaneously SOUTH DAKOTA's secondary battery commenced firing on the illuminating
--2--
ship. The searchlights were quickly extinguished on the second ship in column and the third ship assumed the task of illumination. SOUTH DAKOTA's main battery fired two or three salvos at the second ship in column and then shifted to the third ship. The enemy began hitting almost immediately and continued hitting until 0105. Steering and engine control were never lost, but extensive damage was done to radar, radio, fire control and I.C. circuits and instruments. At 0108 SOUTH DAKOTA ceased firing when all targets were lost. Enemy fire had already ceased. During the last part of the engagement contact with WASHINGTON was lost. SOUTH DAKOTA therefore withdrew to the 1000 rendezvous as her night-fighting efficiency had been seriously impaired.
SECTION III
DISCUSSION
A. Type of Projectile
11. During the engagement described above, SOUTH DAKOTA sustained at least 26 projectile hits. It is estimated that one hit was 5-inch, six were 6-inch, eighteen were 8-inch and one was 14-inch. The caliber of these hits was estimated from the damage produced and fragments recovered of one projectile. In many cases the size of the entry hole of the projectile almost gave a direct measure of its caliber. Although structural damage was extensive, it was considerably less than would be generally expected from this number and caliber of hits. That damage was not more extensive can be attributed to the fact that most projectiles passed through the ship's structure without detonating. SOUTH DAKOTA reported that fragmentation was chiefly due to impact rather than detonation. After a study of the fragments, one 8-inch projectile was classified in reference (e) as a common projectile. From reference (f), however, it appears that this was probably a Japanese 8-inch AP projectile. From the damage produced it appears that the majority of the hits were AP projectiles. Reference (f) reported that the Japanese used a fuze with a time delay of 0.4 second in 8-inch and larger AP projectiles and a time delay of 0.08 second in 6-inch AP projectiles as compared with a time delay of about 0.02 second to 0.035 second in U.S. Naval AP projectiles. This relatively long time delay was used to allow time for penetration of the lower side belt after the fuze action had been initiated on water impact for a near-short. Because of this long time delay, most projectiles passed through the superstructure without detonating.
12. Japanese AP projectiles were designed to continue an undisturbed trajectory under the water with the hope of striking the target below the waterline and possibly below the armor belt. To prevent deflection upon striking water, the forward section of the projectile was weakened so that when it struck water the windshield and cap head would break off leaving a flat end. It would be expected that when striking structure above
--3--
the waterline, these parts would break off and make fragment holes in the vicinity of the hole made by the body of the projectile. This is believed to be the reason that, even when there was no detonation, fragment holes were frequently found near the projectile hole. Also the hole made by the hardened cap head would be expected to be round and slightly smaller than the hole made by the body of the projectile as noted in hits Nos. 9 and 10.
B. Structural Damage
Note: Hits sustained in the engagement are numbered on PLATE I for convenience from forward aft without regard to size or time of hit. The sizes of the projectiles were estimated from the effects of the hits. In some cases, the hits were so concentrated that it was difficult to associate damage with a specific hit.
Hit No. 1
13. This hit, estimated to have been a 6-inch projectile, nicked the top of the starboard 20mm gun shield at about frame 17 without detonating.
Hit No. 2
Photos 1 and 2
14. This projectile detonated upon impact at frame 30 starboard blowing a 5 by 4-foot hole in the sheer strake about four feet below the main deck. The force of the detonation passed inboard and aft and blew an 8 by 6-foot hole in bulkhead 31 just below the main deck and 2 feet 6 inches inboard of the starboard side. The main deck was bulged up about 2-1/2 inches over a 5 by 4-foot area just inboard of the starboard shell and forward of bulkhead 31. The half deck was dished down about 4 inches over a 6 by 6-foot area adjacent to the starboard shell and forward side of bulkhead 31. The 42-inch ventilation duct on exhaust system H2-33-1 was blown out. Expanded metal partitions, doors, shelves and bins in AH-219-L were demolished. It is estimated that this was an 8-inch AP projectile.
15. Six holes occurred in the starboard shell plating between frames 29 and 32 just below hit No. 2 (Photo 1). A seam in the shell about 1 foot above the second deck was opened between frames 30-1/2 and 32; lockers, ventilation ducts, insulation and sheathing were damaged in A-207-L; and fragments ignited a bedding bag in A-206-L and clothes in two lockers in A-207-L. Although there was no area within the ship where the reported extent of damage would indicate a point of detonation and there were no exit holes, SOUTH DAKOTA reported that the holes in the shell had been made by six 6-inch hits. However, from their location, the extent and nature of the damage and knowledge of the characteristics of Japanese projectiles, it is believed that these holes were made by the cap head and fragments of the windshield of the projectile of hit No. 2.
--4--
Hit No. 3
16. The starboard side of Turret I was struck a glancing blow by a projectile, probably 6-inch, which exploded on the starboard sight port. The hinge on the sight port was bent and the closing device on the port was rendered inoperative. Seven strakes of wood deck planking between frames 44 and 48 were badly splintered by fragments.
Hit No. 4
Photos 3 and 4
17. This hit struck between frames 46 and 47 about a foot above the third deck. It penetrated longitudinal torpedo bulkhead No. 2 and detonated on the 12.2-inch longitudinal armor bulkhead about 2 feet 2 inches above the third deck. The armor was not indented, but the projectile left a black circle about 6 inches in diameter within a partial black ring about 8 inches in diameter on the face of the armor. The force of the explosion blew the third deck down about 3-1/2 inches over a 15 by 30-inch area and fragments penetrated the third deck between torpedo bulkhead No. 2 and the longitudinal armor bulkhead in two places. Torpedo bulkhead No. 2 above the third deck was blown outboard between frames 46 and 47 by the force of the explosion. The following tanks were reported to have been flooded as a result of the hit: A-1-F, A-21-F, A-23-F, A-33-F and A-39-F. Although it was not mentioned in the report, A-27-V probably flooded also.
18. This projectile probably landed short of SOUTH DAKOTA and was about to ricochet as the hit was below the waterline and the projectile was rising. From the black circles which the projectile left on the armor, it is estimated that this was an 8-inch AP projectile.
Hit No. 5
Photo 5
19. The wind and spray shield at frame 74 starboard on the flag bridge level was hit by an estimated 8-inch projectile that detonated on contact. The 10-pound STS splinter shield around the starboard 40mm director was badly buckled and holed and the 40mm director was extensively damaged. Fragments from this projectile penetrated the deck of the flag bridge in the vicinity of frame 74 and the watertight door between the signal bridge and signal shelter. One fragment gouged a hole 3 inches in diameter to a depth of 3/4 inch in the 1-1/2-inch STS bulkhead of the signal shelter. Other fragments blew downward and sprayed the first superstructure deck between frames 66 and 72 starboard and penetrated hatch 01-70-1 in eleven places. On the navigation bridge fragments from this projectile penetrated the spray shield and the starboard longitudinal structural bulkhead in two places and the deck in three places near frame 75. Extensive blast damage was sustained by metal joiner doors, ventilation ducts, aluminum bulkheads, and metal furniture in the vicinity of the hit. Three glass panels on the flag bridge were broken by blast or fragments and the operating mechanisms rendered unserviceable.
--5--
Hit No. 6
Photos 6, 7 and 8
20. The 10-pound STS splinter shield was hit at frame 74 about two feet above the housetop deck. The projectile penetrated the 60-pound STS foundation of No. 1 5-inch secondary battery director, severed the center column, and passed out through the port side of the director foundation and the port splinter shield at about frame 75 without detonating. A small electrical fire started and ignited some life jackets. It is estimated that this was an 8-inch AP projectile.
Hit No. 7
Photos 9 and 10
21. The 30-pound STS bulkhead of the 1.1-inch clipping room was pierced by a projectile that passed through and out about 6 feet above the housetop at frame 78-1/2 and detonated over No. 4 1.1-inch quadruple mount. Three fragments penetrated the 15-pound STS splinter shield around the mount exploding the ready service ammunition on the shield and six fragments pierced the deck within the working circle of the mount. The mount itself was badly damaged by the fragments. Within the 1.1-inch clipping room the centerline beam was severed, the overhead blown open, ventilation ducts crushed and insulation badly damaged. Several 1.1-inch clips exploded and ignited life jackets of dead and wounded men. The sprinkling system was cut in three places and 75 1.1-inch clips were destroyed. From the size of the hole it is estimated that this hit was an 8-inch AP projectile.
Hit No. 8
Photo 11
22. This projectile, probably 8-inch, hit the Mk. 45 1.1-inch director on the third level above the housetop at about frame 79. It ripped through the director apparently without exploding.
Hit No. 9
Photo 12
23. The wind and spray shield around air defense forward at frame 79 had one hole on the starboard side and two holes on the port side. It is possible that the two holes on the port side were caused by different projectiles. However, it appears more likely that the cap head of an 8-inch AP projectile broke off upon hitting the starboard side of the windshield and made the second hole in the port side of the windshield. Apparently the projectile or projectiles did not detonate.
--6--
Hit No. 10
Photos 13, 14 and 15
24. A 10-inch hole was pierced in the starboard longitudinal structural bulkhead at frame 82 about 7 feet above the first level above the housetop. The centerline bulkhead had a 10-inch hole about 30 inches above an 8-inch hole at frame 83. The port longitudinal structural bulkhead had a 10-inch hole about 6 feet above the first level above the housetop at frame 84 and a 10-inch by 3-inch hole at the deck level. These holes were reported to have been caused by an 8-inch and a 5-inch projectile. It appears more probable that an 8-inch AP projectile cap head broke off the projectile upon penetrating the starboard structural bulkhead and made the second hole in the centerline and port bulkheads, while the intact projectile made only one entry hole in the starboard bulkhead. Two exit holes associated with only one entry hole from Japanese projectiles have been noted in other war experience. Hit No. 21 on SAN FRANCISCO, 13 November 1942* is an example. The access ladders to the second level above the housetop were damaged, and ventilation ducts demolished, but there is little evidence of a detonation associated with this hit.
Hit No. 11
Photos 16 and 17
25. An estimated 6 or 8-inch projectile detonated upon contact with "N" strake of the shell just aft of frame 83 between the second and third deck levels. A hole about 3 by 2 feet was blown in the shell and torpedo bulkhead No. 2 was holed in numerous places by fragments. A tear in the shell plating extended forward to about frame 81-1/2. The rivets in "N" strake were loose or missing between frames 82-1/2 and 84-1/2. Transverse bulkhead 83 was ruptured and distorted between the shell and torpedo bulkhead No. 2 from the second to the third deck. As a result of this hit, B-23-F, B-31-F and B-39-F flooded.
Hit No. 12
Photos 18, 19 and 20
26. Another projectile, probably 8-inch AP, hit at frame 83-1/2 about 8 feet above the deck of air defense forward. The projectile passed through two 60-pound STS bulkheads and shattered the top of the port spray shield at about frame 84 without detonating. Two 3-inch fragment holes were blown in the director tube.
Hits Nos. 13, 14 and 15
Photos 21, 22 and 23
27. Three hits, estimated to have been 8-inch AP, were made in the starboard bulkhead between frames 83 and 85 from 5 to 8 feet above the third level above the housetop. These projectiles ripped through the
___________
* BuShips War Damage Report No. 26
--7--
transverse passage and the radar plot and out the port side, demolishing the top of the port spray shield between frames 83 and 86. Bulkhead 84 had a 30 by 60-inch hole torn in it and the fourth level above the housetop had a 12 by 18-inch and an 18 by 36-inch hole. The port longitudinal structural bulkhead was perforated by at least five holes about two feet in diameter. All equipment and instruments in radar plot were demolished and a fire was started. In spite of the extensive damage, there is little evidence that these projectiles detonated.
Hits Nos. 16, 17 and 18
Photos 24, 25, 26 and 27
28. Three hits were made on the starboard bulkhead between frames 83 and 85 about three feet above the second superstructure deck. From the size of the entry holes it is estimated that these were one 8-inch AP and two 6-inch AP projectiles. The 8-inch projectile ripped through five structural bulkheads and was stopped by the shield of 5-inch mount No. 2 knocking off the rear door without detonating. When discovered later, it was thrown overboard. In staterooms 0202, 0203, 0205, unassigned space under starboard signal flag locker, and B-103-L, through which the projectiles passed, furniture, ventilation ducts, metal joiner doors and aluminum divisional bulkheads were demolished. Less extensive shock and fragment damage was sustained in staterooms 0204, 0206, 0207 and passage B-0201-L. One fragment pierced the starboard signal flag locker and started a minor fire.
Hit No. 19
Photo 28
29. No. 3 36-inch searchlight received a direct hit estimated to have been an 8-inch projectile that passed through without detonating.
Hit No. 20
30. An estimated 6-inch projectile hit the tank top at frame 85-1/2, penetrated the armor backing bulkhead between the main and second decks and detonated. Transverse bulkhead 85 was ruptured and distorted over an area 15 by 24 inches. Fragments sprayed lockers in supply office stores and started a small, smoldering fire in stationery and clothing lockers.
Hit No. 21
31. An area of the 50-pound STS shell 24 inches in diameter at frame 87 starboard between the second and third decks was indented to a depth of six inches. It was reported that this was the result of an 8-inch glancing hit. If so, the performance of this 50-pound STS plate was most unusual. Another possibility is that this indentation was made by the windshield or cap head of hit No. 11 or hit No. 20.
--8--
Hit No. 22
Photos 29 and 30
32. Just above the second level above the housetop at frame 87 the starboard side of the structural longitudinal bulkhead was hit by an estimated 5-inch projectile. The projectile pierced the foremast housing tube and passed out through the port longitudinal structural bulkhead near frame 86. The port bulkhead stiffener at frame 86 was distorted and the first aid locker penetrated by three fragments. Five panels of sheathing and insulation in the first aid station were damaged.
Hit No. 23
Photos 31 and 32
33. An estimated 8-inch AP projectile hit the radar antenna of 5-inch director No. 3. Fragments of the windshield and cap head broke off and sprayed the starboard side of the stack hood in the vicinity of frame 89. The projectile pierced the stack hood and continued on through the radar antenna of 5-inch director No. 2.
Hit No. 24
Photo 33
34. Five-inch mount No. 5 was hit a glancing blow by an estimated 6-inch projectile. The 2-inch STS was sprung but not penetrated and minor structural damage was sustained inside the mount. Apparently the projectile detonated upon impact. Fragments gouged both guns of 5-inch mount No. 7 and sprayed the starboard side of the deckhouses on the first and second superstructure decks between frames 93 and 100.
Hit No. 25
Photo 34
35. An estimated 8-inch AP projectile hit the shell at the second deck, frame 109-1/2. The projectile pierced the shell at a seam between a 25-pound and a 50-pound STS strake, furrowed through the 20-pound STS second deck, pierced 10-pound longitudinal torpedo bulkhead No. 2 and penetrated the 12.2-inch longitudinal armor bulkhead to a depth of 7 to 8 inches at the top edge of the armor. Fragments went aft and pierced and distorted frames 109, 110, 111 and 112 and penetrated the third deck between torpedo bulkhead No. 2 and the longitudinal armor bulkhead. Although the hole in the shell was above the waterline, compartments B-71-F, B-75-V, B-77-F and B-79-F flooded as a result of this hit. This was reported by SOUTH DAKOTA to have been a 6-inch projectile, but it is not believed that a 6-inch projectile would have penetrated so much armor.
--9--
Hit No. 26
Photos 35, 36 and 37
36. An estimated 14-inch projectile passed through both sides of the coaming of hatch 1-128 and detonated upon hitting the barbette of Turret III at frame 123-1/2 about 17 inches from the top. The 17.3-inch armor was gouged to a depth of about 1-1/2 inches over an area 15 inches in diameter. Surface cracks covered this area and vertical cracks developed in the armor to a distance of 8 feet aft of the point of impact. The blast blew a hole in the main deck 3 feet wide extending around the barbette for a distance of 10 feet. Around this hole the main deck was dished down out to 8 feet from the barbette between frames 121 and 130. Some fragments were deflected down and aft riddling the starboard side of bulkhead 129 in numerous places between the main and second decks including one hole 26 inches by 35 inches. Some of the fragments continued on through C-204-L piercing the equipment in the crew's messing space and penetrating watertight door 2-136-1 in two places and bulkhead 136 in one place. In C-201-L on the starboard side of the barbette considerable damage was done to equipment, mess tables, and ventilation ducts. The armored second deck defeated all fragments. Fragments and blast deflected upward from the point of impact demolished the gas seal and water shed for 30 feet around the circumference of the barbette, gouged the gun sleeves of the right and center guns of Turret III and ignited the gun bloomers. Some difficulty was experienced in training the turret after the hit but it was believed that the turret was still able to fire. Fragments ranging aft on the main deck damaged 20mm guns, ready service boxes, gun shields, starboard catapult, and fire plug 1-133-2. Other fragments spreading forward pierced the superstructure on the main and first superstructure deck levels.
Miscellaneous Hits
Photos 38 and 39
37. The port side of transverse structural bulkhead 81 on the second level above the housetop was riddled with fragment holes ranging in size from 3 to 7 inches in diameter. The foundation of radio direction finder No. 2 was demolished by blast and fragment attack. The source of these fragments is not clear. It is possible that they came from the detonation of hit No. 7 over 1.1-inch mount No. 4.
38. The SC-1 radar antenna and mount were shot away and the radar platform was riddled with holes. From the appearance of Photo 39 it is probable that the radar was hit by a projectile that detonated on contact.
Turret Blast Damage
39. The blast from Turrets I and II while trained as far aft as possible on the starboard side did considerable damage on the first superstructure and main decks. The 3/8-inch STS shield around the 40mm mount at frame 73 starboard on the first superstructure deck was tilted inboard and the
--10--
ready ammunition racks inside the shield were damaged. The 40mm mount itself was wrecked. An area of the deck 9 feet wide between frames 72 and 76 was dished to a depth of 4 inches and the starboard longitudinal structural bulkhead of the senior staff officer's cabin on the second superstructure deck was blown in about three inches between frames 72 and 74. The 3/8-inch STS shield around 20mm guns located on the starboard side of the main deck between frames 54 and 64 was blown inboard and torn loose from the deck. Watertight door 1-58 was buckled. Telephone boxes, 20mm ready service lockers, ladders and ventilation closure covers in the vicinity were damaged by the blast.
Armor Performance
40. It is to be noted that the armor performed as designed. No projectile penetrated the armored box. Hits Nos. 3, 4, 17, 24, 25 and 26 struck armor before detonation and failed to penetrate. The Commanding Officer, SOUTH DAKOTA, in the action report, reference (a), made this comment:
"Armor: - Fire control and conning tower have definitely proven their worth. Further agitation for the removal of this weight is definitely suspended. Control stations behind armor should be used more frequently. Too much stress in the past has been laid to the space restrictions at these stations. Had these stations not been utilized during the engagement, control and conn personnel would probably have been destroyed."
C. Electrical Damage and Casualties
41. Extensive damage was done to electrical circuits in the superstructure. The loss of many fire control, interior communication, radio and radar facilities seriously impaired the fighting power of the ship particularly in night actions. The SOUTH DAKOTA Electrical Work List enumerated thirty-five different kinds of circuits needing repairs including such items as renewing all flexible wiring to main battery director No. 1 and to secondary battery director No. 1. From the information available, in most cases electrical damage cannot be associated with specific hits.
42. The loss of all search radar was a serious handicap to SOUTH DAKOTA. In this regard the Commanding Officer in reference (a) stated:
"The trust and faith in the search radar equipment is amazing. After this ship lost both SG and SC equipment, the psychological effect on the officers and crew was most depressing. The absence of this gear gave all hands a feeling of being blindfolded."
43. During the action, power on fire control and interior communication circuits throughout the ship was lost for approximately three minutes as a result of short-circuits due to the destruction by gunfire of cable and
--11--
equipment on I.C. and F.C. circuits in the superstructure. The short-circuits produced an overload such that the circuit breaker on the normal feeder to the I.C. switchboard tripped on main generator and distribution switchboard No. 1. The I.C. switchboard was equipped with automatic bus transfer to shift the power supply to the emergency Diesel generator switchboard No. 1 in case of interruption of normal power from the main board. As the capacity of the Diesel generator was considerably smaller than the connected load on the I.C. switchboard, the F.C. and I.C. bus was energized through a 1000 ampere circuit breaker which was designed to automatically open before the automatic bus transfer operated. Thus, only the load on the I.C. restricted bus, which was well within the capacity of the emergency generator, would remain on the board. The circuit breaker opened properly. But after the automatic bus transfer operated, the fuzes protecting the emergency supply "blew." Apparently several of the circuits connected to the I.C. restricted bus were still short-circuited. Defective circuits were isolated and power restored on all serviceable I.C. and F.C. circuits in approximately three minutes.
44. Ordinarily, matters which are not the result of damage by enemy action are not included in damage reports. In this case, however, the fact that electrical failure initiated by the shock of gunfire was a handicap to SOUTH DAKOTA while in action warrants some comment. As a result of this failure, numerous control shifts had to be made and it was reported that all power on the after part of the ship was lost for about a minute. This occurred before receiving the first hit.
45. At the time of the failure, normal power was being supplied to the after 5-inch director from generator and distribution switchboard No. 4 through a bus transfer panel, power distribution panel, and an automatic bus transfer switch (PLATE II). The automatic bus transfer switch received its alternate supply from generator and distribution switchboard No. 2 through a bus transfer panel and a power distribution panel. The AQB circuit breakers in the distribution panels, which were in unattended locations, were "locked in" in accordance with outstanding instructions.
46. The shock produced by Turret III firing astern caused the contactor for the alternate power supply in the automatic bus transfer switch to close, thereby paralleling generator and distribution switchboards No. 4 and No. 2. As the two power sources were not in phase the resulting synchronizing current surge welded the contacts on the automatic bus transfer switch closed and the normal feeder cable to the after 5-inch director (FE834) ruptured and short-circuited between phases on the No. 4 generator and distribution switchboard side of the rupture. Because no mention was made of trouble on the alternate power supply to the director, it is inferred that the rupture of the normal feeder cleared the short-circuit on the alternate supply which then continued to supply the director. As the AQB circuit breaker in the power distribution panel was "locked in" the fault on generator and distribution switchboard No. 4 was cleared by the tripping of generator No. 7 ACB circuit breaker. It was not reported whether the feeder ACB circuit breaker tripped also but it was implied that it did.
--12--
47. The operator then energized generator and distribution switchboard No. 4 from generator and distribution switchboard No. 3 by closing the bus tie (FE0404) circuit breaker. The circuit breaker for the normal feeder (FE0716) to the bus transfer panel was closed manually, causing the circuit breaker to generator No. 6 to trip. At this time, the circuit breakers on both normal feeder (FE0716) and alternate feeder (FE0420) to the bus transfer panel were opened. Power was restored to generator and distribution switchboards Nos. 3 and 4 by closing the circuit breakers to generators Nos. 5 and 6. The alternate feeder (FE0420) circuit breaker to the bus transfer panel was closed at generator and distribution switchboard No. 3, tripping out circuit breakers for generators Nos. 5 and 6 and the alternate feeder (FE0420). Circuit breakers for generators Nos. 5, 6 and 7 were immediately closed again, while circuit breakers on normal feeder (FE0716) and alternate feeder (FE0420) remained open. From the time of closure of the automatic bus transfer switch until closure of the circuit breakers for generators Nos. 5, 6 and 7 it was reported that about one minute elapsed. Repair parties then located the fault, isolated it and restored power to 5-inch mounts Nos. 6 and 8.
48. The source of these electrical failures was the unreliable operation of the automatic bus transfer switch. All of these switches have been replaced by a manual type transfer switch.
49. The power interruption on the after main switchboards was made more extensive by the failure of the feeder and the main generator circuit breakers to operate selectively under short-circuit conditions. As a result, instead of the feeder breaker operating alone to isolate the short-circuit, the generator breaker also tripped out at the same time. For proper operation, the generator circuit breakers should not open under fault conditions except when the fault is on the switchboard bus or between the generator and the switchboard. This means that the generator circuit breaker should have sufficient time delay at currents equal to the maximum short-circuit current of the generator to permit the feeder breakers only to trip. At the same time, the generator breakers must provide a reasonable amount of switchboard bus fault protection. After considerable study and development and subsequent to this casualty, improved circuit breaker performance was obtained by replacing the time delay dashpot trip devices on the main generator circuit breakers with a type PQ relay. The type PQ relays installed on the SOUTH DAKOTA were the first that became available. Nearly comparable improvement in selective breaker operation has been obtained on similar ships by the installation of special time delay dashpots on the generator breakers.
D. Fires and Firefighting
50. There were no serious fires during or following the action. Fires were small and quickly extinguished before they spread beyond the immediate vicinity of ignition. The fire potentially most dangerous was in two life jackets which were found burning in passage B-319-T. These were believed to have been ignited by a flash through the ammunition hoist from 1.1-inch clipping room B-0502-M. This passage is within the armored box and adjacent to a 5-inch magazine. Other fires were started in the following locations:
--13--
After end of main deck in the vicinity of catapults
40mm mount No. 2, frame 72 port on first superstructure deck
5-inch loading machine
5-inch director No. 1
1.1-inch clipping room B-0502-M
Radio direction finder room B-0701-CT
Starboard flag bag
Main battery radar transmitting room
Outside Turret No. III
A-206-L
A-207-L
Radar plot B-0801-C
In addition to the fires mentioned above there were numerous small fires on the first and second superstructure decks that consisted mainly of burning pieces of life jackets.
51. The fires in the superstructure, although not serious, were difficult to extinguish. Fire hoses had to be led up on the outside of the superstructure from the main deck to the 07 level as many of the ladders were damaged. Also the large number of personnel trapped in the superstructure complicated the firefighting problem. The water used in firefighting accumulated on deck and filled adjacent areas to the level of the access coamings. Heeling of the ship caused this water to spill over and successively flood the areas below to the level of their access coamings. Lighting transformers on the main and second superstructure decks were partially immersed.
52. To facilitate fighting fires in the superstructure, two 2-1/2-inch risers have been installed, one on the port and starboard sides of the superstructure respectively, from the 03 to the 010 level with a 1-1/2-inch fire plug at each level. These risers may be connected by hose to 2-1/2-inch fire plugs on the 03, 02 or 01 levels. Two risers were provided in event of damage to one.
53. To prevent the accumulation of firefighting water in the superstructure, 2-inch holes were drilled in the corners of the access coamings at the deck level. Now water will drain to a small area of the main deck where the door coamings are 18 inches high. It can then be pumped overboard by electric submersible pumps. Weight considerations precluded the installation of an elaborate drainage system for this purpose.
E. Conclusion
54. Damage to SOUTH DAKOTA did not imperil the ship. Loss of fire control, interior communication and radar facilities seriously impaired her fighting power, particularly in night actions. During the action SOUTH DAKOTA attracted all of the enemy fire so that WASHINGTON was able to sink the Japanese battleship KIRISHIMA practically unmolested.
--14--
[END]
