
The Navy Department Library
Chapter VI. The Coxswain Takes Over
* * * * *
It looks easy when a well trained coxswain pulls away from the dock or makes a smooth landing. A few deft turns of the wheel and the LCVP or LCM seems to move right into place, effortlessly. However, behind smart boat handling are long hours of training, patient study, and a well-developed knowledge of seamanship.
Some of the skills you will develop as a coxswain are explained here clearly and simply. Have them well-planted in your mind before you take the wheel for the first time, and, above all, listen to the down-to-earth advice of your instructor. He knows his boat and already has the background that the beginning coxswain will build up on the swells and in the surf.
Although they are similar in general appearance, the LCVP and the LCM handle differently. This is due mainly to the fact that the smaller boat is a single screw-and-rudder job, while the larger is driven by twin screws with a rudder set behind each. Because of this distinction the operation of each boat is considered separately.
Operating the LCVP
The LCVP responds to its wheel and throttle in much the same way as any single screw craft. Several nautical terms will be used to describe this action. Remember these definitions:
Right Rudder--movement of the rudder to the right. When moving ahead the wheel, rudder, and bow of the boat move to starboard when right rudder is applied.
Left Rudder--exact opposite of right rudder.
Right and Left-handed Screw--the right-handed screw (viewed from aft) turns clockwise; the left-handed screw turns counterclockwise.
Suction Current--the flow of water as it is pulled into the screw.
Discharge Current--the flow of water discharged behind the screw. (Suction and discharge current together are called screw current.)
Advance--the distance gained toward the direction of the original course when turning. The coxswain must allow for advance when coming alongside.
With rudder amidships and under way the single screw vessel moves in an almost straight line unless current and wind effect her. Applying right rudder swings the stern to port and veers the heading to starboard. The reverse is true when left rudder is applied.
When backing, the stern of the vessel tends to turn in the direction in which the rudder is put. Thus right rudder will swing the stern to starboard while the bow veers to port.
The student coxswain should keep the above principles in mind while learning. Before long they become so much a part of him that he knows what to do without taking time out to think of the necessary moves.
Characteristics of the LCVP. Because of its design the "VP" has several characteristics that distinguish its handling from that of less specialized boats. These include shallow draft, high freeboard forward, and a spoon bow. The shallow draft and high freeboard tend to make the boat swing very easily in wind and current. The spoon bow has a more helpful influence. It helps trap aerated water (that is, water filled with air bubbles) under the boat. As this body of water bubbles moves under the hull it has a roller-bearing effect and enables the "VP" to pivot easily and quickly. This quality is especially valuable when in a heavy sea outside the breaker line. The "VP" is lively enough to turn and face an incoming swell in a matter of seconds.
--27--
--28--
Lastly, the LCVP has a small rudder called a maneuvering or pilot rudder set forward of the screw. This rudder helps to make the boat respond to her wheel more promptly, especially when backing.
Starting the LCVP. There are several main topics which you, the coxswain, will read in this chapter: starting and operating your boat, docking, coming alongside, using cargo nets, running in to the beach, unloading, and retracting. These topics are taken up in the order given.
Before getting underway, the usual boat, engine, and equipment checks must be made. They were described in detail in Chapter V. When you are certain that all is in order start the engine.
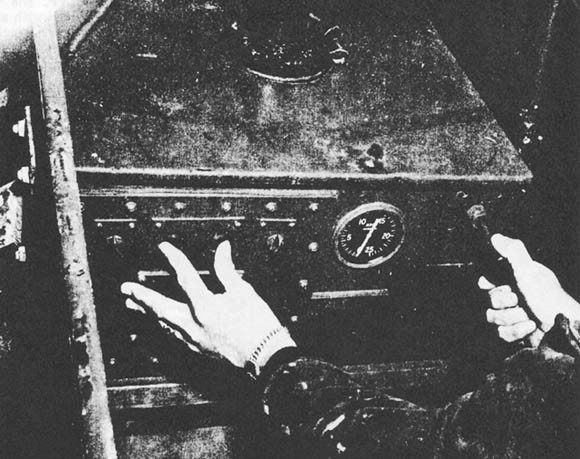
The illustration shows the controls of the "VP". They are used in two different ways in starting your engine. (1) in non-freezing temperatures only the starter button need be pressed to start the engine. (2) To start in freezing temperatures, open the throttle wide and press the starter and heater buttons, at the same time pushing in on the handle of the flame primer*. All three moves must be made at once or serious engine damage will result. After the engine is going, throttle down to normal warm-up speed.
Never grind the starter for more than thirty seconds for either type of start. Allow the starter to cool for two minutes before trying a second time.
Once the engine is running, let it warm up by engaging the clutch and running the engine at 800 to 1000 revolutions per minute. (The tachometer is the instrument panel dial which shows rpm's). If it is undesirable to engage
___________
* A pressure of 10 pounds or more is required to operate the flame primer.
--29--
the clutch, run the speed up to 1000-1200 rpm's. Let the diesel warm until 130° shows on the water temperature gauge. (Normal operating temperature is 160° to 180°).
During the warm-up period you will check the following things:
- Oil pressure--40 to 50 pounds pressure is normal. Except for very short intervals, never operate the engine with an oil pressure of less than 20 pounds.
- Oil temperature--Normal range is 180° to 210° when the engine is warm.
- Battery charge--the ammeter readings will vary. Look for trouble if the battery is not charging or if the reading remains at or near 30 amps.
- Sand traps--see that the water is bubbling through on its way into the salt water cooling system. If you do not have sea suction work the hand pump to start the water circulating.
- Bilge pump strainers--clean them if necessary.
- Water discharge from exhaust manifold--lack of water discharge indicates loss of sea suction.
Once the engine is warm do not let it idle. Shut it off until you are ready to leave the dock.
Several steps are followed in stopping and securing the marine Diesel. First, raise the engine box cover and run the engine at 800 rpm's until the water temperature has dropped indicating that the engine has cooled. Then place the shift lever in neutral and turn the throttle to the "off" position.
Before leaving the boat, check for leaks and breaks in all lines, make any simple repairs needed, and replenish fuel, lubricating oil, and fresh water supplies. Also, test the battery, and close all fuel and water valves. Finally, if the weather is below freezing, or a freeze is probable, drain the fresh water. Salt water can freeze, too, so drain the salt water system when the thermometer registers 27° fahrenheit or below.
When the boat is secured the coxswain lists fuel and oil aboard, hours the boat was run, general comments on the boat's condition, and so forth. A special check-off card is used for this purpose.
Controlling the LCVP. The "V's" now in general use are equipped with simple controls: a steering wheel and the single lever which controls forward and reverse gears and the throttle. Pushing the lever ahead sends the boat forward; pulling it back reverses the screw action.; The throttle is controlled by twisting the hand grip at the top of the control lever. When shifting from forward to reverse or reverse to forward, the throttle is idled and the lever stopped in neutral for a moment before completing the shift. If the gears are shifted when the engine is going at high speed the gears and engine may be harmed.*
Once you have become thoroughly familiar with the ways in which the LCVP responds to her controls, you are ready for the basic boat handling which every student coxswain masters. This includes making landings alongside and on the beach, clearing from alongside and from the beach, and the use of cargo nets, lines, and other boat equipment.
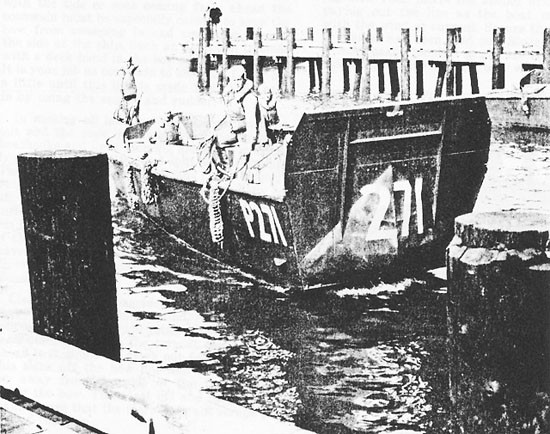
Mooring the LCVP. The nature of the wind and current have much to do with coming alongside a dock or another boat or ship and mooring the "VP". When the weather is fair and wind and current are slight a landing is simple and easy. Approach the pier with enough speed to keep steerageway (control of the boat) at an angle of from twenty to thirty degrees. When about one boat length from the mooring position, but the rudder over the sheer the bow out slightly. Then shift into reverse, at the same time applying hard rudder in the opposite direction and throttling the engine slowly to swing the stern into the dock. When the bow nears the pier the bow man jumps onto it with the bow line coiled in his hand. He takes a turn on a cleat or bollard with this line, being careful not to snub the bow too suddenly. As the stern swings in the stern man jumps out and takes a turn with the stern lines.
When the current is running off the dock, that is, from the direction of the pier toward your boat, the approach is more difficult. Point the bow in at a greater angle and come in with more speed. Special care must be taken here to swing the boat parallel to the dock before the bow touches or it may ram the dock and damage the ramp. Once alongside you must shift the rudder and reverse the engine promptly or the current will carry the boat away from the dock and make a new approach necessary. It is equally important for the bow and stern men to get their lines over quickly. The rudder is
___________
* See Appendix E for additional information on the Gray Marine Diesel Clutch.
--30--
turned away from the dock and the engine gunned slightly so that the screw current forces the stern alongside.
With the current running from ahead and parallel to a transport or dock the boat can be brought alongside easily. Approach slowly at a slight angle and make the bow line fast. The boat will drift back on the line and the stern will swing in.
Going alongside with the tide or current from astern is difficult and must be done cautiously. Approach at a slight angle and with just enough steerageway to keep the boat under control. When near the mooring position move the rudder away from the dock, sheering the bow out and the stern in. As the stern approaches the pier the stern man jumps out and secures his line. Then the action of the current will carry the bow in and a line can be passed over and secured.
In making a landing with the current setting on the dock or transport the boat is swung parallel when it is about half a boat length away from the mooring position. Then the current will set the boat alongside.
The inexperienced coxswain is likely to wonder how he can gauge current and wind accurately enough to handle the business of mooring smartly. This is a skill that comes with experience. The old hand at the wheel notes the direction in which flags and smoke are blowing and observes the movement of objects on the water. Also, the "feel" of his boat as it answers the wheel helps him to size up the probable effect of current and wind.
Several general factors, then, must be considered in landing alongside either a dock or vessel. These are the design of the boat and such conditions as wind, current, swells and available maneuvering space. As a rule, landings should be made into the wind and current since the boat thus can be more easily controlled.
--31--
When coming alongside in heavy weather with the tide or seas coming from ahead the coxswain must be especially careful to keep the bow from sweeping in and smashing against the side of the ship. Such an approach is made with a deck hand in the bow with a line ready. It is your job as coxswain to keep the LCVP off a little until this line is made fast. Then ease in by using the engine and rudder.
In making all landings the fenders must be out and the crew members standing by with boathooks and lines. Coming alongside smoothly requires cooperation and split-second timing. The experienced coxswain avoids flashy maneuvers but comes in slowly and cleanly. Also, he allows for the fact that the weight of his cargo influences the momentum or forward speed of his boat. Finally, he keeps in mind the fact that if the engine fails to go into reverse he must have sufficient steerageway to sheer away from the landing point by use of the rudder alone.
Clearing from alongside. The same factors that influence docking--wind, current, and space--are at work when the coxswain clears from alongside. With the current coming from ahead it is simple to move out forward. To do this slack off the bow line and turn the rudder away from the side of the transport to swing the bow. Then cast off and move ahead making sure that the stern does not scrape the side of the ship.
If it is necessary to back out regardless of wind and current, as often happens, turn the rudder toward the dock or ship. Gun the engine lightly and the stern will swing out. Cast off, place the rudder amidships, and back out. When clear, throw the clutch into forward gear and proceed.
Anchoring. When dropping an anchor astern, heave the anchor over at the stern, paying out about seven feet of line for each foot of water. Be careful to avoid fouling the screw with the line. Secure the line to cleat or mooring bitt when a sufficient length has been let out.
To weigh anchor by the stern, haul in on the line taking up slack. Use the engine only when necessary as when the wind is high. If the anchor is fouled, make the anchor line fast at short stay and break ground by using the engine. Then haul in the anchor. Avoid any slack which might foul the screw.
To drop a bow anchor, head the boat into the wind until you lose all way. Place the anchor at the stern, lead the anchor line forward, and take a running turn around the forward mooring bitt. Then heave the anchor over the side paying out the line as the boat moves back with the wind or current. Secure the line when sufficient has been paid out. Since the anchor is more easily handled at the stern, it is advisable to anchor by the bow only when necessary.
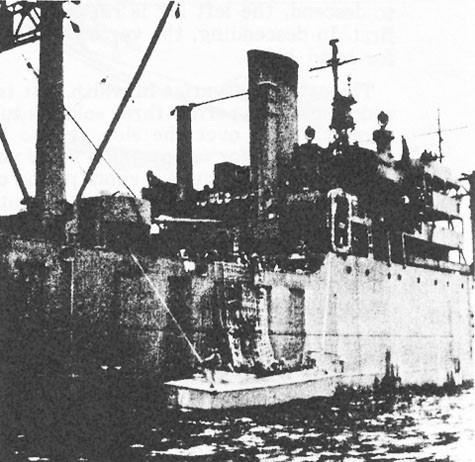
Using the cargo net. The cargo net is a square or rectangular rope net which, in amphibious operations, is suspended over the side of a transport. The net is held outspread by means of four-by-four beams lashed to it on the inboard side. The horizontal and vertical ropes of which the net is made are spaced so that men can descend on the net easily from transport to landing boat.
Usually at least four cargo nets are slung over each side of a transport during debarkation. They have two main uses: to speed up debarkation of troops and to prevent equipment and supplies from falling into the water while the boat is being loaded. A line secured to each of the lower corners of the net, and tended on deck, controls the net which is raised prior to the landing boat's arrival. When the "VP" or the tank lighter is alongside the net is lowered into the cargo space, and then raised just before the boat shoves off.
As a landing boat approaches a cargo net to load, the bow man should be ready to make fast to the sea painter which holds the boat alongside. Also, the crew members stand by to take the cargo net into the cargo space as it is
--32--
lowered from above. The net is tended and kept taut as the boat rises and falls with the swells.
Before going over the side, troops are cautioned to unfasten the straps of their packs and helmets, and to have their rifles slung. This is done so that heavy gear can be shed if a soldier falls into the water. When preparing to descend, the left leg is raised over the side first. In descending, the vertical lines are used for hand holds.
The cargo net varies in width, but is usually wide enough to permit three soldiers to descend abreast. Hung over the side, it also is a convenient device for recovering a large number of men from the water in a short period of time.
The run to the beach. The most interesting and important phase of LCVP operation is the run to the beach. In the surf the coxswain and crew are really put to the test. When the breakers are piling up, when every second counts, when a smash-up and serious injury to boat and crew can result from sloppy seamanship, the small-boat boys have got to be on their toes every moment.
There are a number of things to be kept in mind when the student coxswain hits the beach for the first time--and every time thereafter, as well. These will be discussed, roughly, in the order in which they occur during a landing operation.
Make certain that each crew member is in his place as you make ready for the run. It is absolutely necessary that all men are wearing life jackets when the LCVP or LCM is launched. If jackets are needed they are needed fast. There may be no time to slip them on in an emergency and good swimmers are almost as helpless as non-swimmers in cold water, heavy seas, or surf. Also, even a champion swimmer can drown in a hurry if he happens to be knocked out for a moment in an accident, as when a boat turns over. As coxswain you are in charge! Get those kapok vests on the crew.
As you approach the beach you will want to observe the rolling ground swell which begins to rise several hundred yards out form the shore and try to gauge the nature of the surf. Once inside the breaker line you should not change your course. Therefore, line up your boat with the spot on the beach where you are to land. Do this before you enter the surf.
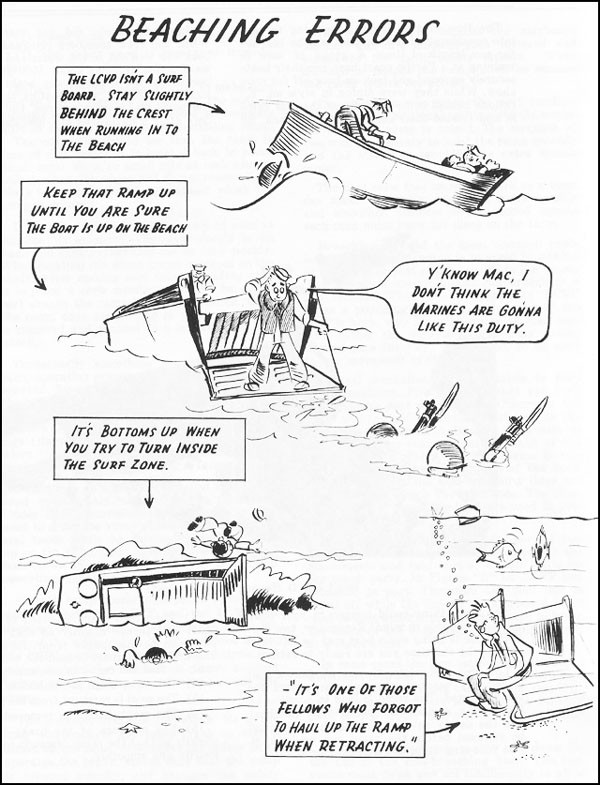
The LCVP, handled by an expert, can cope with a twelve to fifteen foot surf, but a six to eight foot surf is high enough to cause plenty of trouble, especially for the beginner. Size up the height of the breakers and the rate at which they are rolling in, then regulate the speed of the boat so that it rides in to the beach just behind the crest of a comber. This is extremely important. If you are right on the crest the "VP" will be set down hard on the sand when the wave crashes and ebbs.
By all means keep your boat at a 90° angle to the surf. The LCVP is likely to broach if this rule is not observed. Usually the surf goes in parallel to the beach and if you hit the sand head-on the boat will ground safely. However, the coxswain always must check the angle of the surf to be on the safe side.
The exact spot at which the coxswain aims his boat should be chosen with care. The LCVP was designed primarily to run aground on a sand beach. Try to spot any large stones or outcropping of rocks that might damage hull or ramp. Both coxswain and forward lookout will need to keep a sharp eye open for underwater obstacles, too.
If the boat should run aground on a sandbar some distance from the beach, run the engine slowly in forward speed until the hull is floated partly free by the next breaker. When the boat has this flotation, gun the engine. If not freed, cut the engine speed and try again when the next incoming wave lifts the boat.
It is exceedingly unwise to assume that the water is shallow all the way to shore if you are grounded some yards out. Unless given the word by the beach party, do not attempt to unload troops. The water may be ten feet deep a few yards inshore from a sandbar that has stalled your boat.
Beaching. After clearing all bars, the LCVP should be run on the beach at a good speed to insure a secure hold on the sand. When properly beached the boat is at right angles to the surf and its keel is grounded along its entire length. In this position the boat is not likely to broach while loading or discharging cargo.
Keep the engine turning over at about 1200 rpm's to hold the boat well up on the beach. Avoid letting the screw race wildly. Idle down when the water recedes and the screw loses it bite between breakers.
Should the engine fail or some mishap occur when you are within the surf line but not aground, the first thing to do is drop a stern anchor. This helps to hold the stern at right angles to the breakers if the line is payed out carefully. Do not snub the line, but let the boat surge toward the beach with each comber. Only when the boat touches the beach is the anchor line snubbed to prevent broaching.
--33--
--34--
The flow of the tide is something to take into consideration if your boat will be beached for any length of time. A group of men in training at a Pacific coast base ran their boats securely aground and took an hour off for noon chow. While they were dining in style on "K" rations behind some sand dunes the tide came in and floated their LCVP's off the beach. By ill-chance the boats did not merely broach. When the crew members returned every last boat was well out in the water and drifting toward a line of rocks about 1500 yards up the beach. By the time salvage boats were summoned the "VP's" were beating their hulls on the rocks and were recovered, badly battered, only after a hazardous and needless operation.
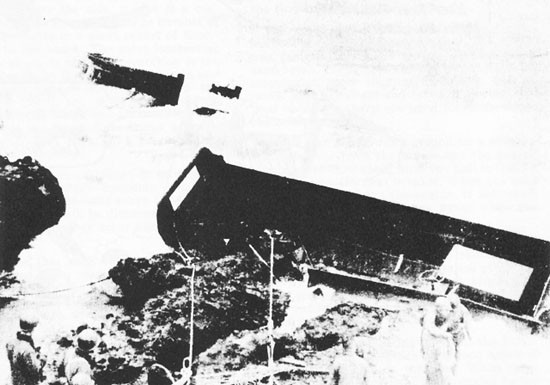
The same thing could happen to your boat, so keep that tide in mind! Remember, too, that if the tide is going out a boat may be left high and dry by the time your are ready to retract.
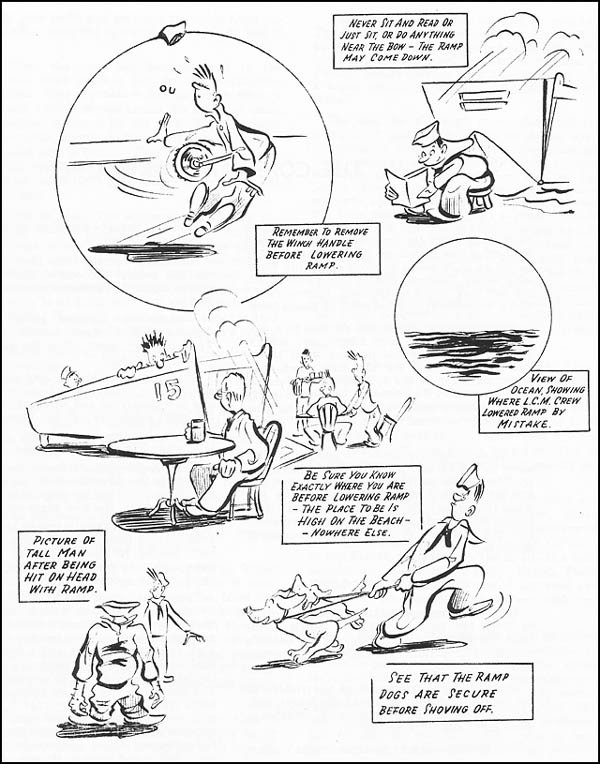
Lowering and raising the ramp*. Once a boat is securely beached, the coxswain orders the ramp lowered. The ramp is held in position by two safety devices, the ramp dogs (latches) and the safety pawl on the winch. Both must be released before the ramp can be lowered. The following steps are standard procedure:
- The winch crank is fitted to the winch shaft and turned slightly so that the safety pawl can be disengaged from the gear teeth. The brake is then set to hold the weight of the ramp so that the crank handle can be removed.
- The ramp dogs are unhooked.
- The pawl is removed from the gear teeth.
- The crank handle is removed.
- The pressure of the brake is lessened slightly so that the ramp descends to the beach swiftly and smoothly.
___________
* See Appendix G for additional information on care of the ramp.
--35--
- Some slack is left in the ramp cables.
- The safety pawl is reengaged immediately.
Before lowering away it is vital to make sure that no one is standing in front of the boat. A member of the beach party could be seriously hurt or killed if struck by a descending ramp.
The coxswain should see that the ramp is free of dirt before it is hoisted back in place. Sand, coral, shell, or small bits or rock usually collect along the edges and if not removed are likely to damage the gasket against which the ramp is secured.
It is customary to raise the ramp as soon as the boat is unloaded. The crew should be on hand and alert so that this can be done quickly. When hoisting the winch [the] crank is placed on the shaft. After making sure that the safety pawl is in place, a crew member (usually the engineer) cranks the ramp back into position. Once the ramp dogs are hooked in place, the crank is removed and secured to a lanyard near the winch.
Occasionally something goes wrong in the ramp operating system after the ramp has been lowered. Since the landing boats cannot leave the beach safely with ramps down, special emergency gear is carried to raise the ramp. This consists of two stout wire straps and two tackle rigs (jiggers) which are attached to the ramp when the need arises. Beach party members work with the crew in hoisting a faulty ramp.
Sometimes as a boat is unloaded it is lightened considerably and begins to float free. Under such circumstances the coxswain may need to order the ramp raised and lowered several times while he drives the boat further up on the sand. This is one more reason why boat crews are required to stand by their ramp operating positions.
Smooth ramp operation depends upon teamwork. In both the LCVP and the LCM each member of the crew is expected to know his part of the work and do it. As explained above, the "VP" coxswain stands by the controls and makes certain that the boat is firmly beached before giving orders to raise and lower the ramp.
The engineer operates the winch. He is the man who engages the ramp crank to take a strain on the cable, disengages the safety pawl, operates the brake, makes sure that the ramp is lowered steadily, and engages the safety pawl once the ramp is on the beach.
The bowman, who handles the starboard machine gun in a landing, goes forward and stands by the ramp safety latches. When directed he undogs the ramp. Also, he secures the ramp before retraction.
The sternman who mans the port machine gun and serves as signalman, assists the engineer when the ramp is raised. The strength of two men is necessary to hoist the ramp speedily and the sternman provides the extra muscle power.
The boat crew that learns to work as a team can make the entire operation move quickly and smoothly. Because every second counts each man must know his place on the team.
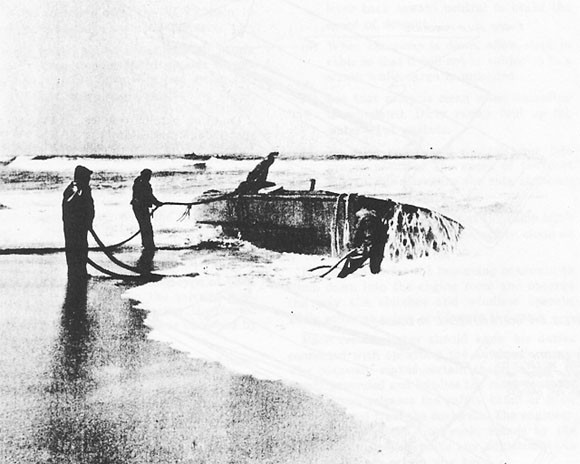
Broaching. One of the most common problems in making a landing is to avoid broaching or letting your boat swing parallel to the beach. The unwary coxswain's boat can broach in a few seconds. When this happens the LCVP takes a pounding from the waves, and if the surf is high, may fill with water or even capsize. Either the bow or stern may swing around once the "VP" is aground, so be alert to any movement of the boat.
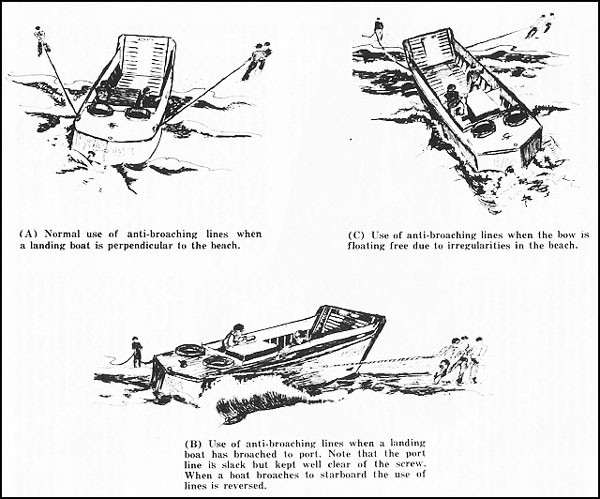
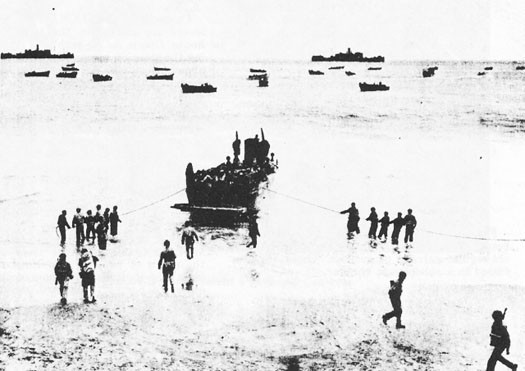
Several precautions may be taken to keep from broaching. First, be sure that you keep the breaking seas dead astern. Otherwise the stern will fall off to port or starboard as the water dashes against it. Second, drive well up on the beach so that the entire length of the keel is aground. Third, gun the engine in forward gear as incoming waves float the boat. Fourth, see that the anti-broaching lines are thrown to the Beach Party at once. The illustrations show how these lines are used to prevent broaching.
As shown in Figure A under normal conditions anti-broaching lines are secured to the stern cleats and held taut at a wide angle by the beach party. In Figure "B" an LCVP has broached to port. Therefore the port line is eased off while the line on the starboard stern cleat is kept under a strain. This helps to bring the stern of the boat around to meet the seas at a right angle.
In some cases the bow rather than the stern may float free due to irregularities in the beach or surf conditions. When this happens (see Figure "C") the lines are led from the forward cleat on the proper side and the bow is hauled around.
No hard and fast rule can be laid down for the use of the anti-broaching lines. The coxswain must think and act intelligently to allow for wind, different types of beaches and other
--36--
--37--
factors influencing broaching. Usually, however, it is wise to line up the bow with some object on the beach. Then you can tell at once if the bow or stern is moving. If this happens, put the rudder over in the direction in which the stern is swinging. Then speed the engine to drive higher on the beach to bring the stern around. Or, if the bow is swinging, turn the wheel in the direction opposite the swing and drive higher on the sand.
Sometimes, if the surf is not high, it is possible to free the broached boat by engine power alone. This may be done by applying hard rudder in the direction of the beach. For example, if the starboard side of the "VP" is toward the beach, apply hard right rudder. As the hull is lifted by each incoming wave, gun the engine. The discharge current will tend to force the stern away from the beach.
Retracting from the beach. When backing down from the beach the coxswain tackles the most difficult part of the landing operation. It is during retraction that the beginner at boat handling is likely to broach or damage the rudder, screw, or skeg.
As coxswain, you will be most successful in getting away from the shore and safely beyond the breaker line if you observe the following procedure:
- Set the rudder amidships before attempting to retract. In the LCVP this may be done by running the engine about half speed ahead. The discharge current or wash from the screw will force the rudder into an amidships position.
- Line up the bow with an object on the beach. If you do this it will be easier to note any swing of the boat soon enough to correct the movement and hold him straight.
- Next, shift the engine into reverse and wait for a wave to float the hull. When you have flotation, accelerate the engine. Nearly always the boat will move backward a short distance.
--38--
- When the wave recedes, slow the engine. This keeps the diesel from racing needlessly when the screw loses its bite in the water and prevents the rudder and skeg from digging into the sand upon which they rest.
- If your bow begins to swing to port or starboard turn the wheel in the direction of the swing. This should bring the bow back. Turn the wheel back before this return swing is completed or the bow will move too far and require more maneuvering.
- Once the LCVP is floating free, and has passed any outer sand bars, continue to back her at right angles to the surf until outside of the breaker line. Be careful to take each incoming breaker with caution.
- Once through the breakers, wait until the boat is on the crest of a wave. Then put the rudder over hard, shift into forward, and accelerate the engine. This will cause the boat to pivot quickly and take the next sea on the bow.
For boats which are unable to get off the beach, broached, or have engine trouble there are regular salvage procedures. These are discussed in a subsequent chapter.
Operating the LCM(3)*
In many respects the detailed comments on the LCVP, presented in the first part of this chapter, apply to the LCM. To avoid repetition, this section on the tank lighter deals with the ways in which the operation of this boat differs from the LCVP.
Characteristics of the LCM. The general lines of the tank lighter are similar to those of the "VP". The draft is shallow, the freeboard high, and the screws and rudder mechanisms are protected by skegs. These characteristics cause the LCM to handle like the LCVP. However, because the tank lighter is larger and has twin screws and rudders there are distinct differences, too.
Once a coxswain has mastered the handling of a twin-screw boat he finds it more responsive and simpler to maneuver than a single-screw type. For example, with one engine in forward and one in reverse, the twin-screw boat will turn almost in its own water.
As already noted the LCM has two Gray Marine Diesel engines. Its screws turn in a clockwise direction, and a rudder is set abaft each screw. The engines are started in the same way as in the LCVP and similar boat and engine checks are made. In the case of the tank lighter, the pilot house contains two identical instrument panels which supply information on dials similar to those mounted in the smaller boat.
Controlling the LCM. Two engine-control levers are located in the tank lighter's pilot house. One is set on each side of the box housing the steering mechanism. Setting the levers ahead places the engines in forward gear. To drive the boat astern the levers are pulled back. Hand grips, set at the top of the levers, are turned to regulate engine speed.
In general, the LCM's engines are set in one of three basic ways, depending upon the maneuver the coxswain wishes to carry out. Both engines may be set ahead, both engines may be set to move the boat astern, or one screw may be set ahead while the other is backing or idling. In the latter instance, the LCM will turn in a very tight circle.
One of the knacks you will need to acquire as an LCM coxswain is the trick of regulating the rpm's of two engines. Until the coxswain learns how to do this, the bow of the ship veers either to port or starboard, depending upon which diesel is turning over at higher speed. The experienced man at the wheel has both a feel for his boat and an ear for the engines and regulates their speed with ease and skill.
Tying up the LCM. Wind, current, and maneuvering space have an influence upon docking the tank lighter which is similar to their influence upon the LCVP. (The student LCM coxswain is referred to the preceding section which deals with the effect of current in docking the LCVP).
When wind and current are minor influences, the LCM may be docked or brought alongside a transport, starboard side to, as follows. Head into the pier at a slight angle with rope fenders over. Apply hard left rudder when within a few yards of a ship or dock to swing the bow out and avoid a collision. When alongside (that is, parallel to the dock) throttle down the port engine, reverse it, and accelerate. This will cut
____________
* The comments made about the LCM(3) also apply to the LCM(6).
--39--
headway and swing the stern in to starboard. To stop headway and check the stern's swing, reverse both engines. The opposite procedure is used when coming in port side to. Hard right rudder brings the boat parallel to the dock and gunning the starboard engine in reverse swings in the stern.
In the event that the LCM is hemmed in alongside a dock it is possible to work your way out, even though there is little space forward or astern. First, let go the stern line. Then, assuming the dock is to starboard, set the port engine ahead and reverse the starboard engine. Gun the port engine and the stern will swing out. When the stern is away from the pier, let go the bow line and back down on both engines.
Beaching and retracting with the LCM. Most of the general rules laid down for running in to the beach in the LCVP are observed when piloting the larger tank lighter. The boat is kept at right angles to the surf and is driven ashore just behind the crest of a wave. It should be grounded well up on the beach along the entire length of the keel and the engines kept running with enough speed to hold the boat firmly beached while loading or unloading.
Once the coxswain is familiar with his boat, the tank lighter is easier to retract than the smaller, single-screw "VP". This is due to the fact that the "M(3)'s" twin screw design gives better control over the bow's tendency to fall off to port or starboard when backing through the surf. In retracting, the LCM's rudders are put amidships, both engines are reversed and she is backed off slowly.
If the bow falls off to starboard there is no need to spin the wheel. The coxswain simply guns the port engine in reverse until the swing is corrected. It is important to remember to ease off on the throttles, however, as soon
--40--
the bow begins to come back to starboard. Otherwise it may continue its swing and fall off to port.
Like the LCVP, the tank lighter can broach in a few seconds if she gets out of hand. Because of her greater size, the latter boat is apt to be more difficult to salvage, so broaching must be avoided at all costs. The same precautions to be followed with the LCVP help to keep the LCM at right angles to the surf.
It should be remembered that broaching lines are less effectual because of the greater weight of the tank lighter. Once in a bad swing the beach party cannot check the sidewise movement that ends with a broached boat helpless on the sand.
In a moderate surf a partially broached LCM can sometimes be freed under its own power by a fast-acting coxswain. If the stern lies to port it may be brought around by gunning the port engine in reverse and idling or accelerating the starboard engine ahead. With the rudders hard left under these circumstances the discharge current from the starboard screw serves to straighten the boat.
When badly broached in either type of boat, do not hesitate to summon the salvage boat. Prompt requests for aid shorten the period during which the broached boat is punished by the sand and surf.
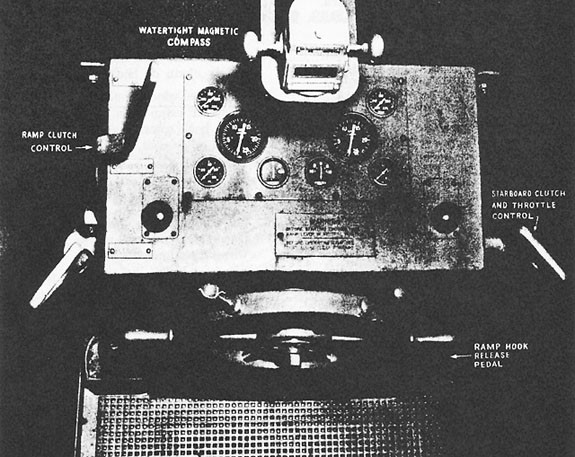
The LCM(3) ramp. The power operated ramp of the LCM is another feature of the boat which differs distinctly from the LCVP. Powered by the port engine, the ramp is raised and lowered from the cockpit. The controls consist of: (1) a foot pedal which releases the ramp hood, and (2) a ramp control lever which is moved to lower and raise the ramp. Usually this lever is pushed forward for lowering and pulled back for raising the ramp. (A small metal plate placed near the lever indicates the direction in which it is moved to control the ramp. See photograph.
The steps to take in operating the power ramp are nine in number:
- Make sure that the boat is firmly beached and that no one is standing in front of the ramp.
- Tighten cable slightly by engaging clutch in the raising position. (This will allow ramp hook to be freed easily.)
- Press down on the foot pedal to port of the wheel housing to release ramp hook.
- See that the deck hand has released the safety chain or hook.
- Push the winch control lever to lower ramp. If ramp falls too fast, ease the lever back toward neutral to brake the speed of descent.
- When the ramp is down, allow slack in cable so that it will not be subjected to a strain while cargo is unloaded.
- See that ramp is clean when unloading is completed. Dirty ramps foul up the water-tight gaskets.
- To raise ramp, pull control lever into proper position. The speed of the port engine will determine the rate at which the ramp rises.
- Check to make sure that the ramp latch is engaged and that the safety chain or hook is fastened.
It is desirable for the beginning coxswain to climb down into the engine room and observe the way the clutches and windlass operate while someone raises and lowers the ramp.
Each crew member should know his duties connected with operating the automatic ramp. The coxswain makes certain that the boat is firmly grounded and handles the ramp controls. A deckhand releases the safety chain or hook upon a signal from the coxswain. The engineer, for his part in the teamwork, stands by the port engine ready to make any adjustments to frozen clutches or slipping belts.
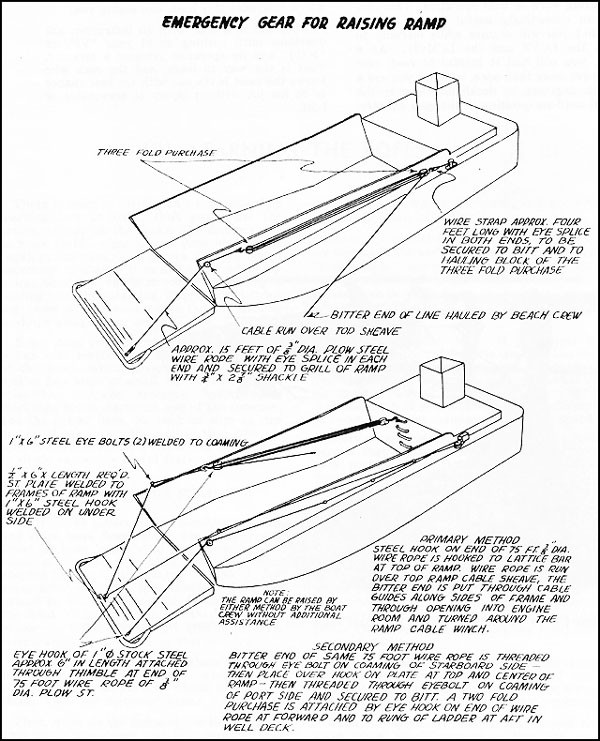
Emergency equipment is carried by the LCM to be used if the ramp-operating gear fails. Each crew member should know his part in using the emergency hook with which the ramp is raised when a cable breaks. This consists of a hook and about 75 feet of wire, 3/8 inch or heavier. The hook is secured to the open grille work of the ramp, led over the topsheave and back to the winch. Three turns around the winch drum should be enough to secure the cable while the ramp is being raised. See the illustration for more information on emergency gear.
--41--
--42--
A parting word on boat operation. This concludes an exceedingly useful section on the skills that you will acquire while learning to operate the LCVP and the LCM(3). As a trainee, you will find it helpful to read over these pages more than once, whether you are a coxswain, engineer, or deckhand. Go over the material until no question in the quiz chapter, which concludes this book, can stump you.
When out in a boat with an instructor, ask questions until nothing about your "VP" or "M(3)" and its operation remains a mystery. That is the way to learn, and the man who knows the most is the one with the best chance to do his job without injury to crewmates or boat.
--43--
[End of Chapter 6]
