
The Navy Department Library
A GENERAL DESCRIPTION OF THE WHITEHEAD TORPEDO
5 meter, 45 centimeter, Mark I.
WITH A BRIEF SUMMARY OF ITS PREPARATION, ON BOARD SHIP, FOR A RUN.
By W.J. Sears, Lieutenant, U.S. Navy

Upload PDF Version [6.2MB]
[COPYRIGHTED.]
U.S. NAVAL INSTITUTE. ANNAPOLIS, MD.
A GENERAL DESCRIPTION OF THE WHITEHEAD TORPEDO.
5 meter, 45 centimeter, Mark I.
With a brief summary of its preparation, on board ship, for a run.
By W.J. SEARS, Lieutenant, U.S. Navy.
--------------------
| Weight of torpedo, ready for discharge (about) | 1160 lbs. |
| Weight of wet gun-cotton (approximately) | 220 lbs. |
| Length of torpedo (5 meters) | 16 ft. 5 in. |
| Greatest diameter (45 centimeters) | 17.7 in. |
| Speed (about) | 28 knots |
| Range (at about 28 knots speed) about | 850 yards |
| Capacity of air flask | 9.9 cubic feet |
Weight of air charge (at 62oF. and 1350 lbs. Pressure per square inch) |
69.19 lbs. |
Reserve buoyancy in sea-water, specific gravity 1.026, ay 62o F., about |
1/2 lb. |
| Weight of Obry gear | 8 lbs. 6 oz. |
The Whitehead torpedo is built chiefly of steel, and is nearly in the shape of a porpoise. It has a blunt, phosphor-bronze head, and is made in five sections, but dismounted and assembled in four principal parts; the head air flask and immersion chamber, after body, and tail, all fitted together with sleeve joints, and held together by joint screws. The motive power of the torpedo is compressed air. It is propelled by two two-bladed screws, revolving about the same axis in opposite directions, in order to neutralize their individual tendencies to cause the torpedo to roll. The
-90-
After propeller is keyed to the main shaft, and the forward propeller to a sleeve or hollow shaft, free to move on the main shaft. By means of bevel gears on the main shaft, and on the forward end of the sleeve, suitably arranged, the propellers revolve in opposite directions.
The torpedo is maintained at constant depth by horizontal rudders, and on a straight curse by vertical vanes set at an angle predetermined by experiment, or by movable vertical rudder controlled by the Obry gear.
These torpedoes are a decided improvement, in the matter of speed and certainty of work, on the earlier type of shorter torpedoes.
The war head, of sheet phosphor-bronze, is charged with approximately 220 pounds of wet gun-cotton, and is closed at its base by a bronze bulkhead. In the bulkhead is a moisture tap, through which distilled water may be poured when necessary to make up possible loss of weight by evaporation. Soldered in the forward end of the war head is the primer case, of brass, in which is inserted the dry gun-cotton primer.
The wet gun-cotton is inserted in a series of discs, a sufficient number of them, counting from forward, being pierced through their centers to receive the primer.
The primer consists of a series of small cylinders of dry gun-cotton in a metal case. The forward cylinder is pierced to receive the detonating primer, containing fulminate of mercury, and capped with a percussion cap.
The exercise head, of steel, is ballasted for exercise by filling it with fresh water.
The war nose screws into the forward end of the primer case. A traveling sleeve has a thread cut inside, throughout its length, and in this thread works a traveling nut. This nut is turned by a screw fan, receiving its motion by its passage through the water. The nut is screwed back by the action of the fan until it rests against the firing pin. A shearing pin holds the latter in place, and as the nut continues to revolve the sleeve moves out, carrying the fan with it, until the square shaft of the fan in pushed out clear of the nut. The fan then revolves freely. When the torpedo strikes the target, the fan, nut and sleeve are driven in, shearing the shearing pin and driving the firing pin against the percussion cap.
-91-
The air flask is a hollow, forged steel cylinder, slightly tapered at the ends, with dome-shaped heads screwed and soldered in each end. A strengthening band, left on the inside surface in boring, is tapped from the outside for three screws for attaching the guide stud. Over a hole in the after head is bolted and soldered the body of the charging and stop valves.
Immersion Chamber.---This chamber contains the immersion regulators. It is just abaft the air flask and is riveted and soldered to it. The after end is closed by a bronze bulkhead.
A small compartment in rear of the immersion chamber has free communication with the water outside through several apertures in its walls. The pressure of the water, due to depth below the surface, acts against a piston, but the water is prevent from getting behind the piston by a circular diaphragm of thin rubber.
The motion of this piston, due to different pressures at varying depths, is communicated to the horizontal rudders by means of rods in such a manner that when the torpedo is below its plane of immersion the increased pressure will elevate the rudders, and when it is above, the decreased pressure will depress them.
When the torpedo is in its plane of immersion the piston is kept in mid-position by an equilibrium between the pressure of the water and the tension of a spiral compression spring.
Hydrostatic Piston Testing Attachment.—This attachment is fir the purpose of testing the action of the hydrostatic piston on the rudder. It obviates the necessity of the bent lever used with the 3.55 m.-45 cm., Mark I, torpedoes.
It consists of a composition jews-harp link encircling with the tube of the hydrostatic piston spring, and fitted at its upper extremity with a collar that fits over the end of the socket post, under the adjusting nut. The lower end of the link is fitted with jaws, by which it is attached to the horizontal arm of a small bell crank lever pivoted on the bulkhead under the tube of the hydrostatic piston spring. The upper arm of the bell crank is connected to the hydrostatic piston by a ball and socket joint. When the adjusting screw is turned by the wrench in the direction that releases the tension of the hydrostatic piston spring, the adjusting
-92-
nut travels downward, bears upon the jews-sharp link, and through the bell crank lever forces the hydrostatic piston forward its full travel.
Pendulum.--A pendulum, which swings in a vertical planes passing through the axis of the torpedo, acts to maintain the torpedo in a horizontal plane. If the hydrostatic piston is acting on the rudder to steer the torpedo up or down, when the torpedo has inclined three degrees above or below the horizontal plane the and counteracts the action of the piston on the rudder. The combined action of the piston on the rudder. The system of levers and connecting rods to the steering engine, and thence to the rudder, to maintain the torpedo in the horizontal plane at the set depth.
Engine Room.-Next abaft the immersion chamber comes the after body, containing two compartments; between them is a bulkhead. The joint is made tight by a rubber gasket. To this bulkhead and propelling machinery is secured. The engine room contains the main engine and oil cup, the valve group, the sinking and retarding gear, the steering engine, and the locking gear.
The Whitehead torpedo engine consists of three cylinders, fixed radially about the propeller shaft with their axes 120 degrees apart. Within the circular enclosure, at the junction of the cylinders, the main crank is free to revolve, and receives its impulse from the piston of each cylinder in succession. The compressed air is admitted behind the piston and evacuated in proper order by means of three slide valves, each working in a separate chest on the forward face of each cylinder, but all regulated by a single cam, keyed to the main shaft.
The Depth Index.---The depth at which a torpedo runs is adjusted by means of the depth index.
An adjusting screw, with a square socket in its upper end, is supported at its lower end in a socket post. A nut travels along the thread of the adjusting screw when turned. A fork at one end of a bell crank presses against a collar on this nut, and a fork at the other end against a compression spring acting against the hydrostatic PISTON. The lower end of the spindle of the depth index fits in the square socket of the adjusting screw, and has a square socket in its upper end, in which fits a male socket wrench, used in setting the depth index. The spindle carries a worm
-93-
which gears into a vertical wheel having graduations around a part of its circumference for 5,10,15 and 20 feet immersion. A cap screws down over the worm wheel, having a central hole through which the figures may be seen when the worm wheel revolves. A smaller cup screws down (using a square male socket wrench) over the spindle of the index, to keep it in place and to prevent water from entering the immersion chamber.
The desired immersion, in feet, will be obtained by turning the depth index spindle, with the socket wrench, until the figure indicating this immersion is seen on the worm wheel through the central hole in the cap over the wheel.
The steering engine is operated by air at the working pressure of the main engine, and transmits the action of the immersion mechanism to the rudder.
The combined action of the pendulum and hydrostatic piston is transmitted by a rod to the steering engine valve, which controls the action of the steering engine, and thence the position of the horizontal rudder.
There is no valve start used in this torpedo with the steering engine. One arm of the bell crank is pivoted to the forward end of the valve stem of the steering engine, the other arm pointing forward. A rod, connecting with the hydrostatic piston and pendulum, is connected with one arm of another bell crank, the other arm of which points aft and is pivoted to the elbow of the bell crank pivoted to the valve stem. A screw (called the valve adjusting screw), with a square head, passes through a collar in the forward end of the after bell crank, its end screwing in the forward arm of the forward bell crank. A spring around this crew tends to keep the forward ends of the bell cranks apart. Screwing down on the adjusting screw compresses the spring, brings the two forward arms of the bell cranks closer together, practically lengthens the valve stem, and puts the rudder down. Turning the valve adjusting screw in the opposite direction shortens the valve stem and puts the rudder up.
The valve adjusting screw is usually set to give one more division of down-rudder than of up-rudder, to give plenty of scope of down-rudder to steer the torpedo down, as it becomes lighter, on account of the air being used to propel the torpedo. The divisions are marked on the face of a vertical scale which fits, by a collar, over the hollow propeller shaft, and, by a slot, to the
-94-
upper vertical tail piece. A horizontal pointer is clamped to the rudder and moves over the scale, showing the number of divisions of up- or down-rudder.
The forward end of the steering rod acts against a spiral spring. When, at the end of the run, air is cut off from the steering engine, this spring forces the steering rod forward, puts the rudder up, and brings the torpedo to the surface.
The reducing valve is balanced between the pressure of a spring tending to raise it from its seat and the pressure of air on top of it tending to seat it. The object is to regulate the pressure of air admitted to the engine. A crank is used to screw down a plug which compresses the spring. The number of turns to give this regulator plug for highest speed, for a run of 800 yards, is given on the record sheet of each torpedo.
The starting lever admits air to the reducing valve, from whence it passes to the main engine. Before the torpedo is launched the lever lies flat along the upper surface of the shell, the end pointing forward. When the torpedo is launched the starting lever catches under a tripping latch, in the tube, and is thrown back.
The distance gear provides means for automatically closing the reducing valve, and thus stopping the engines after the torpedo has run a predetermined distance.
In general terms the action of the distance gear may be described as follows: A spindle with a square head is accessible from the outside of the torpedo, through a hole, and may be turned by a socket wrench. The spindle has a worm on its lower end, which engages the teeth of a wheel, with cogs around of the spindle revolves the sector one tooth, and the number of turns for a run of 800 yards is given on the record sheet of the torpedo.
A small wheel with a sector cut from its circumference, called the friction cam, lies flat along one face of the distance sector. It has a motion of rotation which is limited in one direction by a pin, projecting from its periphery, coming in contact with a stud projecting from the face of the sector. A return spring, connected to the axle of the cam, keeps the pin in contact with the stud in setting the sector, and causes the cam to follow the sector in its rotation when the sector is set.
LOCKING-DIAL AND RUDDER-INDEX.
NOMENCLATURE.
1. Valve adjusting crew.
2. Valve adjusting-screw collar.
3. Valve adjusting-screw spring.
4. Forward bell-crank.
5. After bell-crank.
6. Steering-engine valve-rod.
7. Ratchet-bar sector.
8. Ratchet-bar sector arm.
9. Sleeve-sector.
10. Locking-dial sleeve.
11. Setting-bar.
12. Setting-bar clamp nut.
13. Rudder-index dial.
14. Rudder-index dial clamp nut.
15. Locking-ring.
16. Locking-ring screws.
17. Locking-ring carrier.
18. Long locking-arm.
19. Short locking-run.
20. Locking-sleeve spindle.
21. Locking-sleeve spindle nuts.
22. Locking-sleeve spring.
23. Locking-sleeve.
24. Locking-flange.
25. Initial-mark dial.
26. Dial spindle.
27. Steering-engine.
28. Circular score in locking-ring carrier.
29. Segmental score in locking-ring carrier (not shown.)
30. Rudder-index dial-sleeve cam.
31. Rudder-index dial-sleeve.
32. Locking-sleeve spring washer.
33. Steering-rod union.
34. Locking wrench.
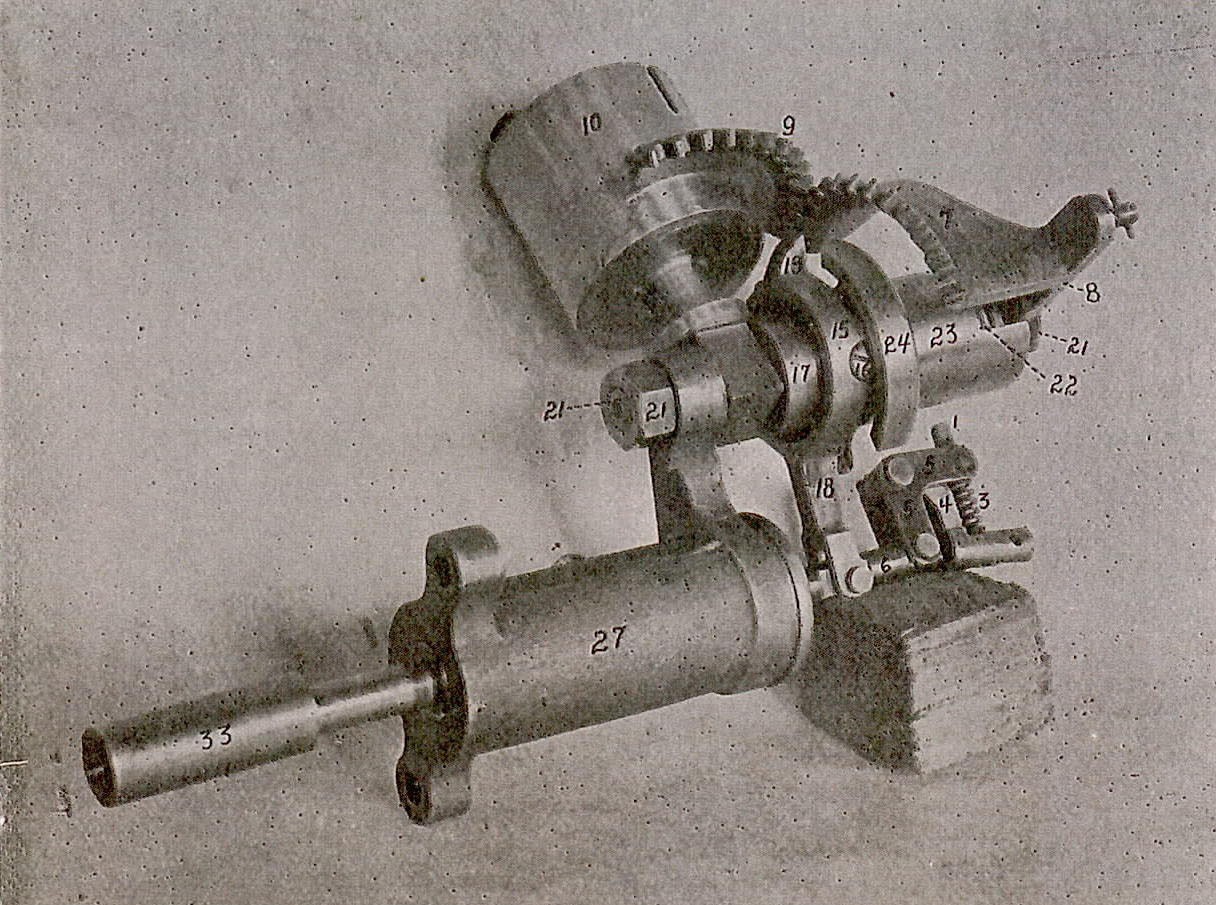
LOCKING-DIAL AND RUDDER-INDEX
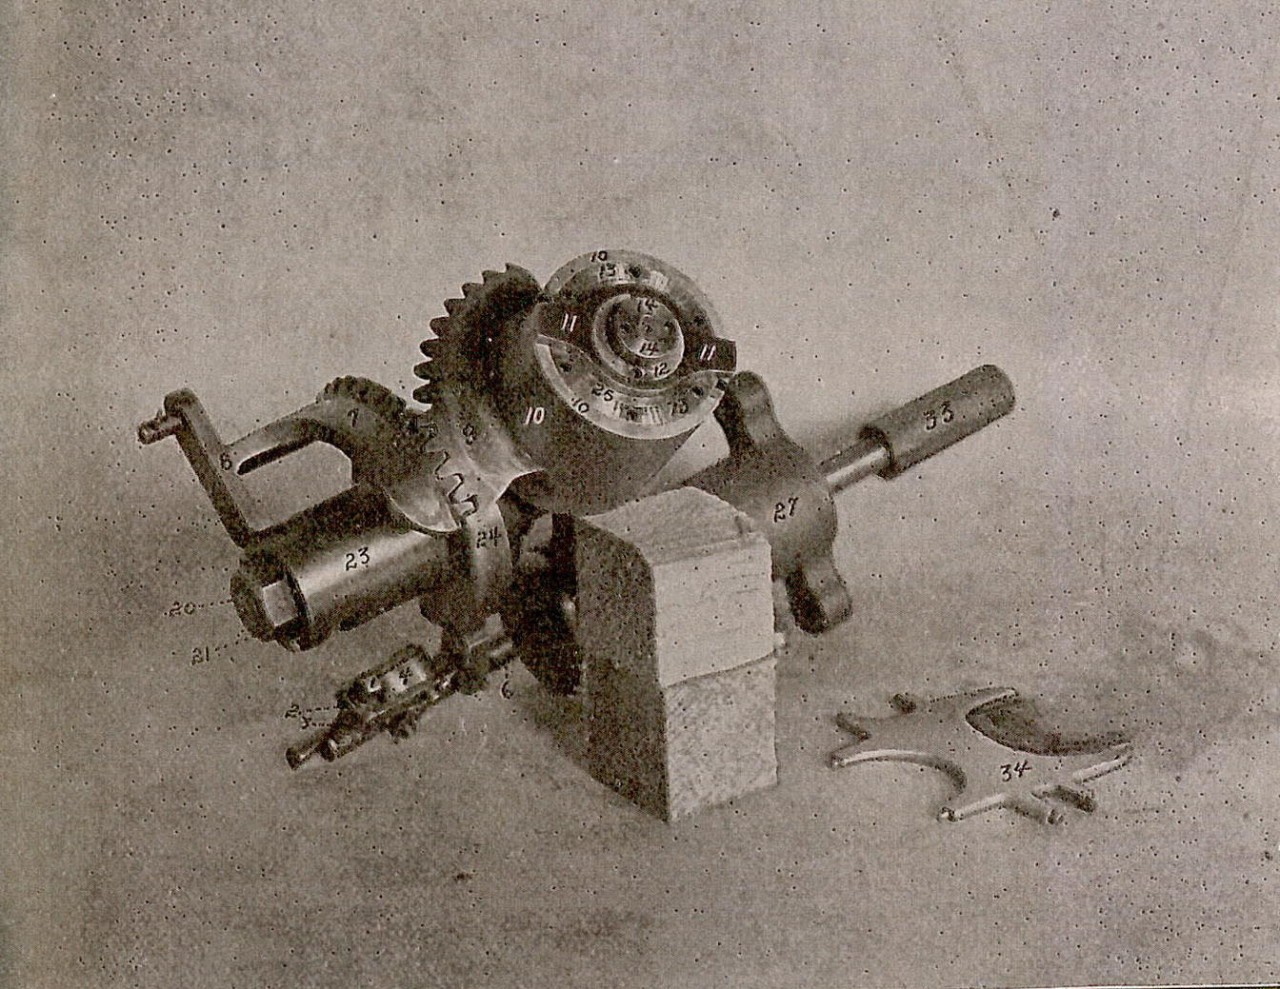
LOCKING-DIAL AND RUDDER-INDEX
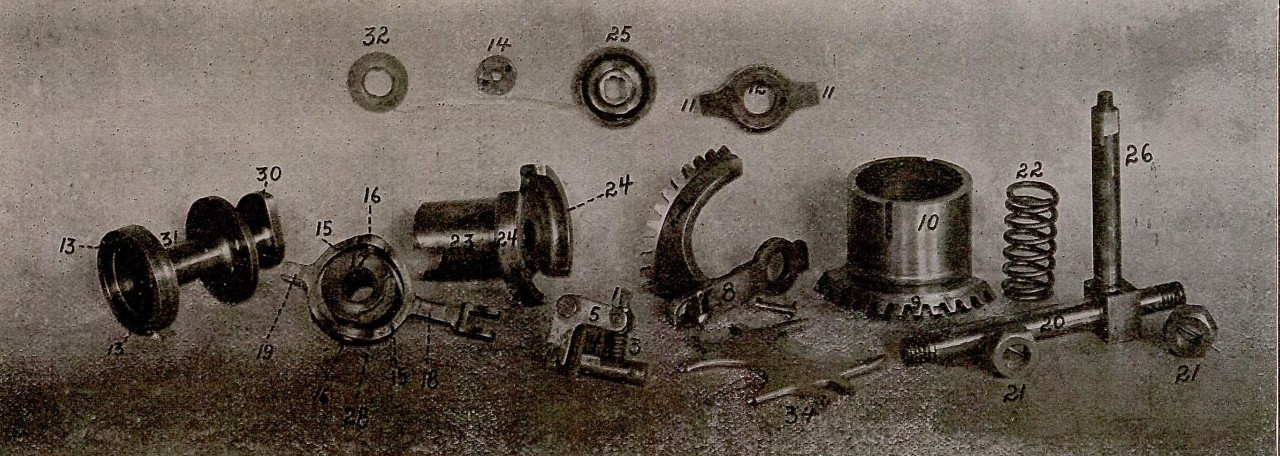
LOCKING-DIAL AND RUDDER-INDEX
-95-
When the torpedo is set in motion the friction cam is revolved against the action of the spring in the opposite direction to that to which it was turned in setting the distance sector, by suitable connections with the main shaft.
When the friction came has revolved back to the proper position it releases the tension on the spring of the reducing valve, which closes and shuts off the air from the main engine.
Retarding Gear.-The object of this gear is to retard the admission of air to the engine from the instant of launching until the torpedo enters the water, thus preventing undue racing of the engine. A lever, called the retarding lever, is so arranged that when it is in a certain position (its after position) it will allow the reducing valve to open only slightly, thus throttling down the main engine. This lever is operated by a bell crank lever, to which is riveted a thin plate of steel, called the water tripper. When not in operation the water tripper lies flat along the surface of the torpedo. Before the torpedo is launched the water tripper is raised to a vertical position. When the torpedo is launched its rush through the water throws the water tripper down flat and releases the reducing valve to its full action.
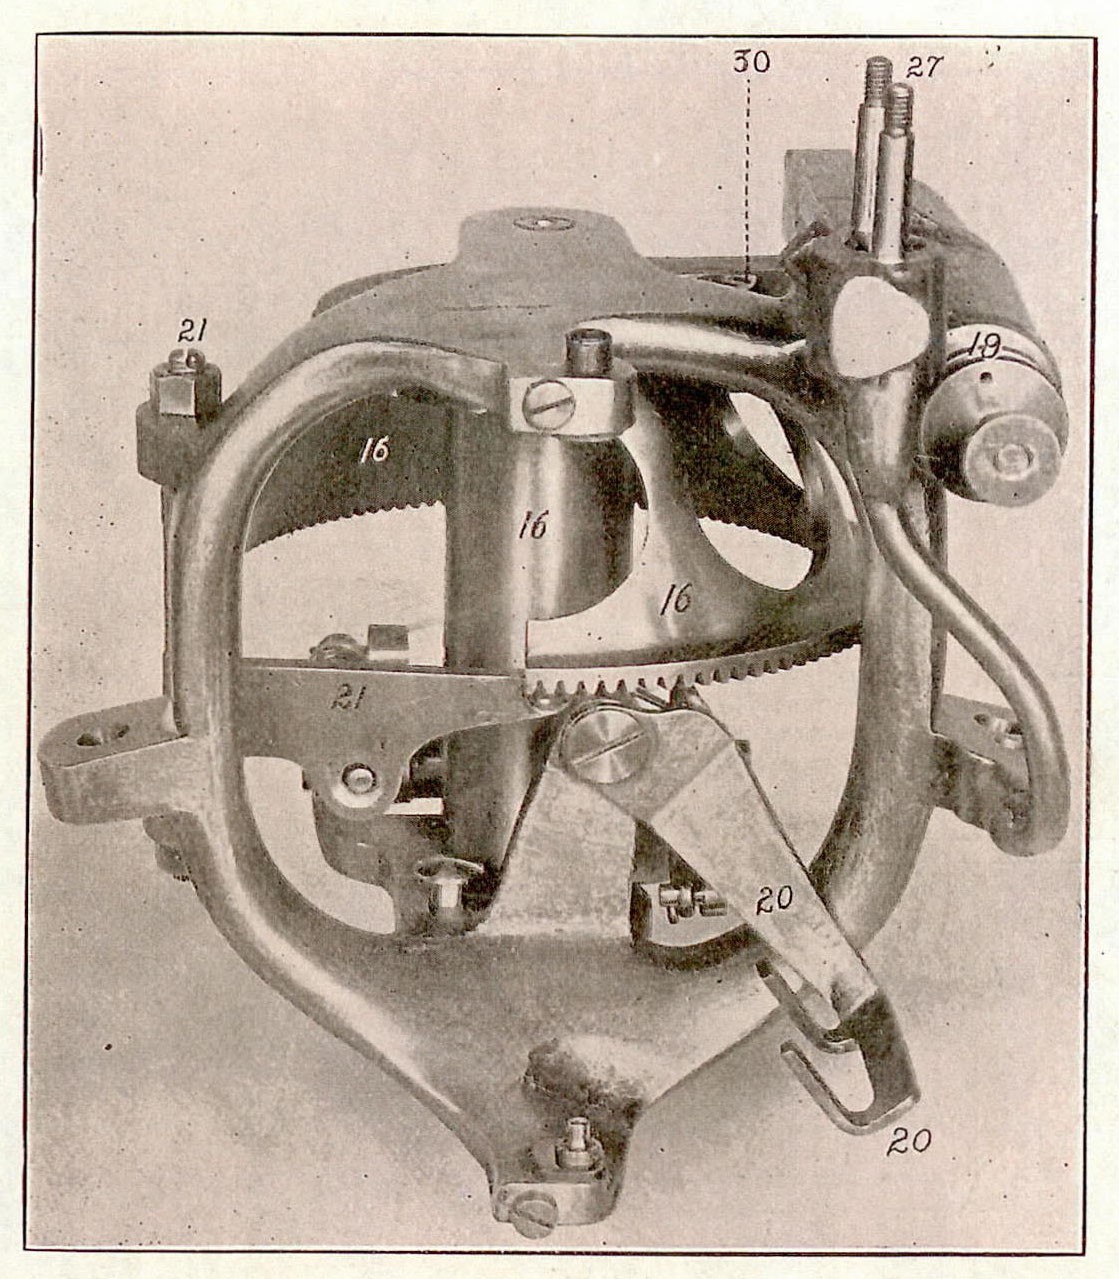
Locking Gear.—When the torpedo is launched the inertia of the pendulum causes it to lag to the rear, thus causing the torpedo to make a deep initial dive. To prevent this, locking gear is provided, which locks the steering engine valve rod until the pendulum will act independently of its inertia. The locking gear is attached to the steering engine, and the locking is accomplished by means of the locking dial, which is accessible through a hole in the shell, on the left side of the after body.
The ratchet bar connects with an arm cast on one cogged sector (called the ratchet-bar sector) of a bevel gear, the other sector (called the sleeve-sector) being cast on a sleeve. This sleeve (called the locking-dial sleeve) is a cylinder, one of the faces of which appears as a flat ring when seen through the hole in the shell. It is the outer, in the system of locking dial and rudder index, and has two small slots to receive the pins of the wrench used in setting the locking dial.
Extending across the system is a setting bar, having eleven divisions graduated on the upper surface, near the middle. These divisions correspond to the 22 teeth of the ratchet bar, and each division will lock the rudder for a run of about 15 yards.
-96-
The flat ring (with two small holes in its surface) next to, and just inside of, the setting bar, is the setting bar clamp not.
When the rudder is locked the valve stem is held rigidly by a long locking arm projecting from a ring, called the locking ring. A shorter arm projects from the opposite side of the ring, and is called the short locking arm. The two arms bear against the face of a flat, circular flange (called the locking flange), cast on a long sleeve (called the flange sleeve), which fits over a rigid spindle. The ring is pivoted midway between the arms on screws which screw into the locking ring carrier. This is a thick cylinder, underneath the locking flange, which slides on a rigid spindle. A circular score is cut in the face of one end of the cylinder, in which a pin, rigidly attached to the locking flange, moves, and thus limits the motion of rotation of the flange around the spindle. The face of the cylinder has a segmental score planed out, which is the bearing surface on the cam on one end of the rudder index dial sleeve.
The flange is cut away in two diametrically opposite sectors, each sector being about one-sixth of the circumference of the flange, and cut deep enough towards the center to permit force and aft motion of the arms of the locking ring, when the locking sleeve and flange are revolved to the proper position.
The flange and its sleeve also slide on the same spindle as the locking ring carrier, the flange and carrier being held to position by a spring (around the spindle and inside the sleeve). Next to the spring is a washer, and next to the washer the ratchet bar sector arm; all held in position on the spindle by a nut screwed o it next to the ratchet bar sector arm. This arm pivots around the spindle, and supports the sector, of which it is part. Two deep slots are cut in the flange sleeve (diametrically opposite), and the ratchet bar sector arm fits in these slots snugly so that the motion transmitted by the latter to the flange sleeve and flange, to release the locking ring, and thus release the steering engine valve rod to action.
In locking the rudder the bevel gear is turned by a wrench, with its two pins inserted in the slots of the sleeve. This draws the ratchet bar down. Its teeth engage with those of a small pinion. This pinion receives a motion of rotation from the engine when running, moves the ratchet bar up again, turns the
locking sleeve until the arms from the ring are opposite the cut out portions of its rim, when the valve stem is unlocked, and the steering engine free to act.
Rudder Index.—This regulates the position (up, down, or horizontal) in which the rudder is locked during the time the locking gear is in action. This regulates the depth of the initial dive of the torpedo.
The dial of the rudder index is on the left side of the torpedo. It is circular and graduated to 32 division on each side of the zero mark, and is turned by a wrench. It is clamped by the inner clamp at the center of the index, the outer clamp being for the locking dial.
The dial is on the face of a long sleeve, the other face of which is a cam, bearing against a sleeve (called the rocking ring carrier) on which pivots the locking ring, with two arms.
The valve stem of the steering engine being locked by the locking gear, when the dial of the rudder index is revolved with a wrench, the valve stem is moved out or in, by the cam on the rudder index dial sleeve moving the locking ring carrier, and with it the locking ring, the long arm of which moves the valve stem. Turning the dial to the right puts the rudder down, and to the left puts it up. Briefly, the rule is, the rudder moves in the same direction that the dial is turned.
Obry Gear.—The object of the Obry gear is to keep the torpedo on a straight course during a run.
It is carried in the after compartment of the after body, just abaft the bulkhead to which the main engine is secured. It is put in place, and may be removed, through a door in the shell of the torpedo on the under side. Its frame is secured by square headed screws to supports riveted to the shell of the torpedo.
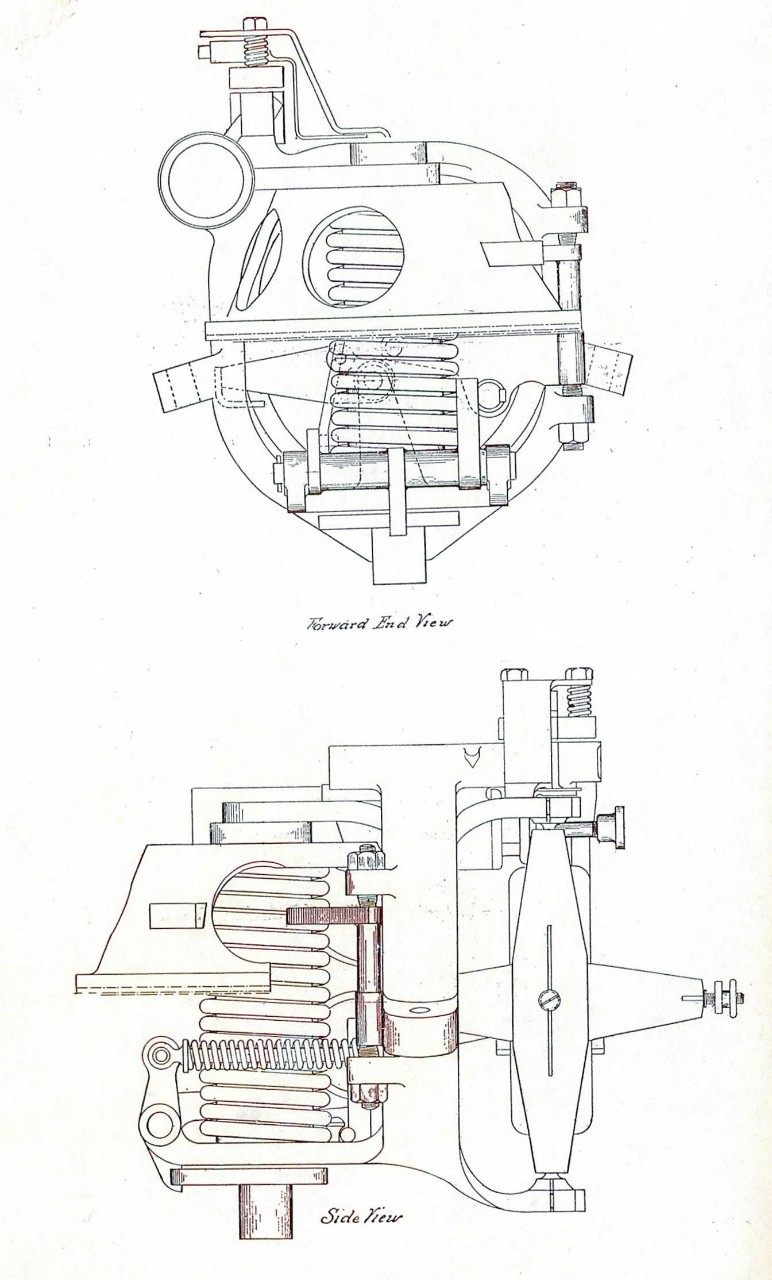
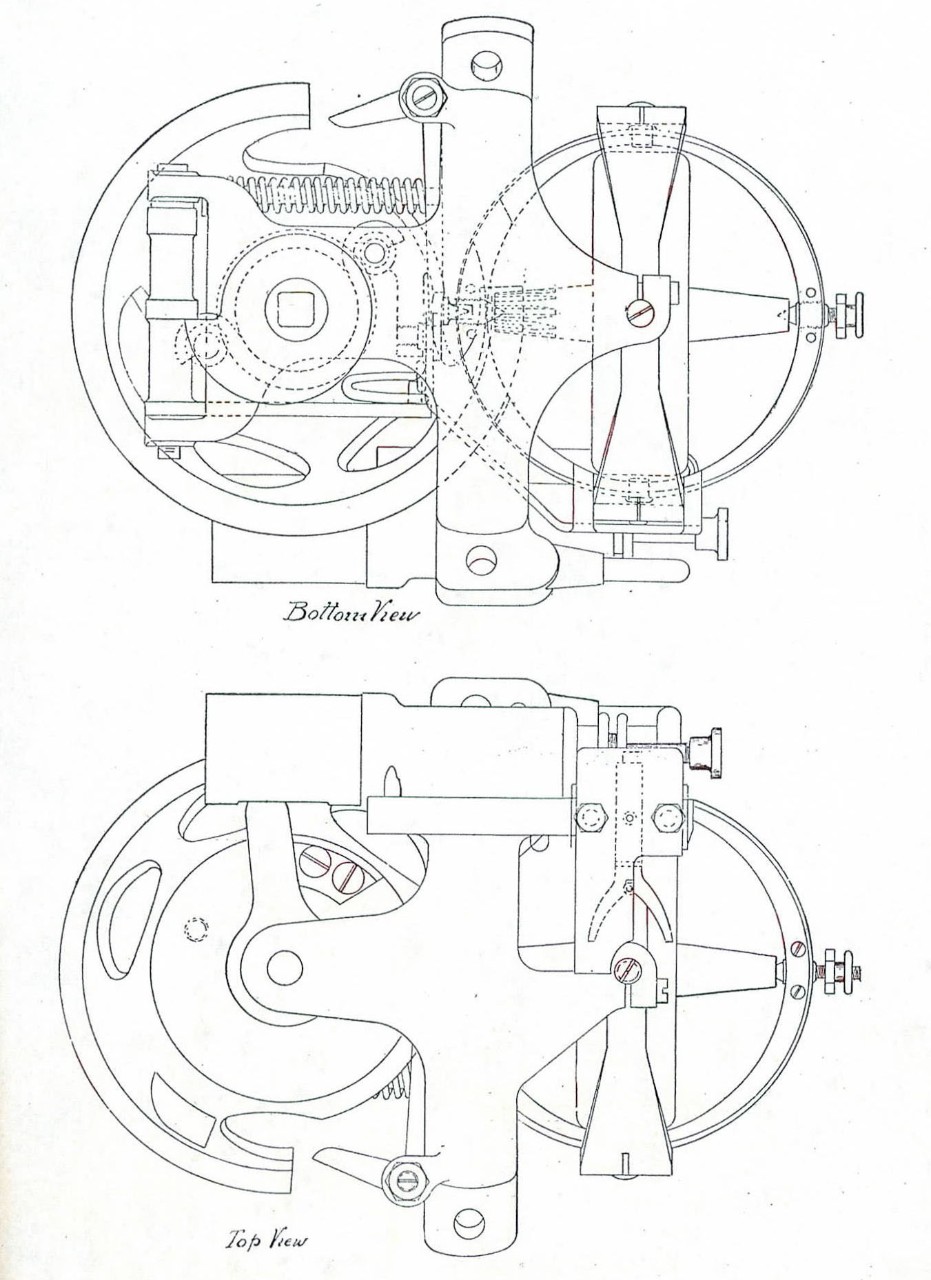
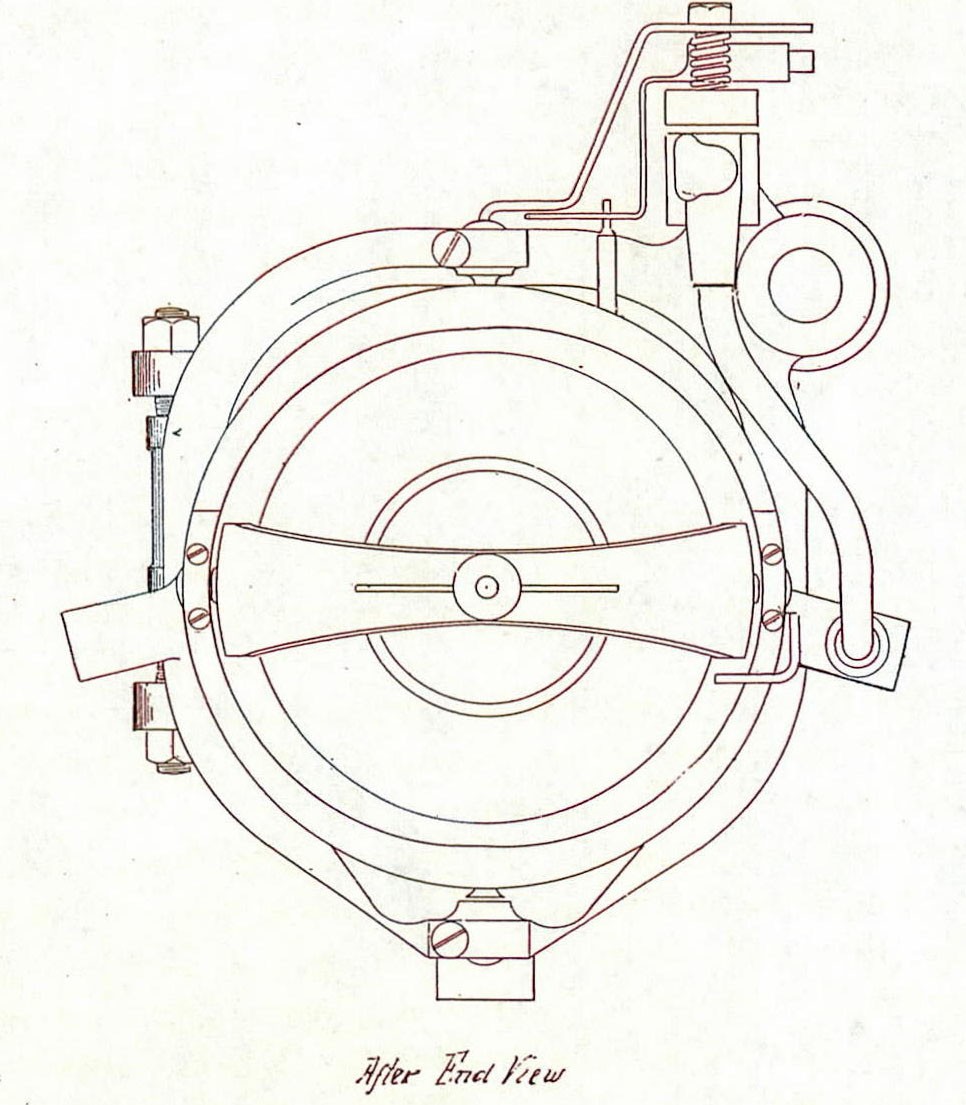
The Obry consists, essentially, of a gyroscope controlling the motion of the valves of a steering engine, which operates two rigidly connected, vertical rudders, working in the forward top and bottom blades of the torpedo.
The gyroscope wheel, of Tobin bronze, is three inches in diameter and weighs 1 ¾ lbs. Its axis is in a fore and aft direction in the torpedo. The axle is fitted with tool steel female centers, supported on male centers screwed through the inner ring. The inner and outer rings are fitted with steel female centers and supported by screws the inner ends of which form the male centers.
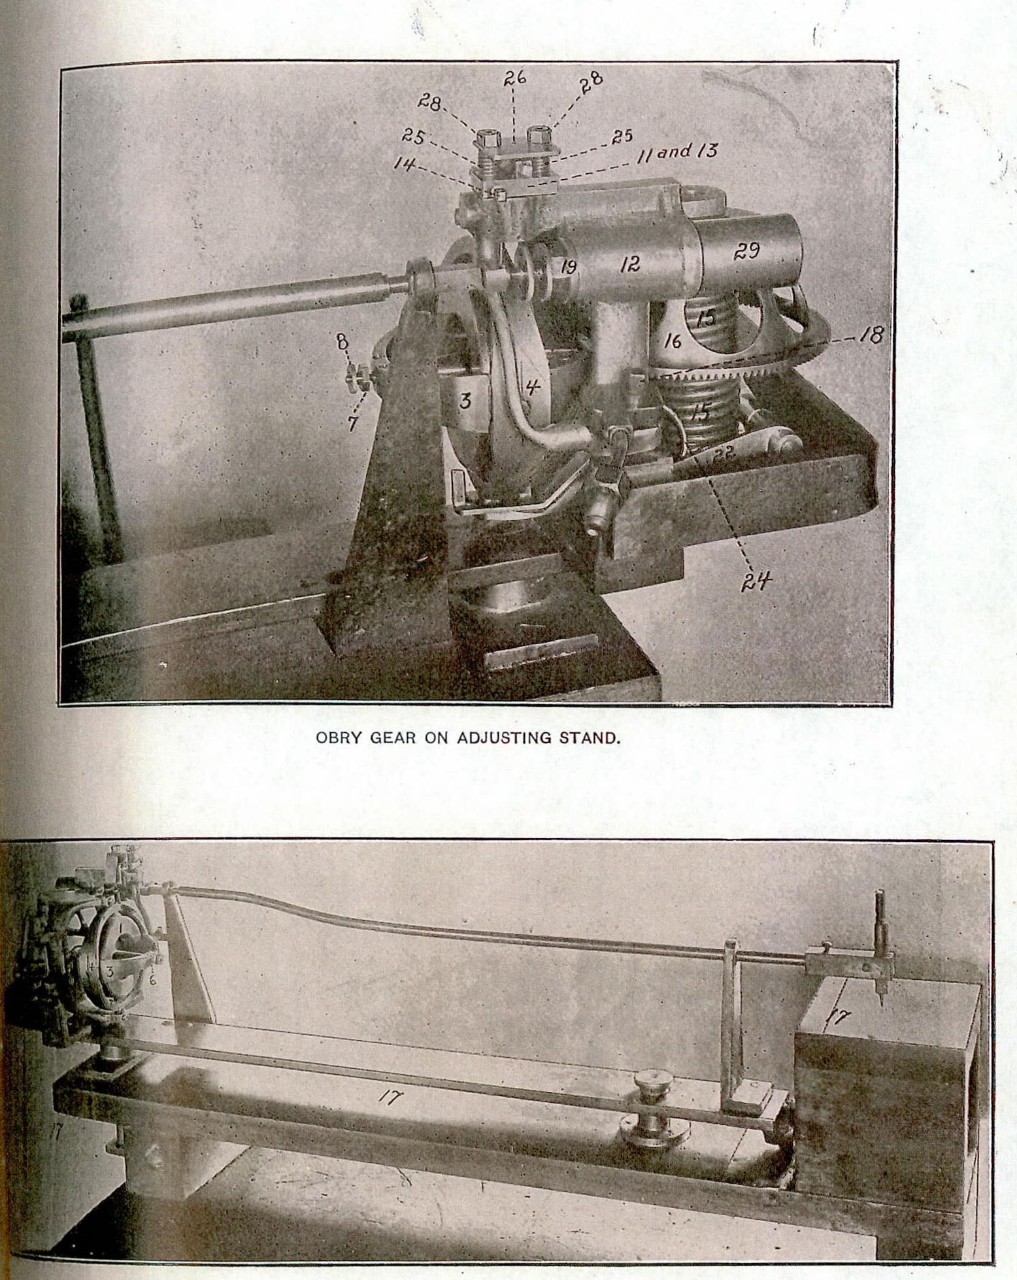
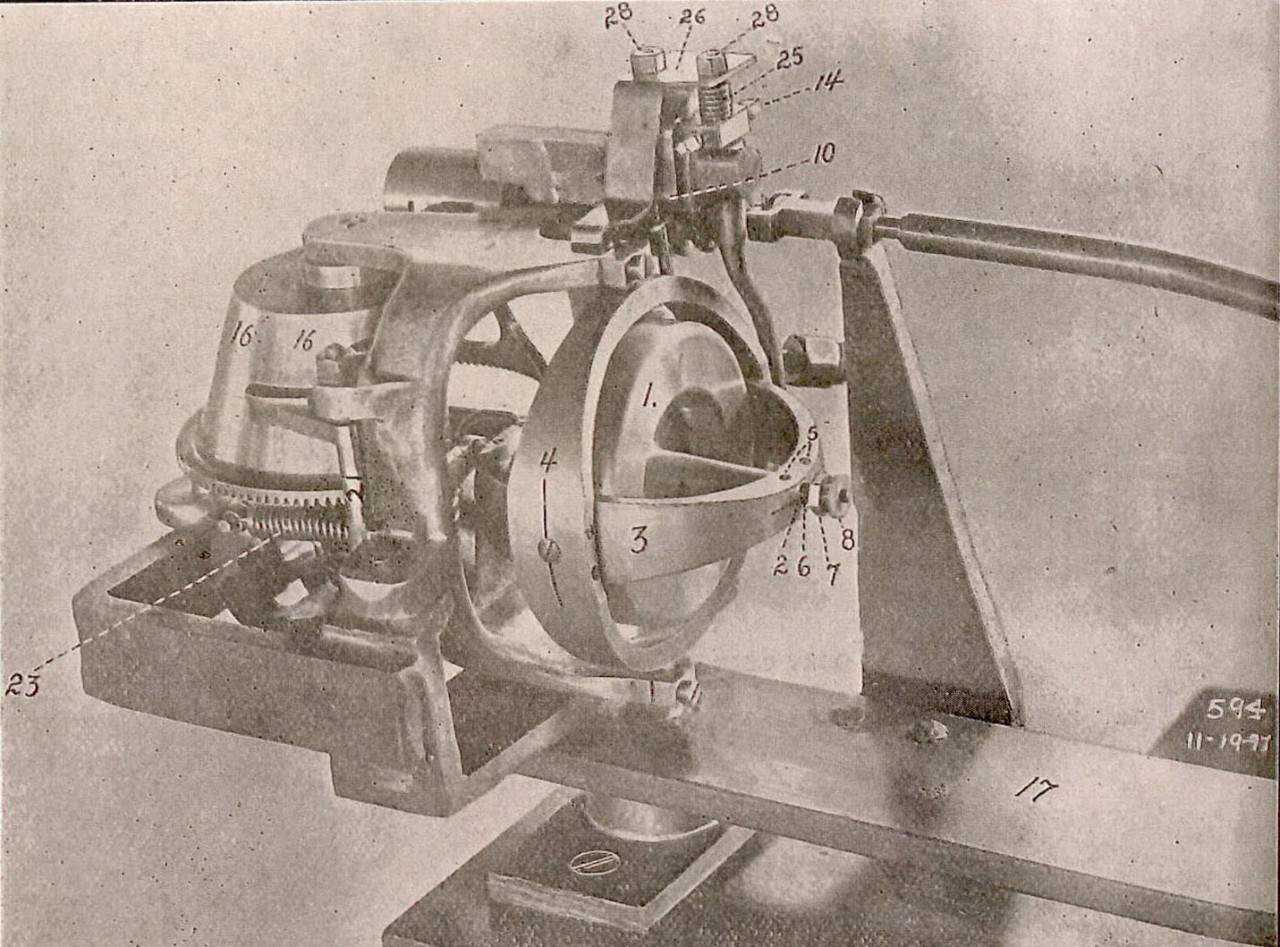
OBRY GEAR AND ADJUSTING STAND.
1. Gyroscope wheel.
2. Male centers.
3. Inner ring.
4. Outer ring.
5. Locking screws.
6. After centering screw.
7. Nut.
8. Jamb nut.
9. Pin for valve arm.
10. Valve arm.
11. Rolling valve.
12. Steering engine.
13. Valve plug.
14. Adjusting screws.
15. Impulse spring.
16. Impulse sector.
17. Adjusting stand.
18. Holding-down screws.
19. Cylinder head.
20. Clutch.
21. Vertical rock-shaft.
22. Horizontal rock-shaft.
23. Double-acting rock-shaft spring.
24. Auxiliary rock-shaft spring.
25. Holding-down springs.
26. Holding-down plate.
27. Holding-down studs.
28. Holding-down nuts.
29. Air-cushion cylinder.
30. Impulse sector stop.
31. Socket for winding key.
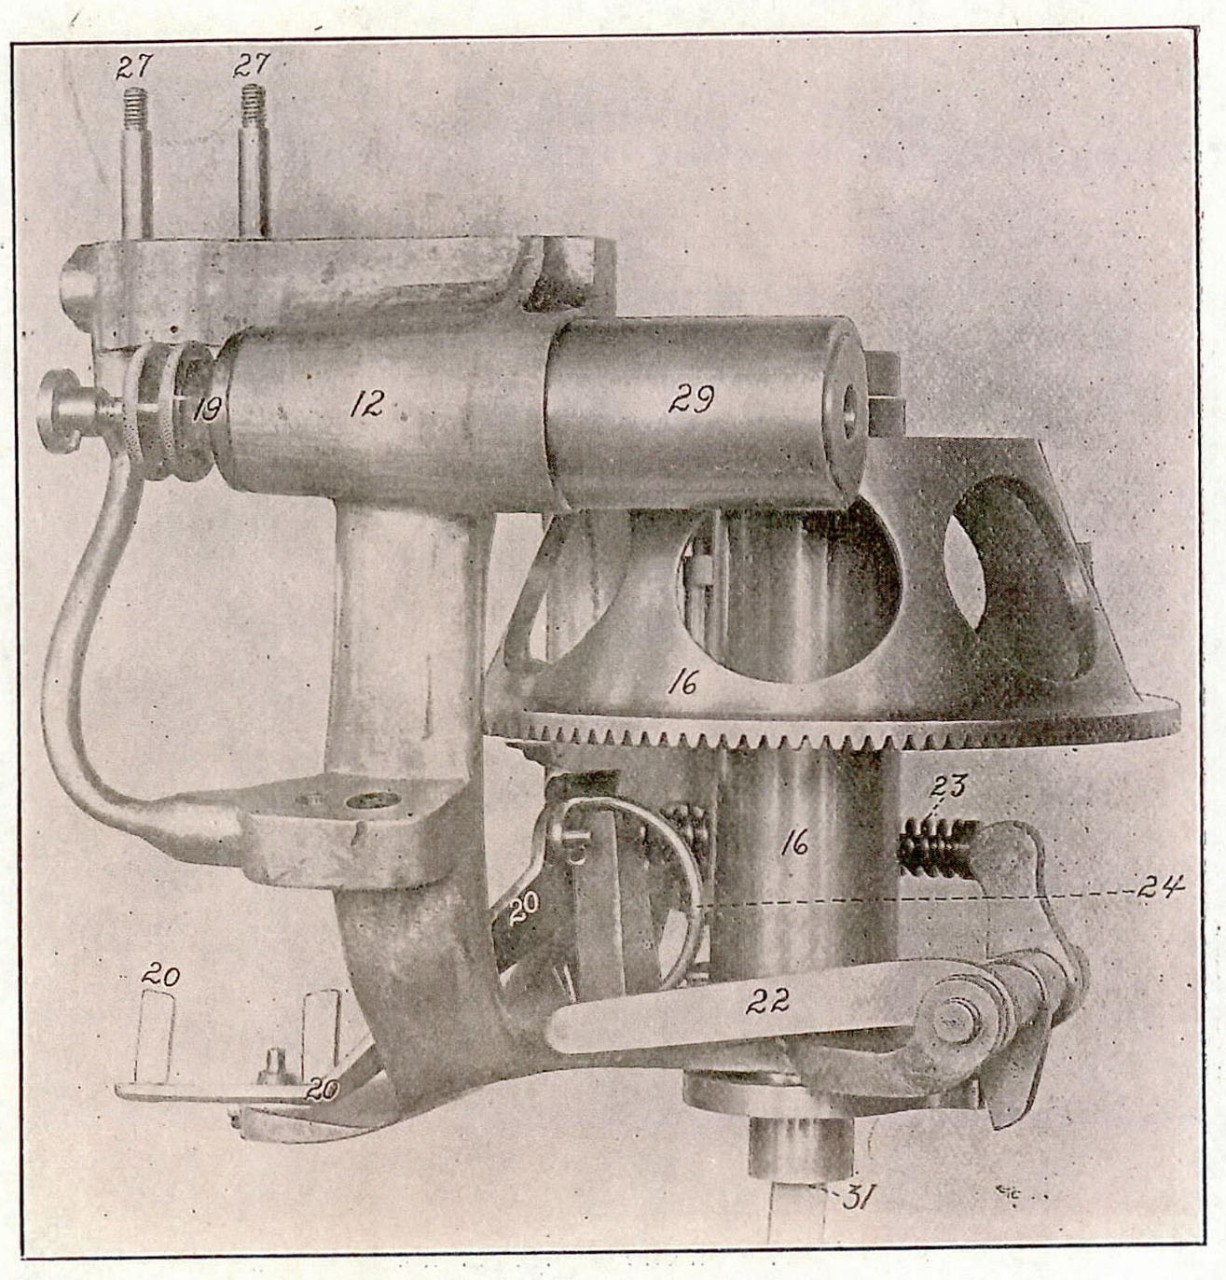
Obry Gear--Gyroscope Wheel, Rings, Impulse Sector Spring and Rolling-Valve Dismounted.
OBRY GEAR ON ADJUSTING STAND
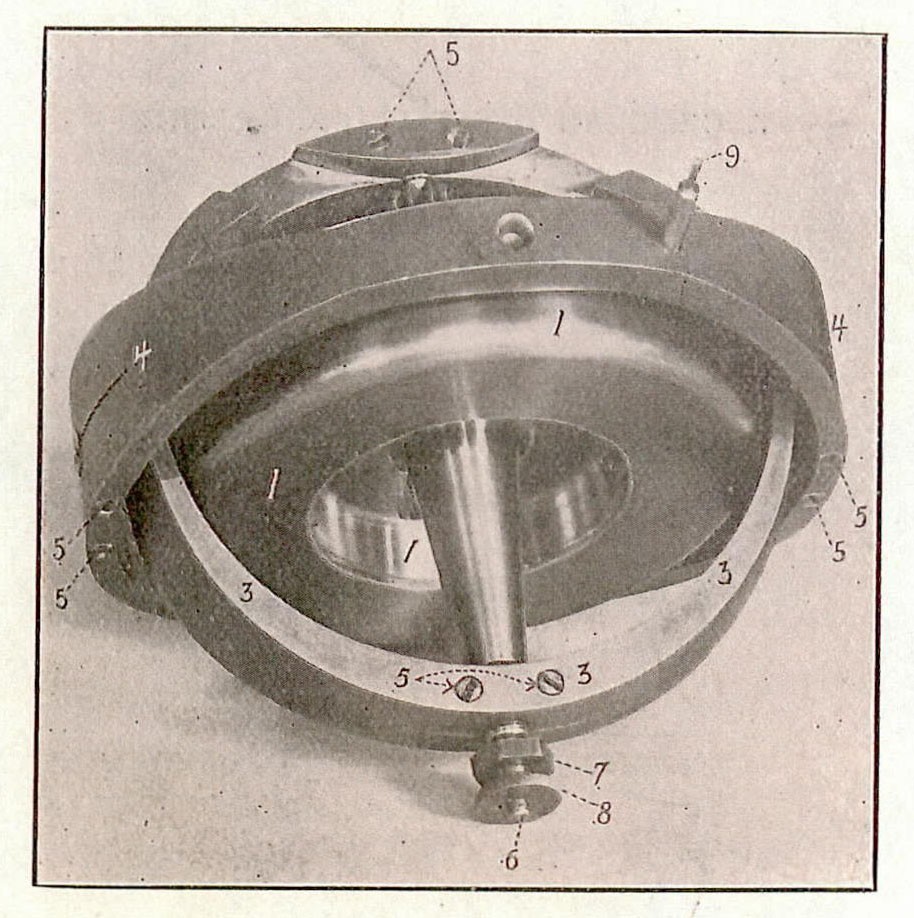
GYROSCOPE WHEEL, with Inner and Outer Rings, Counterbalance, Pin for Valve-Arm, and Clamp Screws.
OBRY GEAR-Wheel and Rings Dismounted; also Impulse Spring and Rolling-Valve Removed.
When the wheel and rings have been adjusted these screws are locked by locking screws. The after centering screw of the axle of the gyroscope wheel projects beyond the inner ring, is threaded, and carries a nut and jamb-nut, which may be screwed towards or from the gyroscope wheel as a counterbalance.
Screwing the counterbalance out causes that end of the axle of the gyroscope wheel to move to starboard in the torpedo,
which will cause the torpedo to run to port; screwing the counter balance in towards the gyroscope wheel will cause the torpedo to run to starboard.
The screws through the inner ring, supporting the gyroscope wheel, may also be used for adjustment by moving the gyroscope wheel bodily in the direction of its axis inside the ring.
The outer ring has a small steel pin projecting outwards, which actuates a steel yoke (called the valve arm) and gives the valve seat (called the valve plug) is outside of the valve (which is cylindrical and hollow) and is, in shape, a hollow, truncated cone, which may be moved within small limits around the valve by horizontal adjusting screws. Air is taken from the valve group.
And, after passing through a reducing valve (which reduces the pressure to about 150 lbs. per square inch), passes around the valve, through the valve plug and valve into the after body.
The adjusting screws of the valve plug are used to correct deviation of the torpedo either to right or left of a straight course. One screw must be slacked up before the other can be screwed in. Then screwing in the second screw draws the end of the valve plug into which it screws towards that side, and causes the torpedo to run towards the side of the first screw (the one slacked up). That is, the torpedo runs in the direction in which the screws are moved.
The motive power of the gyroscope wheel is a stiff steel spring, wound by a key through a hole in the shell of the torpedo. The spring, when released, turns a cogged sector (called the impulse sector), the cogs of which mesh with cogs on the forward axle of the gyroscope wheel, over 276 degrees of the sector, and thus gives the gyroscope wheel a high speed of rotation. A sector of 84 degrees is cut from the impulse sector, which allows the gyroscope wheel to continue its rotation after the cogs of the remaining 276 degrees of the impulse sector have all passed the cogs on the axle of the gyroscope wheel.
By suitable connections with the starting lever of the main engine the gyroscope is centered, before winding it up with the key, by putting the starting lever down flat along the shell of the torpedo. After winding the Obry, throwing back the starting lever releases the impulse spring, which then spins up the gyroscope wheel.
The tail of the torpedo consist of the part abaft the after body, comprising the gear box, the tail tube, and the frame of the tail. The latter consists of a forward and after cone, each carrying a pair of vertical flat blades and a pair of horizontal ones. The forward and after blades are joined stiffly together by rails. On the upper edge of the top rail is a guide which enters the guide slot in the tube in launching.
The gear box carries the bevel gears by which the motion of the main shaft is transmitted to the outer tubular shaft in a contrary direction. The propellers, of steel, are two-bladed and are carried in tandem, the forward one right-handed, on the outer tubular shaft, and the after one left-handed, on the main shaft.
The horizontal rudder, of steel, is carried at the rear end of the
-102-
tail, and is connected with the steering rod by a series of levers carried around the propeller on the lower, vertical, flat blades and lower rail.
The vertical vanes are set when the torpedo has its trial. They are pivoted at their forward ends, and can be swung on their pivots, to starboard or port, to give permanent rudder effect.
The propeller shaft is in two sections, the after one fitting as a sleeve over the forward one, to which it is held to revolution by four feathers and slots.
The tail may be removed by disconnecting the two steering rods and withdrawing the tail joint screws. When the Obry steering rod is disconnected, enter the screw in the locking hole of the tail cone to lock the rudder spindle yoke, to hold the rudder amidships. In removing or putting in the horizontal rudder rod, take out the screw and the rod will more easily pass through the hole for it in the spindle of the vertical rudder.
In putting the tail on the after body see that the marks on the two shaft sections coincide, so that the engine can be set to start without sticking on the center.
The vertical rudders are carried in the forward vertical flat blades, and are rigidly connected by a yoke around the starboard side of the propeller shafts. The steering rod from the Obry steering engine is connected to the yoke.
Preparation, on board ship, of the Mark I 5 m.-45 cm. Whitehead Torpedo for a Run.
Start air pumps to charge accumulators.
Put yoke on propellers.
Close starting lever.
Enter head of torpedo in tube.
Put rope sling under after body, raise it from truck, at same time elevating breech of tube as necessary for torpedo to clear truck.
Place loading staff against end of propeller shaft and shove torpedo into tube, with guide stud just entering guide slot.
Remove charging valve plug.
Screw in valve of charging pipe.
Open stop valve.
Open valves in air pipe between separator and torpedo.
Examine torpedo for leaks.
-103-
Try hydrostatic piston to get the throw of horizontal rudder due to the action of the piston alone.
To do this see the yoke on, level torpedo, give two or three turns to regulator, raise water tripper, raise staring lever; then work depth index with a socket wrench, screwing it up and down between graduations 0 and 5. This will give a total throw of the rudder of from 3 ¼ to 4 ½ division, and in all cases should give ¼ division more down-rudder than up-rudder. In case it does not give this much more down-rudder, lengthen the steering engine valve rod by turning the valve adjusting screw to the right, by means of a small wrench inserted through a hole in the shell of the after body, just forward of the locking dial.
This adjustment is important, and if it cannot be made by the valve adjusting screw, the steering engine rod will have to be lengthened or shortened (depending upon whether down- or up- rudder is required to give ¼ division more down-rudder desired), by screwing the steering engine rod out or into the coupling just abaft the steering engine.
Try Steering Engine.—To do this admit air to steering engine by lifting the starting lever slightly/ Insert a small socket wrench through hole in shell of torpedo, place its end over the end of the valve adjusting screw, and move the steering valve rod as far forward, and then as far aft, as possible. This should give four divisions down-rudder and three up-rudder.
Set distance gear by means of socket wrench inserted through a hole in the engine-room door, fitting over the square upper end of the adjusting spindle. The record sheet gives the setting for 800 yards range. See that the friction cam pin bears against the distance sector stud.
Set the Regulator.—Insert the crank with a square head in the square socket of the head of the regulator plug. Screw the plug up until its upper face is flush with the top of the regulator body. The record sheet gives the number of turns to be given to the plug to obtain maximum speed for an 800 yard run.
To get the best speed of the torpedo the pressure in the air flask should be reduced from 100 to 105 lbs. per 100 yards run. If enough air is not used to reduce the pressure this amount, screw the regulator plug down a little more.
The final pressure in the air flask after a run is obtained by unscrewing the charging valve plug and screwing the valve end
-104-
of the pipe of a pressure gauge in its place. The reading of the gauge gives the final pressure.
The actual final pressure at the instant of the finish of a run is from 50 to 125 lbs. less than the reading, on account of the lower temperature of the air at that instant, due to its rapid expansion during the run.
Set the Locking Dial.---The locking dial is set to lock the steering engine valve rod, to prevent the rudder acting while the torpedo is gathering its headway.
To set it, unclamp, with the locking wrench, the clamp nut (first one from the center) of the setting bar.
Turn the setting bar around the proper number of divisions (each division corresponds to a run of about 15 yards from the ship, counting from the zero division).
Set up the clamp nut with the wrench.
Turn the locking dial sleeve to the left, with the wrench, until the pins of the latter bring up against the setting bar, which completes the locking for the desired distance.
Set the Rudder Index.—To give up, down, or horizontal rudder during the time the rudder is locked.
Unclamp, with the locking wrench, the clamp nut (center one) of the rudder index dial.
Turn the dial (the outer graduated one), with the wrench; to the right for down-rudder, or to the left for up-rudder. (About twelve divisions on the dial are equal to one division on the rudder.)
Set up the clamp nut with the wrench.
Set Depth Index.---To fix the depth at which the torpedo will run.
Put the socket wrench in the socket of the depth index spindle and turn the wrench until the depth, in feet, desired is shown by the figure stamped on the worm wheel, as seen through the central hole in the cap over the wheel.
In assembling the torpedo the reference point of adjustment of the depth index is for five feet immersion of the torpedo. The adjusting screw is turned until the after edge of the lower arm of the forked bell crank coincides with a line cut on the side of the tube for the hydrostatic piston spring, marked 5, which gives the compression of the spring that will balance the water pressure on the after side of the piston at a depth of five feet. The depth index is put in place with the figure 5 showing through the cen-
tral hole in the cap, when the after edge of the forked bell crank coincides with the line cut on the tube for the hydrostatic piston spring.
Oil Cups.—Fill valve group oil cup, gear box oil cup, engine room oil cup, and oil after bearing. The oil in the valve group oil cup is for packing, and is forced out by pressure of air.
See all drain plugs in the after body closed.
Close valves in charging pipe, unscrew charging pipe, and screw in plug.
See that the starting lever is down, and then wind up the Obry.
Lift firing lever and put in safety pin.
Raise water tipper.
Raise tripping latch and shove torpedo in tube.
Take off yoke and see propellers turned until notch on end of shaft is S.S.E. (This is to prevent engine being on center, as the cylinders cut off at 1/3 stroke.)
Work firing lever up and down to see that stop pin is not jammed.
Close door of tube, load, prime, point, and fire.
Obry Gear.—The action of the Obry gear upon the torpedo is to cause it to make a series of short curves, but to keep a mean straight course, varying but little from the line of sight. If the curves are long, or if the general direction taken by the torpedo examined to see if it is properly adjusted.
In testing or adjusting the Obry on board ship, the ship’s head should remain on the same compass course, for if the ship is swinging, the change in azimuth will have the same effect upon the result as though the torpedo had deviated from its course by the same amount as the ship has swung.
To Test the Obry while in the Torpedo.—See the starting lever down, raise the water tripper, and put the yoke on the propellers. Put the transporting strap on, and sling the torpedo so it may be swung in azimuth. Wind the Obry. Raise the staring lever, which starts the gyroscope wheel spinning by releasing the impulse spring. Swing the tail of the torpedo gently from side to side, and note the angle, or are, through which the tail moves when the vertical rudders move from one side of the torpedo to the other. If the Obry is working properly the rudders should move from one side to the other when the tail is swung through an arc of one degree ( ½ degree each side of the central position) ;
-106-
The extreme limit within it is necessary to move the tail to work the rudders might very properly be considered as not more than 3 degrees of arc ( 1 ½ degrees each side of the central position). It should, however, be less than this.
Continue to swing the torpedo to the right and left for four or five minutes, and notice if the limiting points of the arc through which the tail is swung remain constant, or if it is necessary to swing the torpedo a little farther to the right or left each time. If such is the case, and the ship is steady, then the gyroscope wheel is probably not keeping in the same plane as it should. It will therefore be necessary to adjust the Obry.
To Adjust the Obry Gear.—Take out the screws of the obry door and remove the door. Unscrew the holding-down screws of the Obry, with a socket wrench, and lift the Obry out of the torpedo. Put it in the frame of the adjusting stand and screw in the holding-down screws.
Swing the starting lever (on the adjusting stand) around in the direction the hands of a watch move as far as it will go.
Wind the Obry, noting that the impulse sector meshes properly with the teeth on the gyroscope axle.
Have a watch ready to note the duration of the time the Obry will run.
(They run from ten to eleven minutes, when adjusted in the shops where made.)
Trip the impulse spring by moving the starting lever back in the opposite direction to the motion of the hands of a watch, seeing that it remains in the position to which moved and does not fly back.
Set a pointer on the stand, close to the end of the center on which the counterbalance is crewed, so that its motion (if any) may be carefully muted. (This is the after center on which the gyroscope wheel turns when the Obry is in the torpedo.)
If this center moves to the left (against the hands of a watch) the counterbalance is too heavy, and must be screwed towards the ring.
If the after center moves to the right the counterbalance is not exerting weight enough on the wheel, and must be screwed out.
If the horizontal motion, to right or left, of the after center cannot be overcome by moving the counterbalance in to the ring, or out to the end of the screw upon which it is screwed, then the gyroscope wheel itself will have to be moved in the same direction.
-107-
To do this slacken the clamp screws of both centers, unscrew one center about one-quarter of a turn, then screw the other one in carefully the same amount. The wheel will be found very sensitive to this adjustment. See that the wheel turns freely on its centers, hen set up the clamp screws.
Wind up the Obry and try the running of the wheel again. Continue the operation until there is no horizontal motion of the centers of the wheel, and, of course, of the wheel itself.
If the centers of the gyroscope wheel have a vertical motion, after the horizontal motion has been overcome, it probably indicated that the gyroscope wheel is too near the ring-bearing of one of its centers, and too far away from the other one. Moving it back to the proper position would introduce a horizontal motion of its centers. The vertical motion would probably not interfere with the proper action of the Obry, however (unless the torpedo rolled), except in cases when it was so marked that the wheel had turned up to a position where the gyroscopic action was interfered with before the torpedo had finished its run.
The vertical motion might be overcome by moving the wheel in the direction of its centers until in the proper position, and then filing from the heavier side of the ring.
The wheel is nearer the ring-bearing of that center which has a vertical motion upwards when the wheel is running.
Having adjusted the gyroscope so the centers of the wheel do not move in azimuth while the wheel is running, make the air connections and turn on a pressure of about 150 lbs. on the steering engine.
Wind up and start the Obry, and then work the frame of the adjusting stand back and forth to get an indicator diagram. This will show the action of the rolling valve of the steering engine. Excellent cards have been taken by moving the frame through an arc of one degree (one-half degree each side of the center).
If the card shows that the torpedo would have a tendency to run either to port or starboard of the line of sight (through the action of the Obry), counteract this tendency by setting the valve plug by the adjusting screws of the valve.
One screw must be slacked up before the other can be screwed in.
The torpedo will run in the direction which the screws are moved.
To Remove the Gyroscope Wheel.—The centers of the wheel may
-108-
be more readily examined and kept free from rust, if the wheel is kept dismounted and in the compartment provided for it in the Obry gear box. The wheel should always be dismounted for transportation. To dismount it come up the clamp screws of the counterbalance centers, but do not disturb the other center of the wheel, in order that the wheel may be put back in the same position in the ring.
Jam the two nuts of the counterbalance tightly together, holding the hexagonal-headed nut with a wrench, and screwing the jam nut tightly against it with the fingers. Then grasp both nuts with the thumb and forefinger, and by turning them to the left (and with them the center on which they are screwed) the center will screw out until clear of the axle of the gyroscope wheel, when it may be removed.
Impulse Spring.—Should the impulse spring become weak, tauten it up as follows: Take out the screws in the impulse sector stop, and take off the stop. Give the impulse spring one complete turn with the winding key, and holding it in this position by the key, put on the stop again. Be careful to keep the fingers out of the holes through the impulse sector or they might be cut off by sector in case the key should slip.
To Assemble the Obry Gear.—Clean out steering engine cylinder with clean, oily waste.
Put in cylinder head between steering engine and air cushion cylinders, and set it up tightly, using winding key inserted through steering engine cylinder.
Oil piston and piston rod of steering engine and put them in.
See that the packing of the stuffing box of the steering engine is in good order and in place. For packing use a piece of 2 strand lamp wicking, about nine inches long, dipped in best tallow.
Use an oiled linen paper washer under both cylinder heads.
Screw the outer cylinder head in tightly with flat open-end hexagonal 17/32 inch wrench provided.
Set up on the stuffing box with thumb nut, so that the piston works moderately tight.
Put in the split pin holding the bonnet of the stuffing box from turning.
Put in the air cushion pistons, the one with the screw hole in it being outboard.
Put the cushion lever on the impulse sector.
-109-
Put the impulse sector in place, and insert its shaft to see that they fit properly.
Put on the impulse sector stop.
Take out the shaft, and put on the impulse spring.
Put in screws holding the end of the impulse spring.
Put sector and spring in place in frame, and put in impulse sector shaft.
Secure ends of spring to screws.
See that the impulse sector stop is on the right side of the lever for cushion piston.
Screw the outer ring centers in place until they are just through the frame.
Secure inner ring in outer one by its centers, balancing it neatly.
Put rings in frame and screw in outer ring centers.
Put in the centering lever or clutch.
Put in vertical rock shaft for centering gyroscope wheel.
Put gyroscope in rings, balancing it neatly.
Insert a block of wood about an inch and one-half thick between the impulse sector and frame, to bring the sector into position to mesh with the teeth on the axle of the gyroscope wheel.
Turn up the clutch of the position holder by hand until it bears against the inner ring, to get the rings at right angles to each other. Then move the vertical rock ashaft bodily up or down as necessary, by means of the screws at its ends, until the centering stud enters the socket in the end of the gyroscope wheel. When in the right position, lock the rock ashaft against vertical motion by setting up the locking nuts at the ends of the shaft.
Examine the meshing of the impulse sector and teeth on the axle of the gyroscope wheel, to see that it is done satisfactorily, and see that the clutch brings up against the inner ring, to bring it in proper position for the centering pin on the vertical rock shaft to enter the socket in the center of the gyroscope wheel.
Put in the clamp screws of the outer ring centers.
Put in the horizontal rock shaft, the double-acting rock shaft spring and shaft, and the split pin in the end of the shaft.
Hook up the auxiliary horizontal rock shaft spring (a piece of brass wire) and put in split pin.
Clean rolling valve with oily waste, and wash it off with a blast of air from the charging pipe.
-110-
Put in the valve plug, put on the valve arm, holding down springs, holding down plate and nuts. Put in the valve arm holding screw, seeing that the valve is on the center, with the valve arm in mid-position, before setting up the screw tightly.
TOOLS USED WITH OBRY GEAR, WITH THE NAMES, DIMENSIONS, AND USES OF EACH TOOL.
TOOL NO. 1.
Name.—Flat, open-end wrench (double).
Use.—(Hexagonal end, 5/16 inch) with hexagonal-headed nuts, holding down valve-guard plate on top of valve.
Use.---(Square end, 9/64 inch) with valve-plug adjusting screws, and securing screw of valve arm.
TOOL NO. 2.
Name.—Flat, open-end wrench (double).
Use.---(Hexagonal end, 3/8 inch) with check nuts of vertical rockshaft pivots.
Use.(Hexagonal end, 17/32 inch) with cylinder head of steering engine.
TOOL NO. 3.
Name.—Small screw-driver (double end).
Use.---(1/8 inch end) with inner ring clamping screws, and clamping screws of gyroscope wheel pivots.
Use.---(3/16 inch end) with all pivots of gyroscope, and rock-shaft pivots.
TOOL NO. 4.
Name.—Small screw-driver (double end).
Use.—(1/4 inch end) with door-plate screws and frame pivot locking screws.
Use.—(5/16 inch end) with screws for stop on impulse sector.
TOOL NO. 5
Name.----Combination winding key and socket wrench.
Use.—Winding key (square head, male, 11/32 inch, one foot long, stem 6 inches long) winds up Obry; also screws (in or out) the partition between the steering engine and air-cushion cylinders, by inserting wrench (through steering-engine cylinder) in square socket of partition. (This partition forms a cylinder head common to both steering engine and air cushion cylinders.)
Use.—(Square socket wrench, female 7/32 inch) with holding screws of Obry, securing it to its supports in the torpedo, or box.
END
