- Expand navigation for Action Reports Action Reports
- Expand navigation for WWII - Battle of Midway WWII - Battle of Midway
- Bombing Squadron 6
- Commander Cruisers Pacific Fleet Report
- Commander-in-Chief, Pacific Fleet
- Commander Destroyer Squadron Six Action Report
- Interrogation of Japanese Prisoners
- TF 16 Action Report
- USS Enterprise Action Report
- USS Hammann Action Report
- USS Hornet Action Report
- USS Yorktown Action Report
- Expand navigation for WWII - Pearl Harbor Attack WWII - Pearl Harbor Attack
- Ships A-C
- Ships D-L
- Ships M-R
- Ships S-Z
- Commander Battle Force Action Report
- Commander Battleships, Battle Force Action Report
- Destroyer Division 80, Battle Force Action Report
- Destroyer Flotilla One, Battle Force Action Report
- Minecraft, Battle Force Action Report
- Minecraft, Battle Force, Mine Division One Action Report
- Minecraft, Battle Force, Mine Division Two Action Report
- Motor Torpedo Squadron One Action Report
- Patrol Squadron (PBY) Eleven Action Report
- Patrol Squadron (PBY) Twenty-Two Action Report
- Patrol Wing (PBY) One Action Report
- Patrol Wing (PBY) Two Action Report
- Pearl Harbor Mooring and Berthing Plans
- Rear Admiral R.H. Jackson, USN (Ret.) Report on Pearl Harbor Attack
- Submarine Squadron Four Action Report
- Korean War - Carrier Air Groups
- Expand navigation for Korean War - Carrier Combat Korean War - Carrier Combat
- Antietam (CV 36)
- Badoeng Strait (CVE 116)
- Bairoko (CVE 115)
- Bataan (CVL 29)
- Bon Homme Richard (CVA 31)
- Boxer (CVA 21)
- Essex (CVA 9)
- Kearsarge (CV 33)
- Lake Champlain (CVA 39)
- Leyte (CV 32)
- Oriskany (CVA 34)
- Philippine Sea (CV 47)
- Point Cruz (CVE 119)
- Princeton (CV 37)
- Rendova (CVE 114)
- Sicily (CVE 118)
- Valley Forge (CV 45)
- Expand navigation for WWII - Battle of Midway WWII - Battle of Midway
- Expand navigation for Apollo 11 Apollo 11
- Expand navigation for Reports Reports
- USS Hornet (CVS-12) 1969 Command History Report
- USS Hornet (CVS-12): Apollo 11 Cruise Report - Part 1
- USS Hornet (CVS-12): Apollo 11 Cruise Report - Part 2
- USS Arlington (AGMR-2) 1969 Command History Report
- Task Force 130: Apollo 11 Report
- Task Force 130: Manned Spacecraft Recovery Office
- HS-4 1969 Command History Report
- Expand navigation for Photographs Photographs
- Apollo 11 Recovery Photo 1
- Apollo 11 Recovery Photo 2
- Apollo 11 Recovery Photo 3
- Apollo 11 Recovery Photo 4
- Apollo 11 Recovery Photo 5
- Apollo 11 Recovery Photo 6
- Apollo 11 Recovery Photo 7
- Apollo 11 Recovery Photo 8
- Apollo 11 Recovery Photo 9
- Apollo 11 Recovery Photo 10
- Apollo 11 Recovery Photo 11
- Apollo 11 Recovery Photo 12
- Apollo 11 Recovery Photo 13
- Apollo 11 Recovery Photo 14
- Apollo 11 Recovery Photo 15
- Expand navigation for Reports Reports
- Expand navigation for Aviation Training Sense Pamphlets Aviation Training Sense Pamphlets
- Expand navigation for Don't Kill Your Friends: Safety Precautions for Fixed Gunnery (1943) Don't Kill Your Friends: Safety Precautions for Fixed Gunnery (1943)
- (01) Don't Kill Your Friends: Safety Precautions for Fixed Gunnery Front Cover
- (02) Don’t Kill Your Friends: Safety Precautions for Fixed Gunnery Back Cover
- (03) Don’t Kill Your Friends: Safety Precautions for Fixed Gunnery Page 1
- (04) Don’t Kill Your Friends: Safety Precautions for Fixed Gunnery Page 2
- (05) Don’t Kill Your Friends: Safety Precautions for Fixed Gunnery Page 3
- (06) Don’t Kill Your Friends: Safety Precautions for Fixed Gunnery Page 4
- (07) Don’t Kill Your Friends: Safety Precautions for Fixed Gunnery Page 5
- (08) Don’t Kill Your Friends: Safety Precautions for Fixed Gunnery Page 6
- (09) Don’t Kill Your Friends: Safety Precautions for Fixed Gunnery Page 7
- (10) Don’t Kill Your Friends: Safety Precautions for Fixed Gunnery Page 8
- (11) Don’t Kill Your Friends: Safety Precautions for Fixed Gunnery Page 9
- (12) Don’t Kill Your Friends: Safety Precautions for Fixed Gunnery Page 10
- Expand navigation for Flat-Hatting Sense (1943) Flat-Hatting Sense (1943)
- (01) Flat-Hatting Sense Front Cover
- (02) Flat-Hatting Sense Back Cover
- (03) Flat-Hatting Sense Cover Sheet 1
- (04) Flat-Hatting Sense Cover Sheet 2
- (05) Flat-Hatting Sense Page 1
- (06) Flat-Hatting Sense Page 4
- (07) Flat-Hatting Sense Page 5
- (08) Flat-Hatting Sense Page 10
- (09) Flat-Hatting Sense Page 11
- (10) Flat-Hatting Sense Page 12
- (11) Flat-Hatting Sense Page 18
- (12) Flat-Hatting Sense Page 19
- (13) Flat-Hatting Sense Page 20
- (14) Flat-Hatting Sense Page 21
- (15) Flat-Hatting Sense Page 22
- Expand navigation for Radio Discipline Sense (1945) Radio Discipline Sense (1945)
- (01) Radio Discipline Sense Front Cover
- (02) Radio Discipline Sense Back Cover
- (03) Radio Discipline Sense Page 1
- (04) Radio Discipline Sense Page 3
- (05) Radio Discipline Sense Page 4
- (06) Radio Discipline Sense Page 5
- (07) Radio Discipline Sense Page 6
- (08) Radio Discipline Sense Page 7
- (09) Radio Discipline Sense Page 8
- (10) Radio Discipline Sense Page 9
- (11) Radio Discipline Sense Page 21
- (12) Radio Discipline Sense Page 22
- (13) Radio Discipline Sense Page 23
- (14) Radio Discipline Sense Page 24
- Expand navigation for Shark Sense (1944) Shark Sense (1944)
- (01) Shark Sense Front Cover
- (02) Shark Sense Back Cover
- (03) Shark Sense Page 1
- (04) Shark Sense Page 3
- (05) Shark Sense Page 4
- (06) Shark Sense Page 5
- (07) Shark Sense Page 6
- (08) Shark Sense Page 7
- (09) Shark Sense Page 8
- (10) Shark Sense Page 9
- (11) Shark Sense Page 10
- (12) Shark Sense Page 11
- (13) Shark Sense Page 12
- (14) Shark Sense Page 13
- (15) Shark Sense Page 14
- (16) Shark Sense Page 15
- (17) Shark Sense Page 16
- (18) Shark Sense Page 17
- (19) Shark Sense Page 18
- (20) Shark Sense Page 19
- (21) Shark Sense Page 20
- (22) Shark Sense Page 21
- (23) Shark Sense Page 22
- (24) Shark Sense Page 23
- (25) Shark Sense (1959) Front Cover
- (26) Shark Sense (1959) Back Cover
- (27) Shark Sense (1959) Page 1
- Expand navigation for Shoot Seat Sense (1951) Shoot Seat Sense (1951)
- (01) Shoot Seat Sense Front Cover
- (02) Shoot Seat Sense Front Cover Original Artwork 1
- (03) Shoot Seat Sense Front Cover Original Artwork 2
- (04) Shoot Seat Sense Back Cover
- (05) Shoot Seat Sense Back Cover Original Artwork 1
- (06) Shoot Seat Sense Back Cover Original Artwork 2
- (07) Shoot Seat Sense Page 1
- (08) Shoot Seat Sense Page 1 Original Artwork
- (09) Shoot Seat Sense Page 3
- (10) Shoot Seat Sense Page 3 Original Artwork 1
- (11) Shoot Seat Sense Page 3 Original Artwork 2
- (12) Shoot Seat Sense Page 4
- (13) Shoot Seat Sense Page 5
- (14) Shoot Seat Sense Page 6
- (15) Shoot Seat Sense Page 7
- Expand navigation for Taxi Sense (1944) Taxi Sense (1944)
- (01) Taxi Sense Front Cover
- (02) Taxi Sense Back Cover
- (03) Taxi Sense Page 1
- (04) Taxi Sense Page 3
- (05) Taxi Sense Page 4
- (06) Taxi Sense Page 5
- (07) Taxi Sense Page 6
- (08) Taxi Sense Page 7
- (09) Taxi Sense Page 18
- (10) Taxi Sense Page 19
- (11) Taxi Sense Page 20
- (12) Taxi Sense Page 21
- (13) Taxi Sense Page 22
- (14) Taxi Sense Page 23
- (15) Taxi Sense Page 24
- Expand navigation for Don't Kill Your Friends: Safety Precautions for Fixed Gunnery (1943) Don't Kill Your Friends: Safety Precautions for Fixed Gunnery (1943)
- Bureau of Aeronautics Newsletters
- Expand navigation for Commander Naval Forces Vietnam Commander Naval Forces Vietnam
- Monthly Summaries, 1966
- Monthly Summaries, 1967
- Monthly Summaries, 1968
- Expand navigation for Monthly Summaries, 1969 Monthly Summaries, 1969
- Expand navigation for Monthly Summaries, 1970 Monthly Summaries, 1970
- Expand navigation for Monthly Summaries, 1971 Monthly Summaries, 1971
- Expand navigation for Quarterly Summaries, 1972 Quarterly Summaries, 1972
- Expand navigation for Quarterly Summaries, 1973 Quarterly Summaries, 1973
- Command Operations Reports
- Expand navigation for Iwo Jima: Documents from the Papers of Richmond Kelly Turner Iwo Jima: Documents from the Papers of Richmond Kelly Turner
- Radio Broadcast #1
- Radio Broadcast #2
- Statement on the Cessation of Resistance
- Photo: Turner Giving Radio Broadcast
- Photo: Iwo Jima Flag
- Photo: Flagship 1
- Photo: Flagship 2
- Photo: Iwo Jima Leadership
- Photo: Iwo Jima Leadership 2
- Photo: Admiral Nimitz
- Photo: Iwo Jima Landings 1
- Photo: Iwo Jima Landings 2
- Expand navigation for Naval Aviation Records Naval Aviation Records
- Nimitz "Gray Books"
- Expand navigation for Photo Galleries: 9/11 Photo Galleries: 9/11
- Expand navigation for The Attack on the Pentagon The Attack on the Pentagon
- (01) Pentagon employees gather in the South Parking Lot
- (02) Pentagon employees along with members of the Crane Group gather in the South Parking Lot area
- (03) The Pentagon seen from across VA-27 S Washington Blvd a few minutes after the attack
- (04) The first fire teams begin working to put out the flames
- (05) A piece of aircraft lies in the grass
- (06) Fire crews work to put out the flames minutes after the attack
- (07) Fire crews work to put out the flames minutes after the attack
- (08) Emergency response teams begin preparing triage areas
- (09) Pentagon employees walk across VA-27 S Washington Blvd and onto Interstate 395
- (10) Pentagon employees walk away from the building along VA-27 S Washington Blvd
- (11) Fire crews work to put out the flames following the collapse of the E Ring
- (12) An emergency response helicopter lands on Columbia Pike
- (13) Fire crews work to put out the flames after the collapse of the E Ring
- (14) Offices in the E Ring of the Pentagon are left exposed following the collapse
- (15) A triage team prepares to work
- (16) Fire crews work to put out the flames following the collapse of the E Ring
- (17) Fire crews work to put out the flames following the collapse of the E Ring
- (18) Pentagon employees, law enforcement, and emergency response teams gather on VA-110
- (19) Flames escape from E Ring office windows
- (20) A firefighter works to put out fires burning in the E Ring
- (21) Triage teams prepare to work
- (22) Fire crews work
- (23) Volunteers and FBI personnel perform evidence sweeps
- (24) FBI personnel and emergency response teams work near the collapsed E Ring
- (25) U.S. Army personnel take a break from duty
- (26) Navy personnel return to their offices on the fourth deck of the E Ring
- (27) A cabinet marred by fire
- (28) A newspaper dated September 11, 2001
- (29) The alley between C and B Rings
- Expand navigation for Fleet Combat Camera Atlantic in New York City After 9/11 Fleet Combat Camera Atlantic in New York City After 9/11
- (01) A Navy combat photographer documents the scene at Ground Zero
- (02) New York City police and fire personnel work at Ground Zero
- (03) A New York City firefighter works at Ground Zero
- (04) A firefighter stands under the flag of Two World Trade Center
- (05) A search and rescue canine works at Ground Zero
- (06) A New York City firefighter stands in the wreckage of the World Trade Center
- (07) A Navy combat photographer documents the scene at Ground Zero
- (08) A Navy combat photographer documents the scene at Ground Zero
- (09) Relief workers organize supplies near Ground Zero
- (10) A medic stands among other personnel at Ground Zero
- (11) Law enforcement look over the scene at Ground Zero
- (12) A Navy combat photographer documents the scene near Ground Zero
- (13) An overturned fire truck sits amidst the rubble near Ground Zero
- (14) New York City police and fire personnel work at Ground Zero
- (15) New York City police and fire personnel take a break after working at Ground Zero
- (16) A lone fire engine sits amid the smoldering rubble of the World Trade Center
- (17) Two Army Reserve Soldiers catch some rest between guard shifts at Ground Zero
- (18) Volunteers distribute water to personnel involved in the search and rescue efforts
- (19) A Navy combat photographer documents the scene at Ground Zero
- (20) A child's doll lay on the floor of an apartment damaged by the collapse
- (21) An apartment near the World Trade Center is covered in dust and ash from the collapse
- (22) An apartment near the World Trade Center is covered in dust and ash from the collapse
- (23) The collapse caused significant damage to surrounding buildings
- (24) An Army National Guard specialist works to prevent looting of buildings destroyed by the collapse
- (25) A Navy combat photographer documents the devastation at Ground Zero
- (26) Firefighters still work to extinguish the smoldering debris at Ground Zero
- (27) A volunteer steel worker cuts a large part of debris
- (28) Ground Zero, 19 September 2001
- Expand navigation for USNS COMFORT in New York City After 9/11 USNS COMFORT in New York City After 9/11
- (01) USNS COMFORT sails out of Baltimore Harbor
- (02) Standing watch on the bow of USNS COMFORT
- (03) Personnel aboard USNS COMFORT on 13 September 2001
- (04) Charting the course into New York Harbor aboard USNS COMFORT
- (05) Smoke rises from Lower Manhattan as USNS COMFORT sails into New York Harbor
- (06) Smoke rises from Lower Manhattan as USNS COMFORT sails into New York Harbor
- (07) Smoke rises from Lower Manhattan as USNS COMFORT sails into New York Harbor
- (08) Smoke rises from Lower Manhattan as USNS COMFORT sails into New York Harbor
- (09) A combat photographer records the scene as USNS COMFORT sails past Lower Manhattan
- (10) The wreckage of the World Trade Center collapse as seen from aboard USNS COMFORT
- (11) Smoke rises from Lower Manhattan as USNS COMFORT sails past on the Hudson River
- (12) Standing watch aboard the USNS COMFORT while docked at Pier 92 in New York City
- (13) Navy personnel load supplies onto USNS COMFORT while docked at Pier 92 in New York City
- (14) Standing watch while USNS COMFORT is docked at Pier 92 in New York City
- (15) A Petty Officer serving aboard USNS COMFORT displays a copy of local newspaper
- (16) A shadow stands watch while USNS COMFORT is docked at Pier 92 in New York City
- (17) Sailors aboard USNS COMFORT feed firemen, policemen, and volunteers
- (18) A Petty Officer aboard USNS COMFORT prepares french onion soup to feed to police officers, firefighters, and volunteers
- (19) Two Petty Officers aboard USNS COMFORT work on the meal plan
- (20) A Hospital Corpsman works in the galley aboard USNS COMFORT
- (21) MS2 Dan Faul volunteered for the recovery and relief efforts onboard USNS COMFORT in New York City
- (22) A Petty Officer aboard USNS COMFORT prepares dessert for an afternoon meal
- Expand navigation for The Attack on the Pentagon The Attack on the Pentagon
- Expand navigation for Royal Letters: A Selection from the Harold Stark Papers Royal Letters: A Selection from the Harold Stark Papers
- Birthday letter to Princess Elizabeth
- Birthday letter from Princess Elizabeth
- Princess Elizabeth engagement letter
- Princess Elizabeth wedding letter
- Thanksgiving invitation
- Christmas letter
- Lord Mountbatten letter, 1945
- Lord Mountbatten letter, 1947
- Admiral Stark's diary entry from Thanksgiving Day, 1942
- Expand navigation for V-E Day: Documents from the Harold Stark Papers V-E Day: Documents from the Harold Stark Papers
- Expand navigation for V-J Day V-J Day
- Expand navigation for Surrender Ceremony Surrender Ceremony
- Expand navigation for Operation Magic Carpet Operation Magic Carpet
- Expand navigation for Letters from Sailors Letters from Sailors
- Expand navigation for Vietnam War Highlights Vietnam War Highlights
- Communications--Visual –Signals, Radio and Voice
- People-Places-Things--British
- Theater of Operations--European
- Primary Source Document
- World War II 1939-1945
- Navy Leadership
- Image (gif, jpg, tiff)
- NHHC-Archives
VE Day Radio Broadcast #1


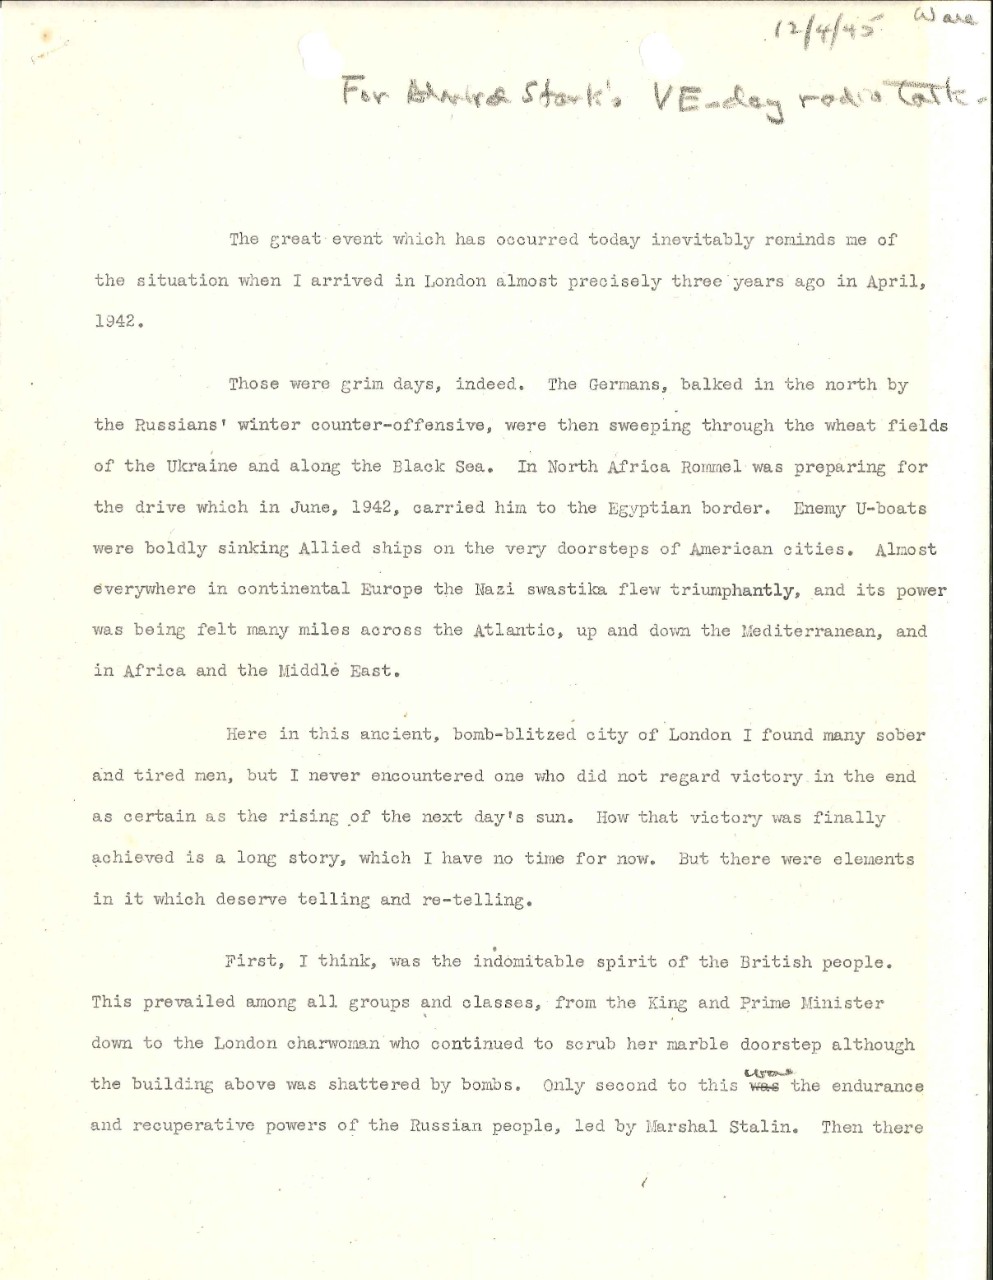
For Admiral Stark: VE-day radio talk
The great even which has occurred today inevitably reminds me of the situation when I arrived in London almost precisely three years ago in April 1942.
Those were grim days, indeed. The Germans, balked in the north by the Russians' winter counter-offensive, were then sweeping through the wheat fields of the Ukraine and along the Black Sea. In North Africa Rommel was preparing for the drive which in June, 1942, carried him to the Egyptian border. Enemy U-boats were boldly sinking Allied ships on the very doorsteps of American cities. Almost everywhere in continental Europe the Nazi swastika flew triumphantly, and its power was being felt many miles across the Atlantic, up and down the Mediterranean, and in Africa and the Middle East.
Here in this ancient, bomb-blitzed city of London I found many sober and tired men, but I never encountered one who did not regard victory in the end as certain as the rising of the next day's sun. How that victory was finally achieved is a long story, which I have no time for now. But there were elements in it which deserve telling and re-telling.
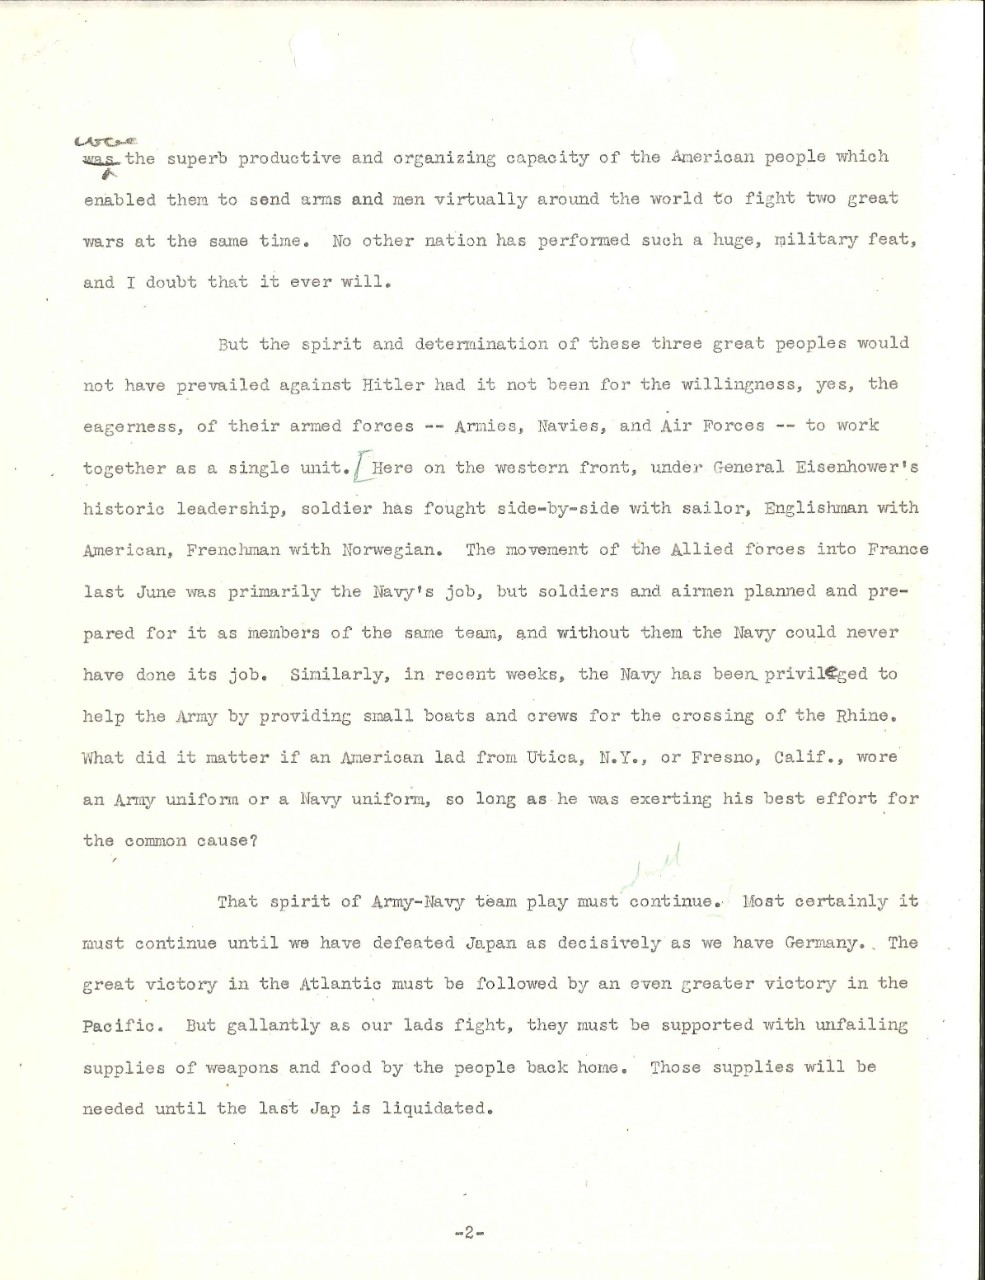
First, I think, was the indomitable spirit of the British people. This prevailed among all groups and classes, from the King and Prime Minister down to the London charwoman who continued to scrub her marble doorstep although the building above was shattered by bombs. Only second to this was the endurance and recuperative powers of the Russian people, led by Marshal Stalin. Then there were the superb productive and organizing capacity of the American people which enabled them to send arms and men virtually around the world to fight two great wars at the same time. No other nation has performed such a huge, military feat, and I doubt that it ever will.
But the spirit and determination of these three great peoples would not have prevailed against Hitler had it not been for the willingness, yes, the eagerness, of their armed forces - Armies, Navies, and Air Forces - to work together as a single unit. Here on the western front, under General Eisenhower's historic leadership, soldier has fought side-by-side with sailor, Englishman with American, Frenchman with Norwegian. The movement of the Allied forces into France last June was primarily the Navy's job, but soldiers and airmen planned and prepared for it as members of the same team, and without them the Navy could never have done its job. Similarly, in recent weeks, the Navy has been privileged to help the Army by providing small boats and crews for the crossing of the Rhine. What did it matter if an American lad from Utica, N.Y., or Fresno, Calif., wore an Army uniform or a Navy uniform, so long as he was exerting his best effort for the common cause?
That spirit of Army-Navy team play must [and will] continue. Most certainly it must continue until we have defeated Japan as decisively as we have Germany. The great victory in the Atlantic must be followed by an even greater victory in the Pacific. But gallantly as our lads fight, they must be supported with unfailing supplies of weapons and food by the people back home. Those supplies will be needed until the last Jap is liquidated.
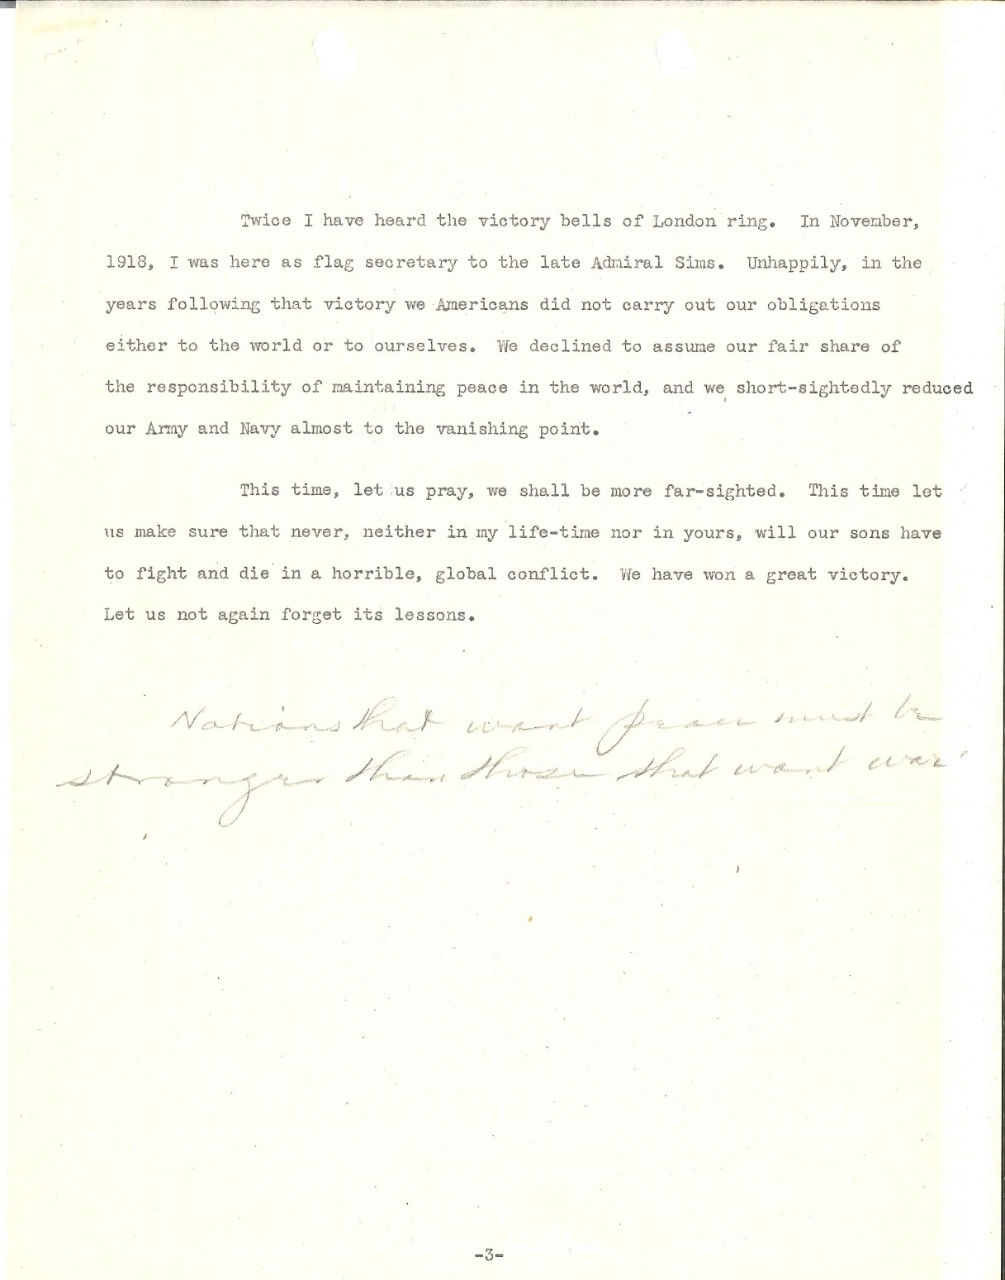
Twice I have heard the victory bells of London ring. In November, 1918, I was here as flag secretary to the late Admiral Sims. Unhappily, in the years following that victory we Americans did not carry out our obligations either to the world or to ourselves. We declined to assume our fair share of the responsibility of maintaining peace in the world, and we short-sightedly reduced our Army and Navy almost to the vanishing point.
This time, let us pray, we shall be more far-sighted. This time let us make sure that never, neither in my life-time nor in yours, will our sons have to fight and die in a horrible, global conflict. We have won a great victory. Let us know again forget its lessons.
Nations that want peace must be stronger than those that want war.
Footnotes
- Accessibility/Section 508 |
- Employee Login |
- FOIA |
- NHHC IG |
- Privacy |
- Webmaster |
- Navy.mil |
- Navy Recruiting |
- Careers |
- USA.gov |
- USA Jobs
- No Fear Act |
- Site Map |
- This is an official U.S. Navy web site


