"ONI Publications, WWI" ZV file, Navy Department Library.

The Navy Department Library
NOTES ON ANTI-SUBMARINE DEFENSES
O. N. I. Publication No. 8
O. N. I. Publication No. 8
[Formerly: Secret!]
[Declassified: 17 August 1972]
NOTES ON
ANTI-SUBMARINE
DEFENSES
NAVY DEPARTMENT
OFFICE OF NAVAL INTELLIGENCE
MAY 1917
WASHINGTON
GOVERNMENT PRINTING OFFICE
1917
Design and Construction of Anti-Submarine Defenses
[2 blank]
Secret!
NOTES BEARING ON THE DESIGN AND
CONSTRUCTION OF ANTI-SUBMARINE
DEFENSES.
[3]
[4 blank]
SECRET.
NAVY DEPARTMENT,
OFFICE OF NAVAL INTELLIGENCE,
Washington, May 5, 1917.
This pamphlet is a reprint of confidential British publications which this office is authorized to republish.
It is very important that this information should be kept secret.
No person not a commissioned officer of the Navy should be allowed to examine this pamphlet.
ROGER WELLES,
Captain, U. S. N., Director of Naval Intelligence.
[5]
[6 blank]
INDEX |
||
| Attachments: | Paragraph |
|
| To mooring buoys | 62 | |
| Of timber floats to jack stays | 30 | |
| Of barrel floats to jackstays | 34 | |
| Boom defense vessels: | ||
| Chief features of | 42 | |
| Calcium flares | 19 | |
| Cross connectors | 9 | |
| "Destroyer" booms | 79 | |
| Dolphin defenses | 93 | |
| Examination service | 119 | |
| Floats: | ||
| Spacing of | 24 | |
| Types of | 25 | |
| "Rendering" buoy | 51 | |
| " Holmes" light | 19 | |
| Hurdle defenses: | ||
| Construction and placing of | 105 | |
| Hydrophones | 22 | |
| Jackstays: |
|
|
| Length of : | 15 | |
| "Continuous" jackstays | 17 | |
| Size of | 14 | |
| Attachments to | 30 | |
| Magnetophones | 22 | |
| Mine fields | 23 | |
| Moorings: | ||
| For vessels | 52 | |
| For buoys | 57 | |
| Length of pendants | 48 | |
| Attachment of, to mooring buoys | 62 | |
| Weights of anchors for | 53 | |
| Cast-iron anchors for | 66 | |
| Chain cable for | 67 | |
| Flexible steel wire employed for | 67 | |
| Net sections: | ||
| Lengths of | 6 | |
| Depth of | 11 | |
| Detachable net sections | 18 | |
| Net sections fitted with mines | 20 | |
| Attachment of, to mooring buoys | 62 | |
| Net defenses: | ||
| Circumstances governing design | 2 | |
| Moral effect of | 85 | |
| Representative net defense | 5 | |
| Nets for great depths | 12 | |
[7]
CONTENTS |
||
| Net defenses - Continued. | Paragraph. | |
| Size of mesh for | 5 | |
| Method of forming mesh | 9 | |
| Net defenses not held by vessels | 47 | |
| Functions of | 75 | |
| Method of laying | 86 | |
| Selection of site for | 4 | |
| Net defenses supported by towers | 91 | |
| Protected anchorage | 119 | |
| "Rendering" winches | 36 | |
| "Rendering" buoy | 51 | |
| Ships' passages or gates | 68 | |
| Width of | 69 | |
| Swinging gates | 70 | |
| Vertical gates | 73 | |
| Signals for | 114 | |
| Fog signals for | 116 | |
| Order of passing through | 117 | |
| Swept channel: | ||
| Position of | 23 | |
| Telephones | 113 | |
[8]
SECRET.
NOTES BEARING ON THE DESIGN AND CONSTRUCTION OF ANTI-SUBMARINE DEFENSES.
MARCH, 1917.
1. These notes are the results of experience gained in the construction and maintenance of anti-submarine defenses since the commencement of the war.
2. Design.--The best form of defense for a particular harbor, port estuary, roadstead, open-anchorage, or bay, is governed by the local circumstances and characteristics.
3. The strength of the tidal stream, the prevailing winds, the exposure to wave action, and the nature of the holding ground require to be specially considered.
4. Site.--In view of the great range and power of the modern torpedo, the defense should be as far removed as possible from the anchorage to be protected, observing that the open mesh of submarine net defenses will not deflect or arrest torpedoes fired from seaward of the boom.
5. Description of submarine net defense.--The nets are usually made of 2 1/2-inch circumference special reinforced flexible steel wire, with a breaking strain of nearly 20 tons and specially lubricated internally during manufacture to resist the action of sea water. This is important.
6. The nets are made 12 feet square mesh and in units.
7. A convenient unit of length is 600 feet.
8. A unit 600 feet long and 60 feet deep, made of 2 1/2-inch circumference flexible steel wire weighs 3 tons, and can be handled and transported without difficulty.
9. The meshes are formed by four-way cross connectors.
10. Many designs of cross connectors have been used but in practice the most satisfactory and economical type is that known as the Trevor cross connector, patented and made by Messrs. Bullivant & Co. (Ltd.).
11. The depth of the defense should be proportionate to the depth of water, but no nets have been made of a greater depth than 140 feet owing to the difficulties of handling and flotation.
12. In practice, defenses exceeding 60 feet in depth are made in two tiers; the upper 60-foot net being of 2 1/2-inch circumference special reinforced flexible steel wire, and the lower net of 2-inch flexible steel wire.
[9]
13. Experiments have demonstrated that the upper portion of the defense should be of greater strength than the lower portion, and wherever possible the horizontals of the nets should be of a greater breaking strain than the verticals.
14. The nets are attached at the surface to a flexible steel wire jackstay; the circumference of which varies from 4 to 5 inches.
15. The length of the jackstay is governed by the intervals between the floats.
16. By dividing the jackstay into comparatively short lengths, attached to the floats, repairs can readily be effected.
17. The use of a continuous jackstay, favored in some designs, is not satisfactory and renders a breach in the defense serious and difficult to repair.
18. Detachable net sections.--Detachable net sections, each 300 feet long, are in use at some bases. The head of the nets is secured to the jackstay by means of a split link of a breaking strain determined with special regard to the local conditions, e. g., strength of the tidal stream, etc. The object in view is to allow the net sections to detach from the jackstay when subjected to abnormal resistance, e. g., when attacked by a vessel, but the split link should be of sufficient strength to withstand the stresses set up by the wave motion.
19. Calcium flares--Holmes' lights.-These are incorporated in defenses with detachable net sections, and serve to indicate the carrying away of a section.
20. Nets with mines.-Mines have also been incorporated in net defenses, but in general it is considered that they are best used independently. Their use with net defenses is open to several objections, and requires skilled personnel, etc.
21. An explosion of a mine would probably cause a serious breach in the defense not readily repaired, and impair or destroy the flotation.
22. The possibility of net sections breaking adrift with mines attached to them would be a serious menace, and, generally speaking, it is preferred to develop the use of hydrophones and magnetophones, reinforced by observation mine fields.
23. If possible the observation mine field is best placed slightly to seaward of the defense, but where a swept channel is maintained it is necessary to place the mines just within the defense, so as to allow sweeping operations right up to the boom.
24. Floats.--The spacing of the floats is naturally governed by the weight to be supported, but 60 feet (centers) is a convenient average distance apart.
25. Two types of floats are in general use: (1) Timber baulks; (2) steel or iron barrels or buoys.
26. (1) The advantages of wooden floats, the maximum dimensions of which should be 9 feet by 6 feet by 4 feet, are:
[10]
(a) Comparative invulnerability to damage by collision or gunfire or the action of water pressure if deeply submerged.
(b) Cheapness.
(c) The raw material is usually readily obtainable.
(d) They present a formidable obstacle to surface vessels.
(e) They do not leak, and when saturated give a reliable buoyancy.
(f) They can readily be repaired.
27. Their disadvantages are:
(a) Size and weight compared with a steel or iron hollow float.
(b) Consequent difficulties of transport.
(c) The increased resistance set up when moored in a tideway.
(d) The increased stresses communicated to the jackstays and attachments as the result of considerable wave motion.
(e) Increased wear and tear and consequent more frequent renewal of component parts as the result of (d).
(f) The uncertainty of floats made of the same class timber giving the same buoyancy.
28. It should be noted that Oregon pine is considered to be the best timber to employ.
29. The best form of timber float is a baulk, symmetrical in shape, composed of a number of sleepers securely bolted together.
30. The attachment to the jackstay should take the form of steel or iron bands or rods, arranged to take the stresses on the jackstays without transmitting them to the float. Unless some such form of attachment is employed, the stresses set up tend to tear the wooden float asunder.
31. (2) The advantages of the hollow steel or iron float are:
(a) Maximum flotation with minimum displacement.
(b) Small resistance set up when moored in a tideway.
(c) Certainty of flotation.
(d) Minimum stresses communicated to adjacent parts.
32. The disadvantages of this type of float are:
(a) Vulnerability to destruction by gunfire, explosion, or collision.
(b) Liability to leakage, which may result in the loss of a net section as the result of the buoys sinking and collapsing under water pressure.
(c) Possible difficulty in obtaining the raw material for the floats insufficiently large quantities.
33. Generally speaking, a form of steel barrel, oxyacetylene welded, of suitable thickness, is considered to be the best type of float.
34. Barrel floats are attached to the jackstays either by a strengthened eye bung, or by a chain led through a watertight trunk in the axis of the buoy and arranged so as to bring no strain on the walls of the barrel itself.
35. The trunk may be either vertical or horizontal.
[11]
36. Rendering winches.--Wherever possible, net defenses should be held by automatic rendering winches, so that the defense may yield on being struck.
37. The chief object of the winches is to offer a progressive resistance sufficient to bring an attacking vessel to rest within the limits of the jackstay rope in reserve on the drums of the winches without the rope being paid off at speeds dangerous to the engine.
38. With this object in view, defenses are broken up into units approximating to 600 feet in length, i.e., the length of the sections.
39. The ends of the jackstay of each section are taken to rendering winches on board trawlers or other suitable vessels, which should be moored in the line of the boom and be armed, fitted with searchlights, and manned by skilled crews thoroughly conversant with the working of the winches, etc.
40. The type of winch in general use is a variety of that designed and patented by the Chase Co. of Ohio, and known as the Chase automatic steam towing winch.
41. Winches operated by compressed air are being introduced.
42. Boom defense vessels.--The chief features required to be possessed by vessels forming integral units of the defenses (i.e., gate vessels, between which there is a ships' passage, or vessels supporting net sections) are:
(a) Strong construction.
(b) Good weatherly qualities to enable the stresses to be withstood when the vessels are moored head and stern in exposed positions, and further girt to withstand the stresses set up by the net sections sup-ported on either side.
(c) Comparatively small size. A vessel with about 100 feet of water line is a convenient size.
(d) Habitability.
43. Boom defense vessels need not necessarily be self-propelled.
44. The self-propelled British type of North Sea trawler has been found to be very suitable, and has been readily available. This class of vessel carries a crew of about 10.
45. Boom defense vessels of special construction.--Non-self-propelled vessels, generally somewhat similar to unwatched light vessels, specially designed to meet requirements, are now being introduced.
46. Many watertight compartments are provided in view of possible attack.
47. Net defenses held by mooring buoys.--Where circumstances do not permit of vessels being moored as integral units of boom defenses, the net sections should be very slackly moored. Considerable resilience can be imparted in this manner.
48. The length of the mooring pendants should never be less than 1 1/2 times the depth of water at high water.
[12]
49. Where it is impracticable to hold the ends of net sections by rendering winches on board vessels moored head and stern in the line of the boom, the ends of the net sections are attached to mooring buoys placed approximately 600 feet apart, i.e. the length of a section.
50. The pegtop form of buoy is largely used, as is also the cylindrical form of buoy, which is of less complicated design.
51. Rendering buoy.--A rendering device in the form of a barrel and brake has been fitted inside mooring buoys, but the present design does not provide for the rope being automatically rewound on the barrel after being paid out.
52. Moorings for vessels.--The moorings for vessels holding sections of the net defense consist of chain groundwork bifurcated by two legs ahead and two legs astern.
53. One 3-ton anchor, backed up if necessary, or one 4-ton anchor terminates each end of the groundwork.
54. The four chain pendants or bridles are brought up, one from each leg, to each side of the bow and quarter.
55. The moorings for gate vessels should be laid with great precision. To prevent translation, breast moorings are laid on the side farthest from the ships' passage.
56. All moorings should be in instant readiness to be slipped and buoyed if necessary. This is specially important in exposed positions, where it may prove necessary for the vessels to run for safety in heavy weather.
57. Moorings for buoys.--The character of the moorings for buoys largely depends upon the stresses likely to be met.
58. Moorings are generally of two types,
(a) Chain groundwork, lying on the sea-bed, with a chain pendant of convenient length attached to the mooring buoy.
(b) Two or more flexible steel-wire mooring ropes terminating in short lengths of chain cable attached to the anchors.
59. Method (b) is generally used for great depths to reduce the weight of the moorings to be supported.
60. Method (a) requires considerable precision in laying.
61. The anchors are laid at right angles to the line of the defense, one on either side.
62. Attachment of moorings and net sections to mooring buoys.--This is all important, as the principal cause of failure is unquestionably faulty design of attachments.
63. The cardinal principle to be kept in view is to allow the mooring buoy (held by one attachment only) to take up the line of least resistance in a tideway in such a manner that the momentum set up by wave motion is not communicated to the jackstay or mooring attachment to any appreciable extent.
[13]
64. Great care is necessary in clenching, or otherwise permanently securing, all connections, e.g., shackles with various forms of securing pins and forelock, check nuts, pins and pellets, grommets, etc., as otherwise these will inevitably work loose and drop out and allow the moorings to sink and the net sections to part.
65. It should rarely be necessary to employ anchors of a greater weight than 3 tons.
66. Cast-iron anchors with wrought-iron bars have been employed with success, but must be carefully laid to avoid fracture.
67. For the moorings, 1 ½-inch and 2-inch chain cable and 5-inch flexible steel wire are generally employed.
68. Ships' passages or gates.--To allow traffic to pass through the defenses, ships' passages or gates are provided.
69. These are generally about 600 feet in effective width, and may conveniently be classified as "swinging" and "vertical" gates.
70. A swinging or pivoting gate is operated by being swung from one end clear of the ships' passage, the other end pivoting upon the vessel or buoy defining the opposite limit of the passage.
71. This form of gate may be operated by a third vessel moored clear of the fairway, or by means of a mooring buoy and a hawser.
72. Although not so rapidly operated, this form of gate is more certain in its action, and constitutes a more effective defense when closed than a "vertical" gate.
73. A vertical gate is lowered to allow vessels to pass, and raised again to complete the defense. It is more rapidly operated than the swinging form of gate, but there is some difficulty in maintaining the catenary at the correct height and insuring that an effective defense is constantly maintained.
74. Further, where the range of depth is small there is some danger of the net being fouled by a passing vessel when lowered to form a ships' passage.
75. Duplication and object of net defenses.--Net defenses should be regarded as an obstacle rather than a permanent obstruction to attacking vessels on or below the surface.
76. The primary object of net defenses is temporarily to embarrass the vessel and force her to the surface, when she can be dealt with by the supporting craft.
77. It is a fundamental principle of anti-submarine defense that the booms should be adequately patrolled.
78. Wherever possible at least two distinct and independent lines of net defense should be placed.
79. Destroyer booms.--The object of a destroyer boom is to arrest surface vessels, and particularly torpedo-boat destroyers attempting to pass at high speed.
80. This form of boom is best placed to seaward of the submarine booms.
[14]
81. It consists of heavy (5-inch) flexible steel wire jackstays (usually two in number) supported as near the surface as possible by means of floats attached to the jackstays at short intervals.
82. The sections of the defense should be held by rendering winches.
83. This form of defense is purely a surface defense, and carries no nets below.
84. Its effectiveness entirely depends upon the resilience provided.
85. Moral effect of net defenses.--The moral effect of a boom defense should not be lost sight of, and unquestionably counts for a great deal in acting as a deterrent. The existence of a boom defense can not long be kept secret, especially when armed vessels are employed to hold the sections.
86. Method of laying defenses.--Early consideration should be given to the selection of a base conveniently near to the site for the defense.
87. An artificial harbor is usually a convenient base, as wharves and cranes are available for assembling and handling the moorings and other heavy material.
88. The moorings for the vessels or mooring buoys having been laid at the prescribed positions, the net sections (with their surface floats attached) are towed from the base to the site, and there secured.
89. For this work, small handy vessels about 150 feet in length, fitted with the usual appliances, are the most useful.
90. For light mooring work, where the depths are not too great, the ordinary North Sea trawler with minor fittings has been successfully employed.
91. Net defenses held by rendering winches and towers.--This form of defense is most suitable to span comparatively small distances by a catenary not exceeding about 1,000 feet in length, i.e., between two pier heads, or across a navigable river.
92. The towers over which the jackstay should pass must be of sufficient height to insure the center of the jackstay rope being maintained near the surface of the water at all states of the tide.
93. Dolphin defenses.--Where an area of comparatively shallow water is required to be protected, or where shallow flats exist with a considerable rise and fall of tide, a line of pile dolphins forms an effective defense.
94. The dolphins should be carried to a height of about 5 feet above high water.
95. The dolphins should be spaced about 60 feet apart and heavy jackstays, nets, and drag ropes suspended between them on the burster principle.
96. If desired, the nets between the dolphins may be anti-torpedo.
97. Dolphin defenses have been employed for depths up to 40 feet at low water, with a tidal rise of 20 feet at springs.
[15]
98. Hurdle form of defense.--Another form of defense suitable for shallow waters consists of hurdles arranged in rows.
99. The hurdles are triangular in shape, made of steel rails of 75 pounds weight per yard run, strongly braced.
100. They should be sufficiently close together to deny passage to submarines and mosquito craft, and flexible steel-wire ropes may be stretched between the hurdles.
101. Where the nature of the bottom and the general conditions do not permit of the construction of a dolphin defense, hurdles are very useful. They can be constructed with greater rapidity than pile-dolphin defenses and are suitable for depths not exceeding 90 feet at high water.
102. For a depth of 70 feet at high water the type of hurdle employed weighs 40 tons. The width of the base is 30 feet and the length of base 62 feet.
103. The hurdles for use in depths of about 90 feet are made in two parts, the upper portion taking the form of a cap or snuffer.
104. The weight of a complete hurdle for use in a depth of about 90 feet is 69 tons, the width of the base 36 feet, and the length of base 62 feet.
105. Construction, and placing of hurdles.--The hurdles are best constructed on cradles running on slipways conveniently near to the site selected for the defense.
106. The slipways should terminate in a depth of water sufficient to enable the hurdles to be lifted off by the vessels conveying them to the site.
107. The hurdles should be conveyed to the assigned positions by self-propelled craft of the salvage-vessel type, fitted with a powerful horn over the knightheads.
108. The hurdle is held by wire slings and tackles (as few in number as possible), which are recovered by a diver after the hurdle has been deposited.
109. Before depositing the hurdle, the vessel should take up her position at moorings previously laid with accuracy.
110. Surmounting each hurdle there should be a top mark visible at high water. This facilitates true alignment of the defense, and prevents accidents to the vessels employed for its construction.
111. The principal objection to the use of this form of defense, especially in commercial ports, is the difficulty of completely removing or dispersing the hurdles when they are no longer required.
112. It should be observed that hurdles can not be employed where the bottom is of a soft nature.
113. Telephones.--The gate vessels of all booms and the traffic control and signal stations should be connected to each other by telephone.
[16]
114. Gate signals.--The day and night signals to be exhibited by the gate vessels to indicate whether the gate is open or closed to traffic in either direction should show only in the direction of approach.
115. Except for commercial ports, a secret code, frequently varied, should be drawn up.
116. Fog signals.--Fog signals should also be established, those for inward-bound traffic being clearly distinguishable from those for outward-bound traffic.
117. Order of passing through the gate.--Generally speaking, vessels proceeding against the stream should wait until vessels proceeding with the stream have passed clear of the gate before attempting to pass, but inward-bound vessels (which are liable to attack, while waiting) should have preference over outward-bound vessels.
118. No vessel should be allowed to attempt to pass another proceeding in the same direction in the neighborhood of the gate, and the speed of all vessels should be reduced when approaching and passing through the gate.
119. Examination service and protected anchorage.--An examination service and protected anchorage should be established, with the necessary precautions against disguised hostile vessels.
[17]
[18 blank]
1916.
[19]
[20 blank]
CONFIDENTIAL.
Attention is called to the penalties attaching to any infraction of the Official Secrets Act.
INDICATOR-NET NOTES.
The following indicator-net notes are the result of experience gained in the working of the nets up to the present time.
Only gear at present in use is dealt with in these notes; gear which has become obsolete since the introduction of indicator nets is omitted.
The notes are drawn up with a view to assisting the officers at the various bases, and are arranged with an index so that any particular point in the working or fitting of the nets can be readily referred to.
In addition to the descriptions of the nets and their accessories in use, the methods of employment of same are set forth, together with some observations as to the best probable methods of dealing with an enemy submarine which has run into an indicator net.
On receipt of these notes all previous notes on indicator nets should be destroyed, in accordance with Admiralty instructions with regard to canceled confidential documents.
INDEX. |
||
| Indicator nets: | Page. | |
| Description of and points in manufacture of same | 23 | |
| Sizes and approximate weight of, per section of 100 yards | 23 | |
| Method of joining sections of | 23 | |
| Floats for and method of attaching | 24 | |
| Indicator buoy: | ||
| Pram type, description of | 25 | |
| Pram type, action of | 25 | |
| Kite type, description of | 38 | |
| Methods of employment of indicator nets: | ||
| Rapid shooting of nets from drifter | ||
| Nets used as moored nets in slack water or in line with direction of tide | 37 | |
| Nets moored across a tideway | 38 | |
| Nets moored at one end only | 44 | |
| Nets used in conjunction with electrocontact mines | 45 | |
| Nets used as drift nets | 46 | |
| Nets used as towed nets | 46 | |
| Weather conditions with regard to working nets | 46 | |
| General remarks on procedure of submarine after having run into nets and methods of destroying same | ||
| Hints to officers employed in indicator-net drifters | 47 | |
[21]
INDICATOR NETS, DESCRIPTION AND MANUFACTURE OF.
The indicator net, as its name implies, is to indicate the presence of an enemy submarine in the net, and is not designed to stop the submarine.
Experiments carried out in 1914 demonstrated that the only net of any value for use as an indicator net was a flexible steel-wire net.
Trials carried out by running submarines against hemp nets showed that in practically every case submarine went clean through the net without altering or impairing her diving capabilities, although in some cases the nets were strengthened by wire.
The size of wire employed in the construction of the mesh of nets is about three-eighths of an inch, the headrope being about five-eighths of an inch.
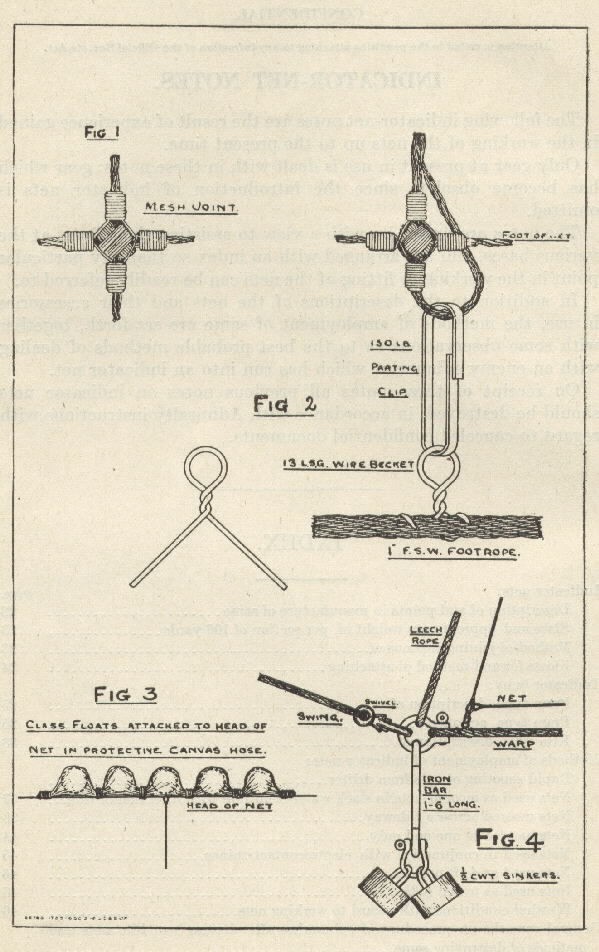
Nearly all netmakers have adopted as their mesh joint either a circular clip stamped on without solder, or a cross seizing as shown in figure 1; the latter is the most satisfactory, as it can not possibly weaken the wire, it is as strong as necessary and always slips before the net wire reaches its breaking strain. It is considered the most suitable for use at bases when repairing nets, and is made with 19 L. S. G. galvanized charcoal-iron wire.
Lead weights have been discontinued, as they are found to be unnecessary and liable to cause fouls.
SIZES OF NETS AND APPROXIMATE WEIGHTS.
Nets are 300 feet long and are supplied in the following sizes:
Depth. |
Size of mesh. | Approximate weight per 100 yards. |
| Feet. | Pounds. | |
| 30 | 10 by 12 feet | 65 |
| 60 | 12 feet square | 100 |
84 |
-do- | 125 |
| 120 | -do- | 190 |
METHOD OF JOINING SECTIONS OF NET.
The 300-feet sections of net can be readily joined together and can be laid out with ease from a drifter's fish hold, 12 sections being the maximum amount one drifter can conveniently carry and lay.
The sections of net are joined together by metal clips, constructed to part when a strain of 150 pounds is applied. The object of having the net in sections is so that if the net is run into that section will break off, and having an indicator buoy (description of which is given on another page) to each section will indicate the presence of the submarine. Three hundred-pound parting clips are also made for use in special cases such as mine nets (described later).
Attention is called to the correct method of attaching the parting clips between the foot of the net and the foot rope; this also applies in cases where the leach of the net is clipped to vertical wires.
Beckets of 13 L. S. G. wire should be worked into the foot rope and vertical wire (usually of 1-inch flexible steel wire) and the clip should be attached to this becket, as shown in figure 2.
FLOATS FOR NETS AND METHOD OF ATTACHING SAME.
A number of different kinds of floats for supporting the nets have been tried, and the one which has been found the most satisfactory is the 5-inch diameter glass ball as used by fishermen.
Kapok placed in a 2 1/4-inch diameter duck tube was originally used, and is still in cases where nets are shot in quick time and will not be immersed for long periods at a time. It was found that the kapok did not retain its buoyancy for long periods, and it was, therefore, discontinued to a great extent. It is also much more conspicuous than glass balls, and holds the tide more when working across the tide.
A float composed of cork chips placed inside a canvas tube previously treated with tallow has also been tried. It was found that this float retained its buoyancy for indefinite periods; but on account of the glass balls being considered as efficient for general use in that they hold the tide less when working the line of nets across the tide, are less visible, and very much less expensive, it was decided not to replace them by the cork float, except in special cases, i.e., for nets in localities where it is desirable that the lines of nets shall be moored at one end of the line only--then the fact of the cork floats having a certain amount of rigidity assists the nets to swing round clear when the tide turns. This float is also used in localities where nets are towed or held in the line of the tide.
Plain cork was also tried, but it is not so satisfactory as glass balls.
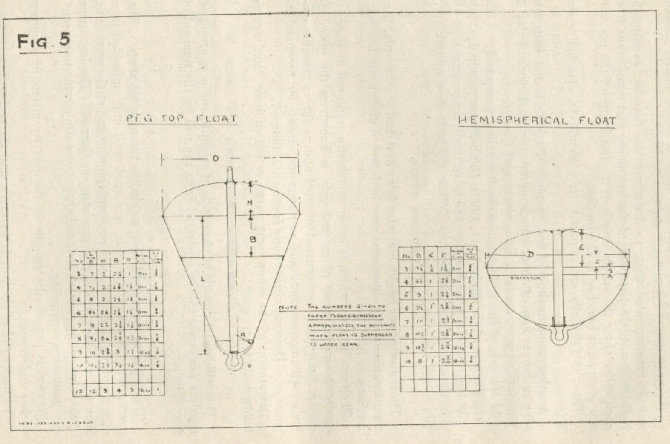
Metal floats have been tried, and are being supplied to a limited extent, of the required size for moored nets. The shapes are as shown in figure 5, and the main idea is that they offer the minimum resistance to the tide and thereby lessen the laying over of the net in a tideway.
Corrosion and insufficient strength to resist underwater pressure are the principal objections to this type of float.
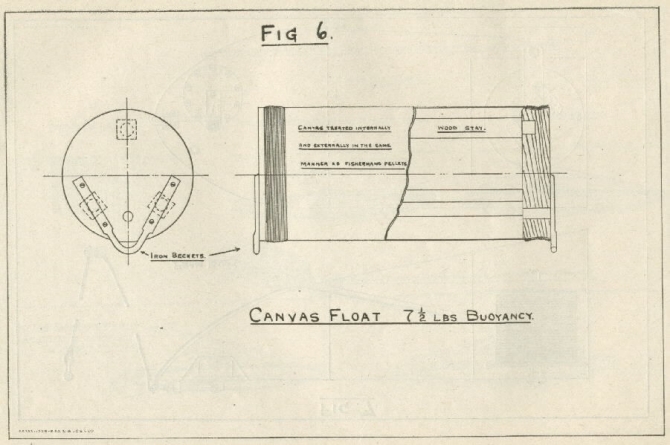
Another type of float is a cylindrical canvas float made on the principle of a fisherman's pellet, as shown in figure 6.
METHOD OF ATTACHMENT OF GLASS BALLS.
The glass balls, before being attached to the net, are put in net bags of untanned trawl twine, and are then attached by a draw line in mouth of the net bag to the head of the net. It is recommended
that the trawl twine employed should be first tarred to prevent it rotting. It is most important that these lines are tightly knotted to the headrope of the net and not loosely attached.
It is recommended that, to distribute the flotation evenly, the balls be put on the headwire of the net singly and equidistant from each other along the whole length of the head wire of the net, and not grouped or bunched at the meshes.
Thus, if 150 balls are required, they should be attached every 2 feet.
Another good method is first to place the balls in net bags and then in canvas hose of about 6 inches diameter, as shown in figure 3. This further prevents balls being worked off the net.
In the case of the 30-foot net, 75 to 100 balls are required.
In the case of the 60-foot net, 120 to 150 balls are required.
In the case of the 84-foot net, 180 to 200 balls are required.
In the case of the 120-foot net, 250 to 300 balls are required.
INDICATOR BUOYS.
The indicator net has an indicator buoy attached to it in order that the movements of a submarine may be followed after a net has been run into.
The type of buoy which is being universally employed at present, except in special cases of moored nets, is known as the pram indicator buoy; it is constructed of steel and as far as possible embodies all improvements and requirements shown by previous experience. Drawing of this buoy is shown in figure 7.
Description of the component parts, action of buoy, etc., are as follows:
PHOSPHIDE CONTAINER.
This will hold 4 pounds of phosphide of calcium, and is so arranged that the container can be separated from the reel by the removal of four split pins.
REEL.
The reel is made of steel plate welded to the required shape. The towing wire, 300 feet in length, is wound on it and embedded in a mixture of resin and tallow to preserve the wire and at the same time keep the various turns and layers snug on the reel. The last turns of the wire on the reel are further lightly secured by twine to prevent any premature unwinding.
Friction is put on the spindle of the reel by means of a spring washer underneath.
The under end of the wire is secured round the reel with a running eye, and the upper end is rove through the towing tube, and is secured to the shackle on the link of the release gear.
[25]
[26]
[27]
![1428933107115[1].jpg 1428933107115[1].jpg](/content/history/nhhc/research/library/online-reading-room/title-list-alphabetically/n/notes-on-anti-submarine-defenses-oni-publication-no-8/_jcr_content/body/image_4.img.jpg/1428933139126.jpg)
[28]
[29]
SHEARING ARRANGEMENTS.
The tear-off strips each cover two small holes in the top of the container and are secured by a screw to the crossbar, which keeps the whole reel in place.
HYDROSTATIC RELEASE.
This gear is operated by a phosphor-bronze spring.
Care should be taken before each occasion of using these buoys to see that the release gear is in working order and to grease over the working parts. Grease and oil must not be allowed to get through the small holes on the cover of the release gear, otherwise the india-rubber diaphragm will deteriorate.
SPARE PARTS.
The following spares have been arranged for and should be demanded on Admiralty as required:
Containers, complete, charged with 4 pounds phosphide and ready to insert in the reels.
Spiral and flat washers for spindle of reel.
Springs for release gear.
Long links for release gear.
I. R. diaphragms for release gear.
I. R. rings for release gear.
PENDANTS.
A special pendant will be provided for each buoy for attaching them to the nets. The pendants are 11 feet long and have a swivel piece in the center and a shackle at each end.
ACTION.
The buoy will usually ride at rest with the bows up and flat side toward the net, and will ride upside down on the surface for any tide up to about 4 knots.
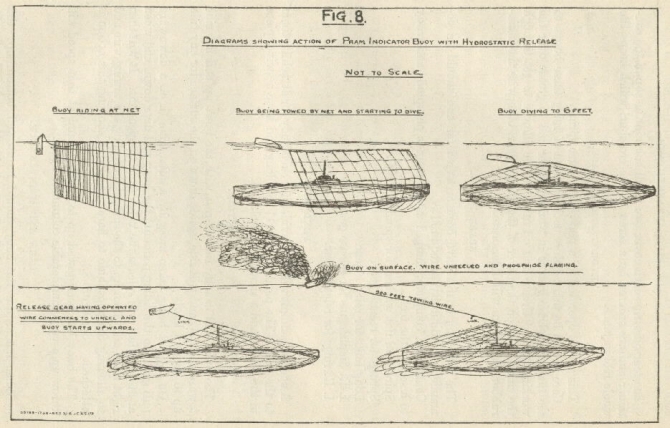
On the net being taken away by a submarine (i.e.; a downward pull given to the riding pendant) the buoy will dive down, and when at about 6 feet will release the valve from the pendant. It will then right itself and shoot up to the surface, unreeling the towing wire and so allowing the phosphide to flare. A sketch showing this action is attached. (See figure 8.)
The buoy has been towed up to 14 knots, and at that speed will throw up a very considerable column of water.
CARE AND MAINTENANCE.
When not in use the buoy should be stowed bottom up; this will insure water being drained from inside the reel and will also protect the tear-off strips from possible damage.
[30]
The buoy should be lifted by one hand under the bow and the other through the hole in the stern.
Opportunity should be taken when in harbor to remove the containers from the reels and thoroughly dry them to prevent any possible rusting, care being taken not to start the tear-off strips. The containers should be repainted if necessary.
Working parts, such as the spindles of the reel and the link and lever of the release gear, should be vaselined over.
The test plug in the fore end of the deck is provided for the use of the manufacturers and is permanently screwed down and should not be removed. The presence of water inside the buoy can be detected by tipping it up first one way and then the other, and listening. If the water does leak in after a time nothing can be done, and the buoys must be returned for rewelding and repairs.
It is not advisable for the release gear to be parted unless it is necessary to replace a portion by a spare part, and even then it is better that this should be done by the base and not afloat.
VARIOUS METHODS OF EMPLOYMENT OF INDICATOR NETS.
Using nets as drift nets.--This is done when the net has been shot quickly across or near the supposed course of a submarine, and only requires to be in the water for a short period. Some drifters are now specially fitted for the purpose of shooting nets in quick time.
Detailed descriptions and sketches are as follows:
METHOD OF LAYING OUT INDICATOR NETS IN QUICK TIME FROM A DRIFTER'S HOLD.
The following is a description of a method of laying out indicator nets from a drifter's hold at full speed which has been carried out successfully, and it is considered that this method will be of use, especially during the winter months:
From 4 to 10 sections of 60-foot nets are joined together in the usual way with clips. Kapok floats, as originally used, are attached to the headrope. Kapok is considered quite satisfactory for this method, as the nets would not require to be in the water long at a time and would probably have ample time to be properly dried after having been used. Glass balls have been used with this method in wooden drifters, only a small percentage getting broken; they are, however, not so good as kapok for this purpose.
The nets are flaked down in the drifter's hold--head of net the after end, netting in the middle, and footrope at the foremost end.
The indicator buoys are attached to the net by a wire span of sufficient length to reach the foremost coaming of the hold, and are placed in order on planks which are laid across the fore end of the hold for this purpose.
[31]
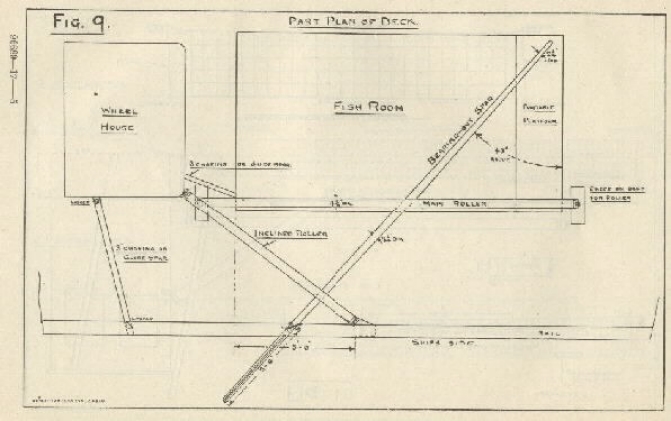
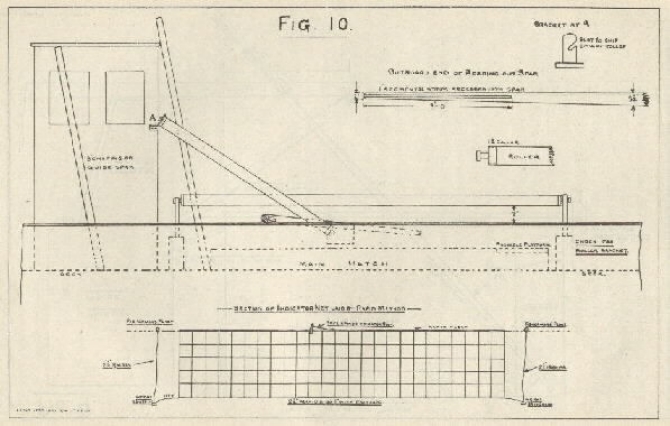
The following fittings are necessary and are shown in figures 9 and 10:
(1) A horizontal roller on the coaming of the hold; this is a standard fitting in all drifters and is used for their own fishing nets.
(2) A diagonal roller from the corner of the wheelhouse to a chock mounted on the bulwarks at a horizontal distance of about one-third of the length of the hold from the after end of the hold.
(3) Underneath this diagonal roller a smooth iron-shod spar is fitted as shown and is placed over the gunwale horizontally, pointing aft at an angle of about 50° with the fore and aft line. This spar is lashed to the rail of the drifter, just abaft the foot of the diagonal roller.
(4) Chafing or guide spars are lashed against the wheelhouse to assist in guiding the nets over the side.
The method of shooting nets is as follows:
A fisherman's pellet is attached as shown at each end of the line of nets to be shot, with a fire bar (or other similar weight) on each end of the footrope.
The first end of the net is paid out over the iron-shod spar, so that the latter middles the net, the kapok float being the inboard side of the spar, the footrope being on the outboard side.
As soon as the fire bar and pellet reach the water the net will continue to run out, the drifter going at full speed.
The iron-shod spar is manipulated by hand from the inboard end and kept as near as possible in the middle of the net whilst the net is running out. The spar is also well greased to allow the net to pass over it easily.
The indicator buoys are picked up and thrown clear each in its turn, care being taken not to throw them until the right moment.
The pram indicator buoy can be used with ease, and the men attending the buoys do not run any risk of being caught in the meshes and dragged outboard.
The advantages of this method are that the nets can be kept normally on board and shot when required in a very short time with the drifter going at full speed, which under certain circumstances may be a very great advantage.
There is no danger of the net fouling the drifter's propeller in running out.
The nets can be shot in almost any weather by this method.
A very important point to attend to when shooting nets is to see that the footrope enters the water before the headrope.
Figures 9 and 10 show dimensions of fittings, etc.
For hauling nets, the iron-shod spar and diagonal roller are un-shipped, the horizontal roller being shipped on the gunwale; the
[32]
[33]
[34]
[35]
nets are then hauled in over this roller and stowed in the hold, ready for running out again.
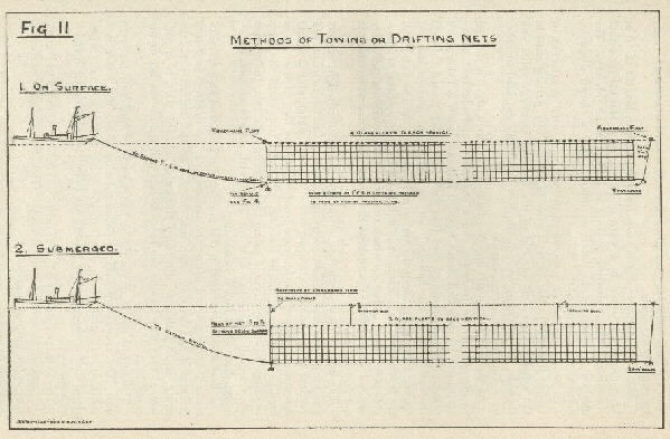
Method of towing or drifting nets from a drifter in lengths of 10 or 12 sections, connected to a warp along the foot, the drifter either steaming slowly or drifting or lying at anchor in the tideway. The method is described in detail as follows and is shown diagrammatically on figure 11:
A footrope of 1-inch rope, 98 yards long, is secured at intervals of 11 feet 9 inches to the vertical wires of the nets by parting clips in the usual manner. At the end of the footrope is an eye splice and thimble, the adjoining ends of the footrope being shackled together by a 1/2-inch bow screw shackle.
At the pole end a drift line of 4 fathoms of 2-inch hemp is secured to the eye of the footrope, and a one-half hundredweight sinker suspended by a 2-inch hemp rope 10 fathoms below a fisherman's pellet. Care is necessary that this drift line is not passed through the end mesh of the indicator net, as this would prevent the net coming away clear; the pellet serves as a drogue. At the swing end the leach rope, 10 fathoms long, is fitted with wire beckets, at intervals of 11 feet 6 inches, to which the eyes of the horizontal wires are secured with spring clips, except the eye of the lower wire, which is not so secured.
The leach rope is connected to the one-half hundredweight sinkers and to a large buff. This keeps the leach of the net more or less vertical when the nets are being towed through water, and prevents the upward pull of the footrope from lifting the foot of the net as high as otherwise would be the case. In order to prevent the warp twisting under the strain of riding to, or towing, the nets, the sinkers are shackled to a 1-inch iron bar fitted with an eye at each end-length over all, 1 foot 6 inches (fig. 4).
A fleet of 10 nets fitted in this manner can be towed at a speed of about 2 knots without lifting the sinkers to a less depth than 7 to 8 fathoms if the distance from the first net to the drifter, i.e., the swing, is 70 fathoms. Provided the swing is kept taut, it is considered that wire rope is the best, as this will reduce the lift in the swing end.
The end of the warp should be buoyed with a buff and ready to slip. The amount of buff or pellet showing above the water is a valuable indication of the depth of the swing end of the nets; when about half is showing, the sinkers are found to be between 7 and 8 fathoms deep.
The average speed of a line of drifters should be about 3/4 to 1 knot, the maximum speed about 2 knots. This reserve gives sufficient margin for keeping station.
METHOD OF TOWING INDICATOR NETS SUBMERGED.
Indicator nets can be towed at the distance required below the surface in a similar manner to which they are towed on the surface.
The only differences which have to be made from towing on the surface method are as follows in the case of 60-foot nets:
(a) Only two glass balls are attached to the headrope at each vertical.
(b) Each 300-foot section of net has one pellet or group of glass balls on the fore end and one in the center, as shown in the accompanying sketch. These pellets, or glass balls, float on the surface, and the line by which they are attached to the net must be of equal. length to the depth the net is required to be beneath the surface.
(c) The indicator buoy instead of being attached to the head of the net is shackled to a becket which is worked into the center pellet line of 300-foot section just below the pellet; this prevents the probability of the indicator buoy being taken below the surface due to the weight or the pull of its mooring wire.
Nets must only be towed at a very slow speed, and in any case the speed must not exceed 2 knots.
METHODS OF MOORING NETS.
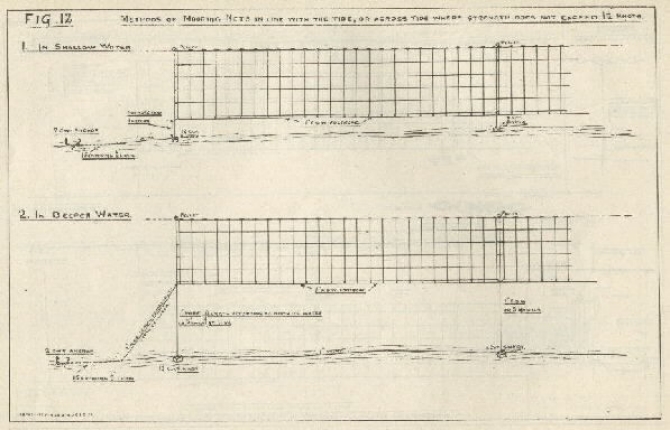
A number of methods of mooring nets have been tried, and in localities where there is not much tide or where the line of nets is laid in the line of the tide the method described as follows and shown in figure 12 is the most suitable:
The number of nets in a fleet should be five, and the moorings at each end of a fleet of nets consists of a 2-hundredweight anchor backed up by a sinker or 15 fathoms of 5/8-inch chain; a 1-inch or 1 1/2-inch wire of a length of about 1 1/2 times the depth of water is then shackled to the footrope at the end of the fleet of nets, the other end being fast to the moorings.
At the end of each section of net and at the extreme ends of the fleet of nets vertical lines of 1-inch wire, or 2 1/2-inch manila, of the required length according to the depth of water at high water are moored by one-half hundredweight sinkers and buoyed by small pellets or steel floats. The leaches of the net are clipped to grommets on these vertical lines, and the foot of the net is clipped to the 1-inch wire footrope.
The required number of glass balls are attached to the head of the net. Indicator buoys are attached to each section in the usual manner. Should it be required to lay the nets in this manner, but with the head submerged, the number of glass balls is reduced to about one-half and the net is clipped on at the required distance down the vertical, as shown in figure 12; a line from the center of each section of net must be led to the surface and buoyed by glass
balls, the indicator buoy pendant being attached to this line just below the glass balls supporting it; this results in the weight of a long line being taken off the indicator buoy and precludes the possibility of the indicator buoy being taken under by the tide.
This method of mooring submerged nets may be desirable in deep water and also where there is a lot of traffic, as it enables surface craft to pass over the nets without disturbing them; but they should be laid at such a depth that the submarine can not pass over the nets without showing herself; the depth should therefore be not more than about 30 feet, i.e., head of net that distance below the surface.
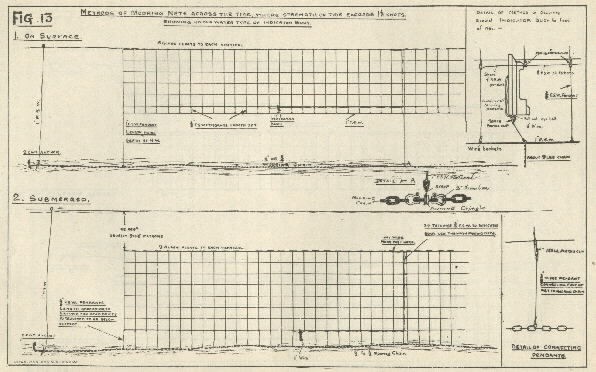
METHODS OF MOORING NETS ACROSS A 2 TO 3 KNOT TIDEWAY ARE DESCRIBED AS FOLLOWS WITH THE AID OF FIGURE 13.
The moorings consist of 1/2-inch to 5/8-inch chain of the required length according to the number of nets in a fleet, with a 2-hundred-weight anchor at each end. The chain is in 300-foot lengths, which are joined together by a 3-inch iron bar between two shackles. This bar has an awning thimble round it which is free to revolve on the bar. The vertical wires are screwed to these thimbles (see detail, fig. 13). It has been found necessary to adopt these thimbles, as if the vertical is shackled to the chain it has been found on weighing that the turning of a cable when being paid out twisted the vertical wire round it.
These vertical wires are of a length equal to twice the depth of water at high water.
Pendants 3 feet in length, of 3/8-inch flexible steel wire with an eye in each end, are clipped to the foot of the net, and attached to wire beckets in a horizontal 1-inch flexible steel wire; as shown in figure, this horizontal wire being made fast to the vertical wires from the mooring chain.
The necessary number of glass balls are attached to the head of the net, according to the size of net employed.
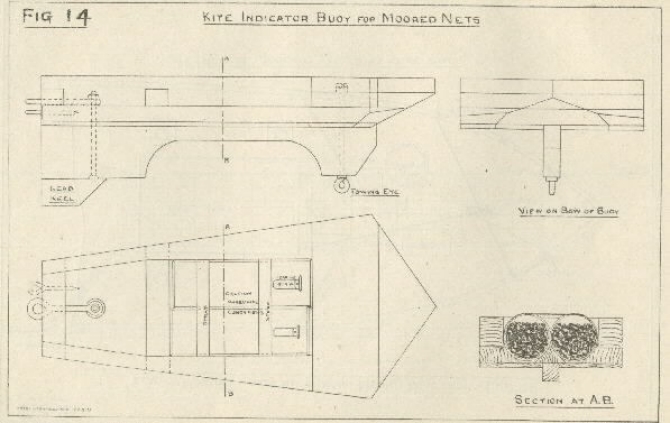
A special type of indicator buoy is used for this method; it is made of wood and its construction is shown in figure 14.
It is attached to the foot of the net as shown in figure 13. From the towing eye of the buoy is attached 34 fathoms of 3/8-inch flexible steel wire which is rove through the parting clips at the foot of the net and up the leach, the end being secured to the head of the net at the first vertical from the end.
The action of the buoy, is, that on its section of net being carried away, the parting clips release the 34 fathoms of wire, and when the strain comes on the buoy the 300-pound clip on its lower end parts, allowing the stripping pieces on the phosphide containers to be torn off; the buoy is then towed along by the 34 fathoms of wire, the construction of the buoy and the position of its point of tow causing the buoy to plane to the surface.
[38]
[39]
[40]
[41]
[42]
[43]
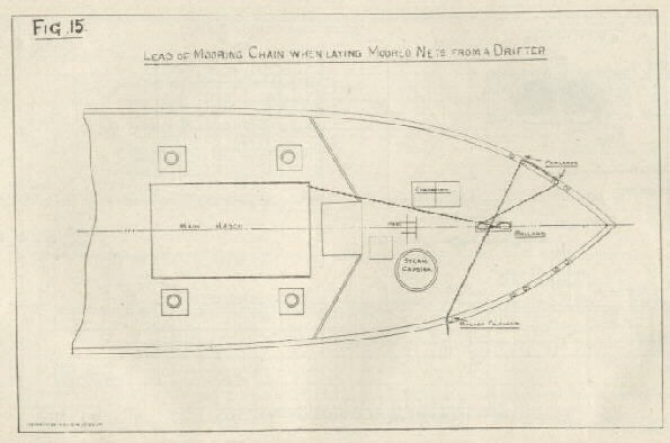
The mooring chain is stowed in the hold and whilst being paid out is led round the large bollards on the drifter's deck up to the small bollards on the gunwale port side and thence across to the starboard side round a roller shipped in the gunwale. The vertical wires are shackled to the chain as it is being paid out, the net being thrown over the side as the strain comes on.
The lead of the chain is shown in figure 15, but will vary slightly owing to the bollards in different drifters not being in the same positions.
Unless prominent landmarks are available for keeping the line in which it is required to lay the nets, mark buoys are laid out for the purpose and the drifter laying the nets keeps on the line either by means of her own engine or if preferred by means of another drifter made fast alongside, which latter method is recommended.
NETS MOORED WITH THE HEAD BELOW THE SURFACE.
The same moorings are employed as for the previous method, and the only difference is that the pendants, which are on the foot of the net, are attached direct to the chain and are of a length according to the depth of water and the distance below the surface it is required to have the head of the net.
The horizontal 1-inch wire is thus done away with and there are no vertical wires, the sections of nets being clipped direct to one another.
As will be seen from the accompanying sketch, there is nothing showing on the surface except an anchor buoy at each end of the line.
In the latter method the nets are attached to the chain by the pendants as the chain is being paid out, the lead of the chain being as described in the other method.
A second drifter can be made fast alongside the drifter laying the nets if necessary, and the line can thus be maintained.
Metal floats, for use with submerged nets, have been designed and can be supplied when available to replace the glass balls. The idea of these floats is that one float, with an equivalent buoyancy to a number of glass balls, will offer far less resistance to the tide and will thus lessen the tendency of the net to lay over at the full strength of the tide.
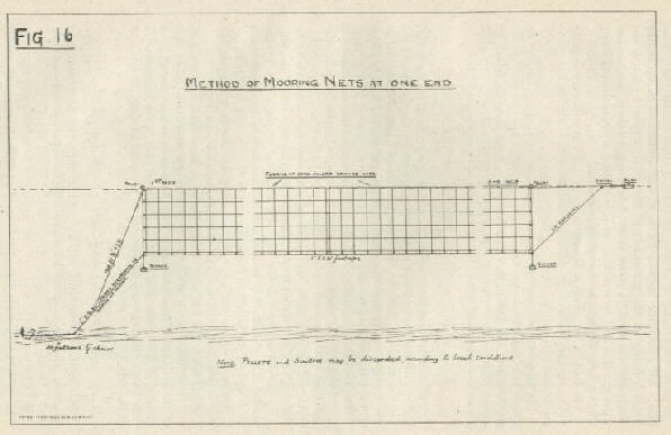
METHOD OF MOORING NETS AT ONE END ONLY.
This method of mooring nets at one end only, can be employed in localities where a submarine's course may be expected to be at right angles to the tide.
Four to ten sections of net are employed as a rule, and the float employed is a 21-inch diameter hose of canvas treated with tallow
and filled with cork chips; it is made up in 25-foot lengths, which are lashed along the whole length of the head wire of the nets. The advantage of this type of float is that owing to the amount of rigidity it possesses, it assists the nets to swing round clear at the turn of the tide, and prevents bunching.
The moorings, etc., used with this method are shown in figure 16.
MINES USED IN CONJUNCTION WITH THE NETS.
A specially designed electro-contact mine is being supplied for use with indicator nets. The mine is secured in the lower part of the net, two to each 100 yards and roughly 150 feet apart, the circuit being stopped along the footrope, and led along the warp to the drifter, where it is joined up to a small secondary battery; this having been done, the mine will explode on one of its eight protruding plungers being forced in. It has been found necessary to place well-greased steel rings or stiff wire grommets between turks heads at intervals along the warp and to reeve the circuit through these rings or grommets in order to prevent the circuit being parted owing to the warp twisting.
The greatest number of nets with electric-contact mines which can be conveniently worked by one drifter is six. It is considered advisable to use indicator buoys with these nets, but it is not absolutely essential. The electro-contact mine nets are paid out from a drifter which is securely anchored, and the nets are kept in line by the tide and swing round at the turn of the tide, the drifter acting as a pivot. The special cork float in canvas hoses is used with these nets in most cases.
If the depth of water permits, these nets can be laid out with the head submerged as in the case of nets without mines, in which case glass ball floats are employed.
The mines are so constructed that they are balanced, having practically no buoyancy, either positive or negative, and, therefore, are not a dead weight in the net. They contain 45 pounds of T. N. T. The great advantage in these nets is the embodiment of their own destructive agent. If required, the battery can be placed in an empty mine case and left joined up if no danger to shipping is caused thereby, and if it is not desirable for a drifter to stay close to the nets giving away their presence. In this case the line of nets is moored at both ends in line with the tide by the method employed for mooring nets in a tideway as described on page 8, which has also proved successful with the mines in the nets.
In any case, the mines should not be left continuously under water for more than 36 to 48 hours.
PURPOSES TO WHICH VARIOUS METHODS OF EMPLOYMENT OF INDICATOR NETS SHOULD BE PUT.
Nets used as drift nets.--This method is employed when, the net is required to be shot across the supposed course of a submarine, and when the nets will not require to be in the water for a long period.
A submarine, having been sighted, might be completely surrounded by nets shot quickly, when she will either run into a section or lay on the bottom if the depth of water, etc., is suitable.
Nets towed by a drifter.--This method is the one most generally employed, usually where a large number of drifters are operating and a line of nets is required to be maintained.
The drifters so operating nets thus are armed, some with guns and others with depth charges and bomb lances to deal with a submarine which runs into their nets.
Moored nets should be used where weather, holding ground, and tide conditions render it possible; the most general use to which this method is put is for the closing of channels. In depths up to 10 fathoms L. W. O. S. 30-foot nets should be used; up to 15 fathoms 60-foot nets; up to 20 fathoms 84-foot nets; and 120-foot nets for greater depths.
It is desirable in some cases to moor the nets with their heads submerged at a depth to allow of surface vessels passing over the nets without carrying them away; the nets must not, however, be moored so deep that a completely submerged submarine can pass over them without fouling them--about 30 feet is a good average depth for the head of the nets to be submerged.
Patrol vessels, armed with guns, depth charges, bomb lances, and, if trawlers are available, modified sweep, must be detailed to watch the line and deal with any hostile submarine running into the nets.
WEATHER CONDITIONS WITH REGARD TO WORKING NETS.
For the proper working of nets moderate weather is essential Although the drifters are capable of working in any weather the result of having them out in heavy weather with the nets down has shown that it entails
(a) Very great expenditure of material, such as loss of nets.
(b) Impossibility of keeping the boats together and consequent lack of protection and support.
(c) Great danger to boats, while working their nets, of fouling their propellers and becoming out of control.
(d) Damage to equipment and gear, which is a serious drawback in preparing boats for further service when weather conditions improve.
[46]
If the nets are to be worked in the manner for which they are designed, viz., for the nets to be so lightly attached to one another that they will readily break adrift without tearing when fouled by a submarine, moderate weather is essential, the reason being that it is most necessary from time to time to straighten the line; and in rough weather this can not be done, as the drifters knock about very much, and overstrain parts the connecting clips; then the nets have to be boarded and reconnected; and it is recommended that a certain proportion of drifters at the various bases be fitted with quick-shooting nets, ready for use when the weather is too bad for the other methods of working nets. Moderate weather is also essential for mooring nets, but once down they will, as a rule, stand the severest weather if moored by the methods described.
HINTS TO OFFICERS AND MEN EMPLOYED IN NET DRIFTERS.
1. A strict lookout must at all times be kept, and it must be borne in mind that any laxity in this respect may result in the opportunity of destroying a hostile submarine being missed.
2. It must not be thought, in any particular patrol area, that because hostile submarines have not been sighted for a long time, they will never operate in such area again.
3. It is the wrong idea only to expect hostile submarines when one has been reported or seen in any particular area, as it is more than probable that the first intimation of the presence of hostile submarines a net drifter will get is the fact of a submarine running into the drifters' nets.
Should this occur, assuming the section break away, as hoped for, the submarine will then probably behave as follows:
(1) If the propeller is fouled by the net (which is not very likely to happen), the submarine must either lie on the bottom (if the water is not too deep, i.e., not more than 30 fathoms approximately) or come to the surface; in either case she should be able to be destroyed.
(2) If the submarine is in net, but unaware that she is netted, she will probably continue on her course at a normal depth, and will thus provide an excellent opportunity for destroying her, her course and position being shown by the indicator buoy.
(3) If in net, propeller not fouled, and aware that she is netted, she, will undoubtedly dive to the maximum possible depth, and will either proceed at full speed, or, if not too deep, may lie on the bottom, trusting to get clear of the net under cover of darkness. In this case the indicator buoy should still remain on the surface unless the submarine dives below 25 fathoms.
The scraping of the indicator net wire on the hull of a submarine can be plainly heard inside the submarine. Trials have shown that on entering the net, submarine will become enveloped, but it is
[47]
possible that in future cutters may be fitted on the outside of the submarine to endeavor to get through the nets; it would, however, be difficult for cutters to completely clear a submarine from a net in which it has become enveloped.
(4) If a submarine is observed to be caught in a net, the catch should at on[c]e be signaled, so that a strong armed force may be concentrated in the neighborhood.
(5) If the submarine comes to the surface, all drifters and other craft in the vicinity must at once close the submarine and endeavor to sink her by ramming, gunfire, bombs, or depth charges.
If submarine lies on the bottom, given fairly calm weather, it should not be difficult to locate her with a hand lead, grapnel, and sweep. When located, she should be destroyed by exploding charges, i.e.:
(1) Depth charges dropped over her supposed position.
(2) Modified sweep.
(3) Cruiser mines dropped over the spot.
(4) Bomb lances dropped over her supposed position.
Descriptions of the above different explosive charges have been issued separately.
If submarine continues her course, a few bombs and depth charges should be dropped as close as possible on the chance of damaging her.
The importance of having guns, depth charges, etc., ready for instant use, is obvious; a second or two delay being quite sufficient to miss an opportunity of sinking the submarine.
[48]
Attention is called to the penalties attaching to any infraction of the Official Secrets Act.
REVISED INSTRUCTIONS FOR THE USE OF SPECIAL ELECTRO-CONTACT MINES WITH INDICATOR NETS.
[49]
[50 blank]
INSTRUCTIONS FOR THE USE OF SPECIAL ELECTRO-CONTACT MINES WITH INDICATOR NETS.
GENERAL DESCRIPTION.
The special electro-contact mine consists of a welded cylindrical steel case with domed ends with an eye at top and bottom for attaching to an indicator net.
The weight of the mine complete is 98 pounds, the charge being approximately 45 pounds of T. N. T., the actual amount of explosive varying a pound or two to make the buoyancy of the mine exactly neutral.
The mine is fired electrically, current being supplied from a secondary battery, pattern No. 3360. Two mines 50 yards apart are secured in each 300-foot section of net and the main circuit, consisting of either pattern 841 cable or pattern 600, according to which method of using the nets is being employed; in the case of the former the cable itself forms the footrope of the net; in the latter case the circuit is stopped along the 1-inch flexible steel, wire footrope of the net. Branches of pattern 1207 or pattern 600 cable are forked out of the main circuit, one to each mine.
The circuit being all correct and the battery joined up, the mine is fired on one of the eight plungers protruding from the mine case being forced in.
DESCRIPTION OF MINE AND FIRING ARRANGEMENT.
Figure 1 gives a picture of the mine in section and plan.
The top dome is removable and has an insulating plug through which the circuit is led and brought to a terminal on the inner ring, which is secured to a ring of ebonite, which in its turn is secured to the mine; the inner ring is therefore insulated. Equally spaced around the ring and secured to the ebonite are eight spring fingers, which, on being pressed, bear on and make contact with the inner ring; these fingers are all joined in parallel by short lengths of wire. The current therefore gets as far as the spring fingers should one of them be pressed in, and a lead of wire takes it from there to the two detonators in series, the other side of these being joined to an earth terminal.
The spring fingers are operated by a plunger with an ivory tip which bears on the spring, and the other end of the plunger protrudes three thirty-seconds of an inch through the mine case, over this an
[51]
india-rubber disk is secured, and the external plunger, which operates when the mine is bumped, bears on the rubber and through it onto the internal plunger.
Thus, when one of the external plungers is forced in, the circuit between the inner ring and the spring fingers is completed and the mine is fired.
INSTRUCTIONS FOR FITTING THE MINE.
Remove the cover.
With a menotti test inner ring for insulation from mine case.
Test spring fingers for insulation.
Test inner ring for non-contact with spring fingers.
Join one side of menotti to spring-finger terminal and put the other to each spring finger in turn and test for continuity; this is to be sure none of the short connecting leads are faulty.
Fit a 4-foot length of pattern 600 with a pudding about 2 feet from one end after stripping back the braiding and tape. Before making the pudding the gland nut and coned washer must be rove on the wire. Secure the cable in the insulating plug in cover of mine. Join up the inner end of cable to inner ring and short-circuit spring-finger terminal to earth terminal.
Join menotti between other end of 4-foot length and the mine case and press in each plunger separately; a full swing should be obtained.
Care should be taken to see that the part of inner ring where spring finger makes contact is perfectly clean. If any of the inner-spring plungers are sticky they should be removed by taking off the outer plunger, which is secured by four studs and nuts, and for which a special spanner is supplied.
The india-rubber disk should also be inspected if the mine has been in store for long or has had much hard wear.
The mine is now ready to fit for service.
TO FIT THE MINE FOR SERVICE.
All the precautions laid down in the torpedo drill book must. be observed.
Test the two No. 8 detonators in a place of safety.
Join them in series and join a length of about 18 inches of wire; pattern 611, to each outer leg.
Place them in their proper holes in the T. N. T. primer, being very careful. not to use any force. If the detonators are a tight fit in the primer, force must on no account be used, but the holes in the primer may be slightly enlarged or cleaned out with a rectifier.
The pattern 611 wire is rove through the bung of the primer tin and the bung screwed up in the tin. The top disk of T. N. T. in the
[52]
primer tin is kept clear of the bung by a cardboard distance piece. If the detonators are too loose a fit, it would be possible for them to fall out of the holes in the T. N. T.; a very little india-rubber solution around the head of them should prevent this.
The primer is now inserted in the mire and its two leads joined up, one to the earth terminal and the other to the spring finger contact terminal. The lead through the cover of the mine is then joined to the terminal on the inner ring and the cover put on, taking care that the india-rubber washer is in good condition and that the instructions given below for making the joint watertight are carefully followed. The mine is now fitted and primed, and should be so marked, and handled with the greatest care.
INSTRUCTIONS FOR MAKING THE COVER JOINT.
The jointing material should be of pure rubber 1/16 inch thick in complete rings into which the stud holes have been punched in correct spacing.
The ring should be first immersed in water, and after being thoroughly wet should be laid over the studs onto the stud flange. The upper surface should then be thoroughly coated with a mixture of black lead and mineral grease or tallow. Cover should then be placed over studs and nuts screwed equally all around flange.
In the event of it being necessary to remove cover, the jointing material should not stick on its upper surface.
(NOTE.-The present stock of insertion rings are to be used up before pure rubber is supplied.)
TESTING FOR WATERTIGHTNESS.
Each mine after being fitted primed, should be tested for water-tightness.
This is done by removing one of the plunger brackets and securing in its place a special bracket adapted to take a bicycle-tire valve; the mine is then pumped up to insure that there is a small pressure of air inside, and then placed in a tank of water; any leak will be easily detected by the bubbles rising from it.
One or more of the ordinary plunger brackets can be easily fitted with a bicycle valve by any artificer and kept for this purpose.
TO FIT THE CIRCUIT.
The circuit consists of the main lead of pattern 841 or pattern 600, cable, with 12 branches for the mines.
In the case of the main circuit being of pattern 841 cable, 600 yards of cable is required for each fleet of six nets.
At every 11 feet 9 inches (approximately) wire beckets about 2 inches in diameter are securely seized to the cable, two beckets being;
[53]
required close together where adjacent sections of net join, as shown in figure 2. Branches of pattern 1207 cable (one for each mine) are forked into the main circuit in the positions shown at A in figure 2.
Each branch is 50 yards in length, and the end to be forked into the main circuit has its armoring laid bare to a convenient length (about 9 to 12 inches); the protruding core is then separated into two parts, which are rove through the center of the core of the main circuit, which core is laid bare at the required position for about 18 inches. The two parts of the core of the branch are then laid up around the core of the main circuit, one part right-handed and the other part left-handed; the junction is then carefully insulated with insulating tape; the armoring of the main and branch circuits is then replaced as far as possible and the junction thoroughly well served over; the branch circuit, is then seized to the main circuit near the junction in order to prevent any strain being brought on the junction.
When pattern 600 cable is used, as is usually the case for towed electro-contact mine nets, the following procedure for fitting the circuit must be carried out:
At the drifter end there is 200 yards of cable for stopping to the warp, and from there on the branches are forked in every 156 feet of the cable, the distance between each being 50 yards, the extra 6 feet being allowed to provide slack and to prevent the strain coming on the cable instead of the warp. The end branch can be a continuation of the main circuit.
The length of each branch is 70 yards. The total length of the main circuit, including the end branch, is about 840 yards, and in round numbers 850 yards should be allowed when cutting up the cable.
N. B.--In both methods all junctions must be very carefully made and insulated, and should be tested by placing the circuit in salt water, leaving out the ends of the branches and, after it has been in the water for at least 24 hours, testing for insulation with a 6-cell test battery between main wire and an earth plate.
PLACING THE CIRCUIT ON THE NET.
1. When the main circuit is of pattern 841 cable and (a) the branch circuit of pattern 1207 cable or (b) the branch circuit of pattern 600 cable:
The foot of the net is clipped to the footrope of pattern 841 cable by means of 150-pound parting clips being attached between the eye-splice at the foot of each net vertical and the corresponding becket on the circuit.
(a) The 50 yards of branch circuit (pattern 1207 cable), one end of which is forked into the pattern 841 cable footrope as previously described, is seized to the main circuit as near the junction as possible,
[54]
and is then led along the footrope toward the center of the net and is stopped to seven of the beckets on the footrope; it is then brought back, as shown in figure 2, and the end left ready to connect up to the mine.
One end of the main circuit is stopped up to the last vertical on the end of the line of nets and insulated thoroughly, the other end being joined to the 1,000 yards length of pattern 1207 cable; the latter leads to the battery in the attendant drifter, anchored near, or to a moored empty mine case containing the battery, as shown in figures 4 and 5.
(b) The branch circuit is sometimes of pattern 600 cable, in which case, instead of being stopped along the footrope, the slack is coiled in a net bag attached to the footrope, as shown in figure 3. The net bag should be of good size and fitted with a stiff wire grommet for cable to run out through, if net is taken away by a submarine.
2. When both the main and branch circuit are of pattern 600 cable:
The six nets are first put on the 1-inch footrope in the usual way. The main circuit is then stopped to the footrope at every 12 feet, allowing 12 feet 6 inches of cable to every 12 feet of footrope. The branch circuits are next forked into the main circuit in the required position, where shown in figure 2. The slack of the branch circuit may be coiled in a net attached to the footrope immediately below the mine, as described above, instead of the method of stopping the slack of the branch circuit along the footrope. In the case of the latter method being employed, great care must be taken that the stops are weak enough for the slack cable to break away readily from the stops, and that the cable itself will not be broken before the stops part when the net is taken away by a submarine.
TO PREPARE THE NETS.
The branch circuit is first connected to its mine through the water-tight gland in the mine cover; the cover is then replaced and carefully screwed down. A length of 1-inch flexible steel wire is then rove through a small shackle on the ring at both the top and bottom of the mine, and a throat seizing is put on the wire, as shown in figure 6. The first mine is then placed midway between sixth and seventh vertical from one end of the net, and in the case of the 60-feet not midway between fourth and fifth horizontals; the second mine is placed midway between the seventh and eighth verticals from the other end. The 1-inch wire is made fast at the mesh joints, as shown in figure 2. The mines are thus suspended in the net in a horizontal position and present the minimum resistance to the tide when working in the line of the tide, which is practically invariably the case.
[55]
The same procedure is gone through with the two mines for each of the six 300-foot sections of net.
The nets are floated by glass balls attached as shown in figure 8. This method is perfectly efficient if correctly carried out. The net bags for the glass balls should be of tarred trawl twine. When it is required to leave the line of nets down for extended periods the glass balls in the net bags may be covered with wire netting; this is usually done in groups of four glass balls as shown in figure 8.
Extra glass balls are usually attached immediately above each mine.
The leaches of the sections of net are clipped together by 150-pound parting clips and the foot of the net clipped to the 1-inch foot-rope also by 150-pound clips.
The circuit and mines having been placed on the fleet of six nets as described, the nets are then paid down into the drifter's hold, the mines being stowed athwartships on special chocks, in one wing of the hold, so that the mines do not rest on the plungers. The mines are usually stowed on these chocks in two tiers of 6 or three tiers of 4, depending on the drifter. The nets are then ready for shooting.
TO SHOOT TOWED ELECTRO-CONTACT MINE NETS.
Nets are shot in the ordinary manner of towed nets, two hands being stationed on deck at the fore side of the nets for getting up the mines and one hand, who must know in which order the mines go, is stationed in the wing with the mines; and this is best arranged by chalking the number on the mines as they are placed in the drifter's hold after being fitted to the nets. A lanyard of 11-inch hemp about 8 feet long is attached to each end of each mine to facilitate lifting them out of the hold. When the nets are shot the circuit should be tested by means of the special test set supplied to each drifter for the purpose; the test set when joined up between main circuit and earth should give no swing.
If all is correct and the drifter well clear of the nets the end of the main wire may be joined up to the firing battery. The battery must be unlocked by the officer in charge, and the torpedo rating will join up under his supervision.
TO SHOOT MOORED ELECTRO-CONTACT MINE NETS.
Each drifter is fitted with 800 yards of 1-inch chain and two 2-hundredweight anchors. The chain is in 100-yard lengths joined together by chain connectors as shown in figure 7. The 1-inch wire verticals are secured to these connectors, which are necessary owing to the tendency of the cable to turn and twist the 1-inch wire vertical round it. The section of nets are clipped to beckets on the seven
[56]
1-inch wire verticals, each of which has a fisherman's pellet at the top. Each vertical is made up of three 10-fathom lengths to allow for mooring in various depths of water. The verticals should be not less than 5 fathoms longer than the depth of water at H. W. O. S.
For laying the nets one 2-hundredweight anchor is shackled onto the mooring chain and let go, the drifter drops down with the tide riding to this anchor, the mooring chain is led twice round the base of the capstan which is used as a bollard, and as each 100 yards of chain goes out the vertical is shackled to its chain connector. The head and bight of the net are paid overboard, and great care must be taken not to let any strain come on the parting clips during the process of paying out, as it is this that carries away the clips and not the strength of the tide after the nets are shot.
Nothing stronger than 150-pound parting clips should be used. The chain is checked each time as a mine is lowered into the water. The second anchor is shackled to the inboard end of mooring chain and is let go when all chain is out and taut. Six hundred yards of net can be laid by this method in about half an hour, and can be weighed in from half an hour to an hour according to strength of tide and state of sea.
To moor an extended line of nets, divisions of drifters anchor on a line of bearing just over 800 yards apart. When signal is made to shoot nets each drifter drops down with the tide paying out her fleet of nets. Any required length of line can thus be laid out in the minimum time.
It is of the greatest importance that drifters' capstans should be in good order, otherwise this method can not be used.
Great care must be taken in veering cable with the nets, and the cable must not have turns round the barrel of the capstan, but round the base of the capstan, or bollards can be used. In weighing nets the drifters must use their main engines to keep strain off cable and to prevent surging strain.
Should the line of nets be left unattended, the drifter, after having paid the line of nets out, takes the end of pattern 1207 cable, which is connected to the end of the main circuit, proceeding at right angles to the line of nets, and, at the required distance, drop the 5-hundred-weight sinker, to which an empty mine case is moored with 11-inch flexible steel wire. The length of the mooring depends on the depth of water, and it should be so arranged that the top of the mine is just awash at low water, otherwise the mine case is very conspicuous. The mine case supports the battery, which may be enclosed in a watertight box seized to the top.
Before mooring the mine case, and when the drifter is well clear of the line of nets, the circuit is tested, and if correct is joined up to the
[57]
battery. One arrangement of mine-supporting battery (in water-tight box) is shown in figure 4.
The 5-hundredweight sinker has a 4-inch hemp tripper attached, which is led to a 11-hundredweight sinker; to the latter a wooden clump buoy and buoy rope are attached.
If the lines of net are not left unattended the drifters anchor at a predetermined distance at right angles to their line of nets, the battery in the wheelhouse being connected to the main circuit by pattern 1207 cable.
The chief handicap to laying and maintaining moored electro-contact mine nets is the weather, as it is almost impossible to carry out the work in bad weather; this, however, has not prevented the method being used with great success in many localities.
VERY IMPORTANT.
The battery is kept in the wheelhouse in a locked box.
The cable must never be taken into the wheelhouse except to join up to the firing battery, and all precautions must be taken to see the nets well clear of the drifter before doing this.
The firing battery must be disconnected and the box locked up, before attempting to board the nets.
For exercise purposes with a submarine the mines may be fitted with two No.19 disconnectors in series in an empty primer tin, but the disconnectors must have the powder removed from them previously; this is only to be done by order of the officer in charge of the practice.
PREPARATIONS REQUIRED FOR FITTING DRIFTERS TO TAKE THE MINE NETS.
Battery boxes should be fitted in the wheelhouse, with lock and key.
Elbow pipe to be fitted in side of wheelhouse, for leading in line and earth wire. The wires should never be allowed to be taken in except through this pipe.
A suitable nut or terminal to be found or fixed for connecting the earth lead to.
The wings of the hold to have a deck built flush with the platform, and this deck should have chocks for taking the mines and keeping them off the plungers.
In fitting out the holds of drifters to take the mines the height from the upper deck to the platform should be not less than 3 feet 9 inches, to allow sufficient room to handle the mines; about 4 feet will be found a convenient height.
[58]
The chocks for supporting the mines should have a hole bored through them between each mine in order that a lashing may be passed through for securing the mines in bad weather.
It is desirable to paste up in the wheelhouse a simply worded notice for the skipper to refer to, such as the following:
PRECAUTIONS WITH NET MINES.
Do not join up firing battery until nets are out and well clear of the drifter.
Do not board the nets until the firing battery is disconnected and the box locked up.
Have a man stationed with a sharp knife to cut the cable if a friendly vessel approaches the net and there is not time to disconnect the battery.
Do not join up to firing battery until you have tested the circuit with the menotti and get no swing. Should one of your mines fire, disconnect the firing battery to prevent it running down.
REPAINTING OF MINES.
Mines should be repainted with red lead once a quarter. The best method of doing this is to remove and replace one mine in each boat every week and thoroughly overhaul and repaint it, and at the same time renew all the india rubber fittings.
CARE AND MAINTENANCE OF ACCUMULATOR BATTERIES.
In reports from ships on the various makes of accumulators supplied, defects in smaller secondary cells are generally stated to be "due to broken terminals" (probably from weakness owing to excessive corrosion).
2. It is considered that this corrosion of the positive terminal is due to the acid creeping over the sides of the battery, due to spilling, etc., while filling, or overflow while gassing during charging. In some cases the corrosion due to electrolytic action has probably been assisted by the access of salt water to the battery packing, owing to the lid not being screwed down properly.
3. Attention is drawn to the need for exercising great care in the handling and maintenance of these batteries, especially as regards the wiping off of all surplus acid, cleaning and vaselining of the terminals and drying out of the receptacles after charging, and in the case of water getting into the battery boxes.
4. The cells, pattern 3361, have been found to gas excessively when charged at rates higher than the normal. The charging rate of three-quarters of an ampere should, therefore, not be exceeded unless necessary, and a half-ampere rate is necessary toward the
[59]
end of the charge. This and the preceding paragraphs should be read in conjunction with the instructions promulgated on the introduction of secondary batteries, of which the following are extracts:
"CHARGING AND RECHARGING.
"The accumulators if supplied uncharged are to be filled with chemically pure sulphuric acid, diluted with distilled water to a specific gravity of 1.200 when cool.
"It is most important that the diluted acid should be cool before filling the cells, and an hour or so after the cells have been filled they should be topped up with further quantities of the diluted acid to replace that absorbed.
"The cells take about a quarter of a pint of diluted acid each when filled and topped up, or two pints per battery,
"The batteries may be joined two in series while charging, if desired.
"The normal recharging rate is three-quarters ampere from 15 to 20 hours, and on first charge this should be extended to at least 45 to 60 hours.
"The cells may be recharged at a maximum charging rate of 1 amperes for 8 to 12 hours, but it is preferable, if time permits, to recharge at the normal rate.
"TESTS OF CELLS AND BATTERIES.
"The cells or batteries when fully charged and allowed to stand for about five minutes should give slightly over 2.2 volts per cell on open circuit, or 18 to 19 volts for the battery of eight cells.
"Where a voltmeter is not available, the cells and battery can be efficiently tested with the cell tester, and with this each cell when fully charged should give 1 ampere through 2 ohms, and the battery of 8 cells when fully charged should give at least 1 ampere through 16 ohms.
"The battery should not under ordinary circumstances be allowed to fall below 1.8 volts per cell or 141 volts for the 8 cells during discharge, and this is determined by means of the cell tester, by each cell giving a current of 1 ampere through only 1.5 ohms, or the 8 cells giving a current of 1 ampere through only 10.5 ohms, when they are discharged to their normal discharge limit of 1.8 volts per cell.
"NOTES.
"The batteries when fully charged will (if not used) retain their charge without any appreciable loss, this being somewhat less than 10 per cent, for six months with a correspondingly less percentage loss for shorter periods.
[60]
"The batteries should be kept charged up to their full efficiency as often as opportunity occurs, in order that they may be capable of giving approximately their full output when required for use.
"Any acid accumulated on the top of the cells should be cleaned off.
"When charging the batteries, it can readily be confirmed that the cells are being charged in the right direction by reversing the charging leads and noting the brilliancy of the lamp in circuit. If the current is passing in the wrong direction the lamp will burn with greater brilliancy than if the current is passing in the right direction."
| List of naval stores required to establish a base of 30 drifters with electro-contact mine nets. (This list does not include the ordinary stores required for indicator nets.) |
|||
| Pattern and description. | Denomination. | Quantity. | |
| B.3. | |||
| Open tank for testing circuits. (Drifters tanning tank very suitable) | Number | 2 | |
| B.6. | |||
| Wire line and strand, flexible for seizings, ½-inch | Yards | 600 | |
| B.7. | |||
| Earth plates, copper, 65 W. G., 1 foot square | Number | 4 | |
| B.9. | |||
| 611A | Blow lamp | Number | 1 |
| 252 | Scissors | Pairs | 2 |
| B.10. | |||
| 1467 | Spring balance to 30 pounds | Number | 1 |
2050 |
Shackles, screw, ¼-inch | 850 | |
| B.11. | |||
| 672 | Vice, hand | Number | 1 |
| 677 | Vice, bench | do | 1 |
| 1071F | Diamond cut chisel | do | 1 |
| 468 | Pliers, side cutting | do | 40 |
| 1 | Prickers | do | 14 |
| 1450 | Spanners, shifting jaw, 8-inch | do | 2 |
| 307 | Hammers 2-pound | do | 2 |
| 2200 | Cold chisel | do | 2 |
| 666 | Screw drivers 8-inch | do | 2 |
1678F |
Punches steel ¼-inch | do | 4 |
| 1055 | Soldering bits | do | 3 |
| 1064 | Shears, tinman's | Pair | 1 |
| 490 | Saw, hack, frame for | Number | 1 |
| 552 | Saw, hack, blades for | do | 6 |
| 553 | Saw, hack, blades for | do | 6 |
| 402 | Files, flat, safe edge smooth, 8-inch | do | 2 |
| 384 | Files, flat, bastard, 8-inch | do | 2 |
| 386 | Files, flat, bastard, l0-inch | do | 2 |
| 78 | Files, round taper, smooth 8-inch | do | 2 |
| 79 | Files, round taper, bastard 10-inch | do | 1 |
| 330 | Files, half round, smooth, 8-inch | do | 2 |
| 312 | Files, half round, bastard, l0-inch | do | 2 |
| 536 | Rule, wood, folding, 2 feet | do | 1 |
| 670B | Tape, measuring, 100 feet | do | 2 |
| Spl. | Die nut, 5/16-inch | do | 1 |
| 618F | Taps, separate (taper, second and plug), 5/16 inch | Set | 1 |
| 681A | Wrench, tap for | Number | 1 |
| 686A | Palms, sailmaker's | do | 2 |
| 699 | Needles | do | 2 |
| 1 | Drill breast, with drills | Set | 1 |
| 900 | Stocks, taps, and dies, B. A | Box | 1 |
| 800 | Stocks, taps, and dies, Whitworth | do | 1 |
| 613A | Stocks, 5/16 inch | Pair | 1 |
| 618B | Dies, 3/16 inch | Pair | 1 |
| D.1. | |||
| Canvas, R. N., No. 6 | Bolt | 1 | |
[61]
| List of naval stores required to establish a base of 30 drifters with electro-contact mine nets -- Continued. | |||
| Pattern and description. | Denomination. | Quantity. | |
| D.3. | |||
| 50 | Twine, sail | Pounds | 8 |
| 86 | Cloth cleaning | Yards | 12 |
| D.5. | |||
| Nettle stuff, 2-yarn | Hundred-weight. | 2 | |
| Spun yarn, 4-yarn | do | 4 | |
| Lines, cod | Pounds | 2 | |
| Lines, mackerel | Hundred-weight. | 2 | |
| Lines, white, signal halyards, 3/4-inch | Fathoms | 850 | |
| E.2. | |||
| 257 | Tape, india-rubber | Boxes | 100 |
| 249 | Solution, india-rubber | Tubes | 100 |
| 258 | Tubing, india-rubber | Yards | 200 |
| E.4. | |||
| 452 | Toolboxes | Number | 34 |
| E.5. | |||
| 1308 | Wire, sounding machine | Yards | 4,000 |
| E.6. | |||
| 17A | Chalk, French | Pounds | 1/2 |
| 67 | Rosin | do | 1/2 |
| Mixed colors | Box | 1 | |
| E.7. | |||
| 3 | Acid, sulphuric, 2 Q. 1215 | Quarts | (1) |
| E.8. | |||
| Vaseline | Pounds | 2 | |
| 94 | Plumbago | do | 14 |
| E.9. | |||
| 27 | Cotton waste, white | Pounds | 28 |
| E.10. | |||
| 48 | Tape, white | Yards | 400 |
| E.12. | |||
| 1025 | Mallet, serving | Number | 1 |
| 763 | Handles for files | do | 6 |
| 986 | Cloth, emery | Sheets | 72 |
| 987 | Cloth, emery | do | 72 |
| 249 | Solution, soldering | Bottles | 4 |
| 152 | Chalk, white, prepared | Box | 1 |
| 401 | Board, black | Number | 1 |
| F.2. | |||
| 1498 | Whetstone bridge | Number | 1 |
| 1640 | Cell testers | do | 2 |
| 1806 | Voltmeter, low reading, 0.3 volt | do | 1 |
| 600 | Cable, electric | Yards | 2 70,000 |
| 104 | Cable, electric | do | 100 |
| F.2. | |||
| 3361 | Cells, secondary | Number | 3 480 |
| 6-cell test battery and galvanometer | do | 2 | |
| 1309 | Sheets, tin | do | 3 |
| 1310 | Sheets, tin | do | 3 |
| Cells, dry | do | 6 | |
| Special testing sets consisting of voltmeter, patt. 1806, and 3 cells, patt. 1375B. | do | 32 | |
| Single cell test batteries | do | 2 | |
| Chatterton's compound | Pounds | 3 | |
| Stationery. | |||
| Drill books | Number | 30 | |
| 1 As necessary for charging accumulators. 2 Spare cable not exceeding 1,000 yards per vessel fitted may be demanded. Cable patterns 841 and 1207 may be supplied in lieu for main circuits with Admiralty approval. 3 Sixty 8-cell batteries. |
|||
[62]
| List of naval ordnance stores required to establish a base of 30 drifters with electro-contact net mines. | |
| Mines, electro-contact | 360 |
| Primers, filled T. N. T. (with mouthpiece) | 360 |
| Detonators, electric, No 8 | 756 |
| Cylinders, G. C., dry charge priming, 2 1/4-pound | 36 |
| Mouthpieces | 36 |
| Spanners | 40 |
| Fuses, electric, No. 19 | 30 |
| Diaphragms, india-rubber, for plungers | 720 |
| Ebonite tips for spring finger contact adjusting screw | 36 |
| Gland nuts | 36 |
| Nuts, brass, 2 B. A. | 36 |
| Nuts, brass, 5/16-inch | 100 |
| Nuts, brass, 1/4-inch, tapped out to 5/16-inch | 100 |
| Nuts, brass, 1/4-inch, tapped out to 5/16-inch, extra long pattern | 100 |
| Screws, brass, cheeseheaded, 2 B. A., 3/4-inch long | 120 |
| Spanners for -- | |
| Cover nuts | 30 |
| Plunger nuts | 30 |
| Mine gland, 1/2-inch | 30 |
| Studs for flange, 5/16-inch | 200 |
| Washers for mine covers | 90 |
| Pump | 1 1 |
| Valves | 1 4 |
| Adapters | 1 2 |
| 1 To each base. | |
[63]
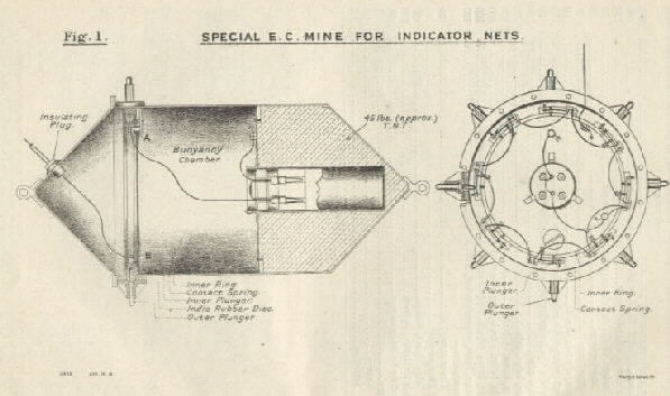
[64]
![Image of figure 2: Method of securing E.C. mine in 30 ft. indicator nets plus sketch showing arrangement of cable to drifter. [Folded plate inserted between pages 64-65.] Image of figure 2: Method of securing E.C. mine in 30 ft. indicator nets plus sketch showing arrangement of cable to drifter. [Folded plate inserted between pages 64-65.]](/content/history/nhhc/research/library/online-reading-room/title-list-alphabetically/n/notes-on-anti-submarine-defenses-oni-publication-no-8/_jcr_content/body/media_asset_15/image.img.jpg/1399561366686.jpg)
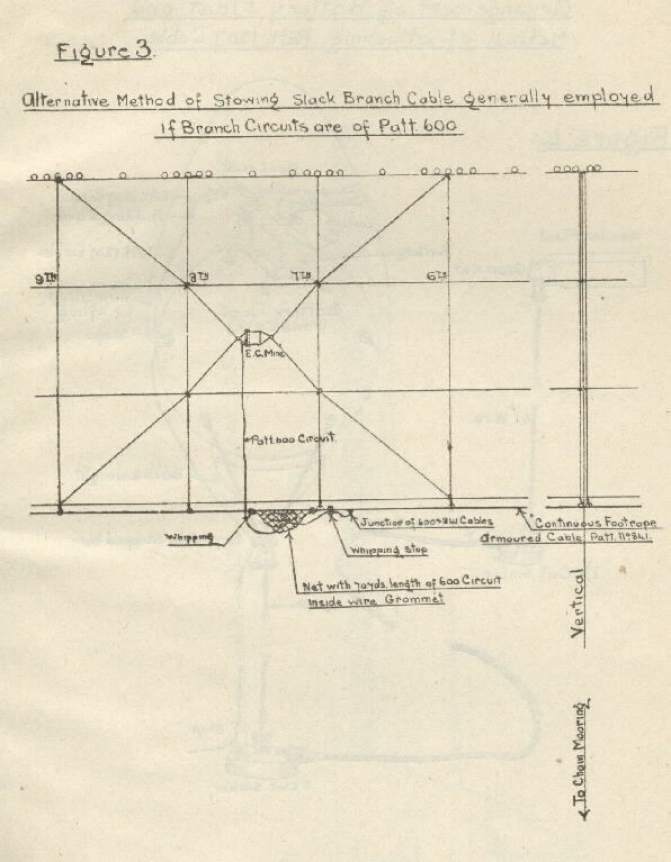
[65]
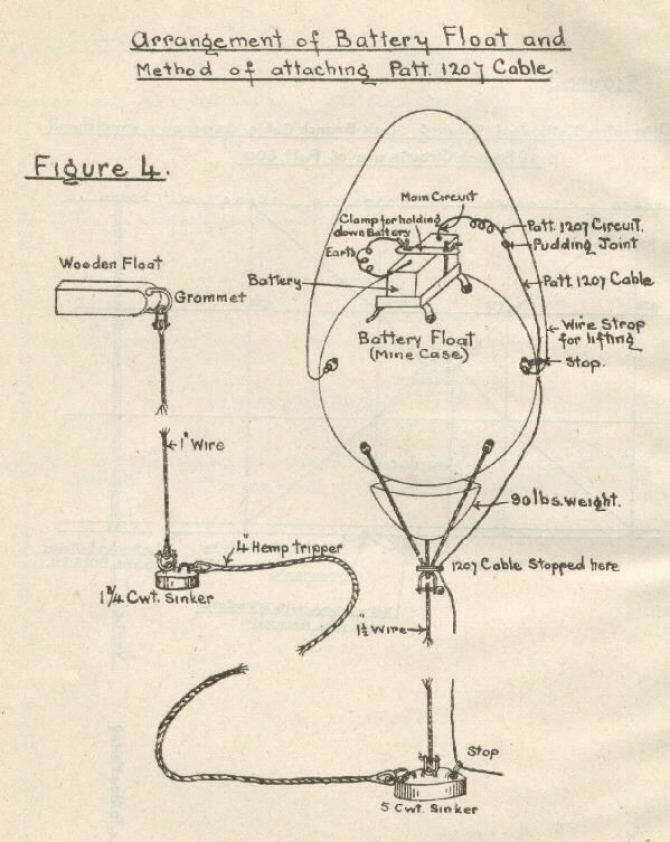
[66]
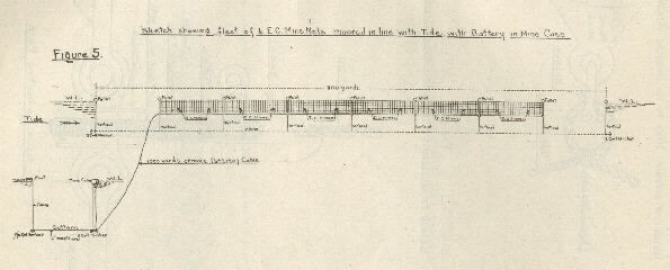
[67]
![Image of figure 6 & 7: [6] Method of securing mine to its mooring wires; [7] Method of securing verticals to ground chain. Image of figure 6 & 7: [6] Method of securing mine to its mooring wires; [7] Method of securing verticals to ground chain.](/content/history/nhhc/research/library/online-reading-room/title-list-alphabetically/n/notes-on-anti-submarine-defenses-oni-publication-no-8/_jcr_content/body/image_17.img.jpg/1428938572965.jpg)
[68]
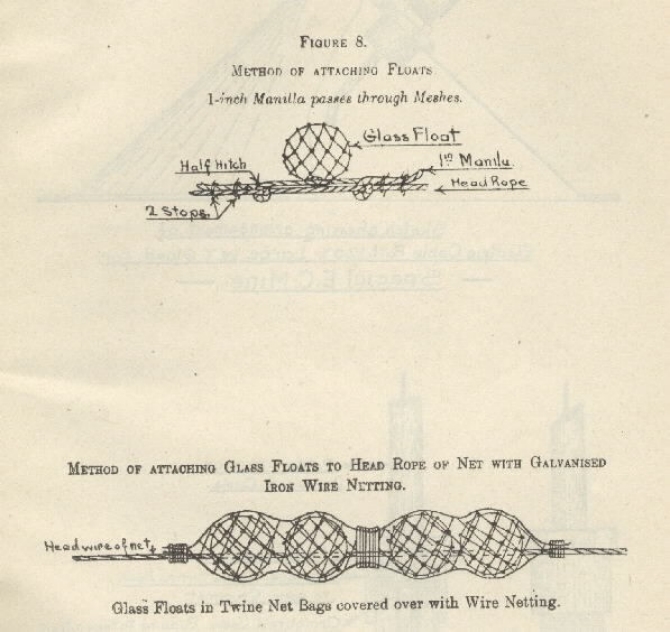
[69]
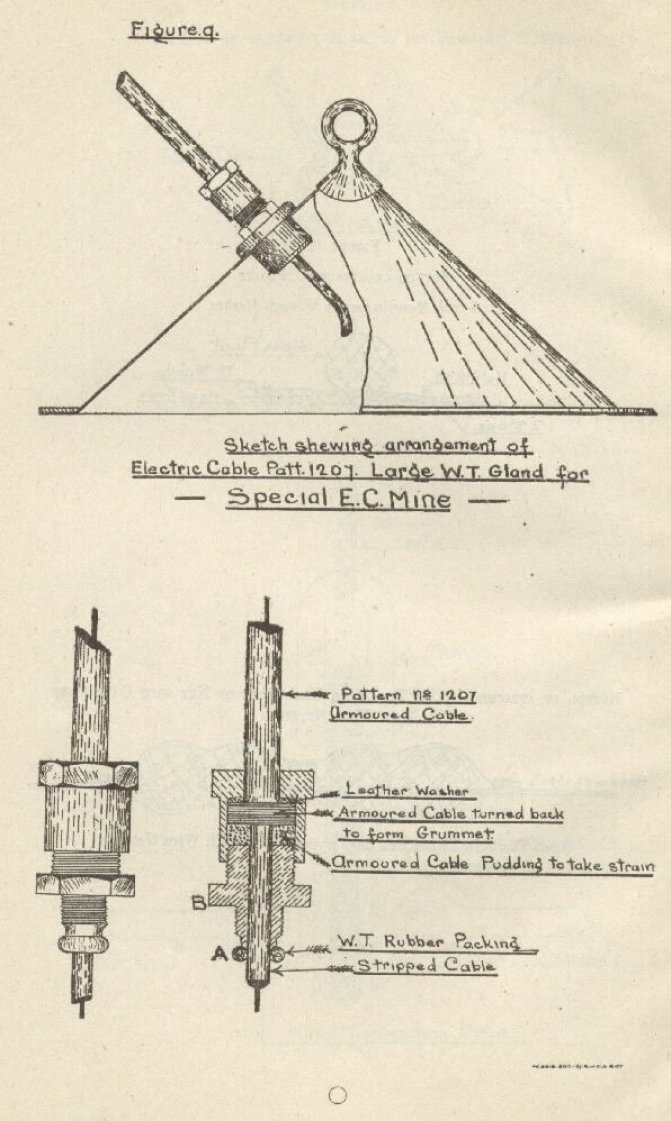
[70]
[END]


